UPDATE (11/2/22): I just noticed a parameter in OWA policies in EXO PowerShell the other day that allows you to set the default domain for Bookings calendars. I was able to set the default domain to bookings.company.com and it is taking effect for all newly created Bookings calendars. You need to run this for all OWA mailbox policies that apply to users who have access to create calendars. The command I used was:
During testing of Microsoft Bookings we found there was no way to adjust the sender email address for a Bookings company. This was frustrating as our default address was our default tenant address (which ended in onmicrosoft.com). This led me to ask how does this system even work? What is generating the emails? What hosts the email address?
Let’s start by looking for the object(s) hosting this service from an email perspective. To do this we can issue the command below in an Exchange Online PowerShell session. For each ‘company’ created in Bookings there is an associated mailbox created with the ‘RecipientTypeDetails‘ of ‘SchedulingMailbox‘. These mailboxes are not visible in the Exchange Online admin console.
When the company is created, the user(s) with permissions to manage are added with ‘FullAccess‘ to the mailbox permissions. This is how Bookings company permissions are managed.
The mailbox is also configured to forward to the email address configured under ‘Business Information’ -> ‘Send customer replies to’.
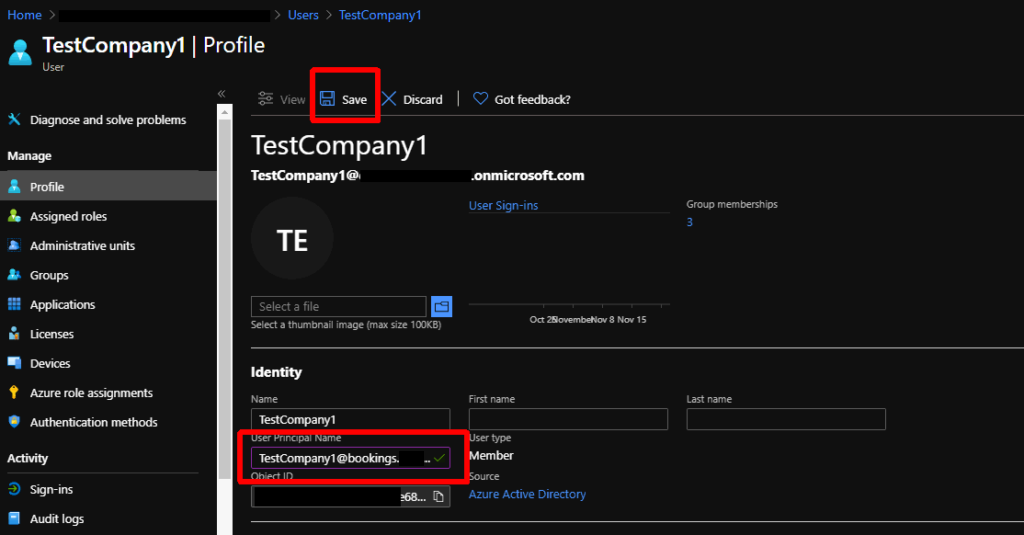
There is also a Azure AD user account created for each company.
Now that we have the new sub-domain we can use this in our Bookings company mailbox. The easiest way to do this is to adjust the UPN of the user account associated with the mailbox. This will automatically update the address.
After the Exchange Online directory syncs up with Azure AD the email address should be updated.
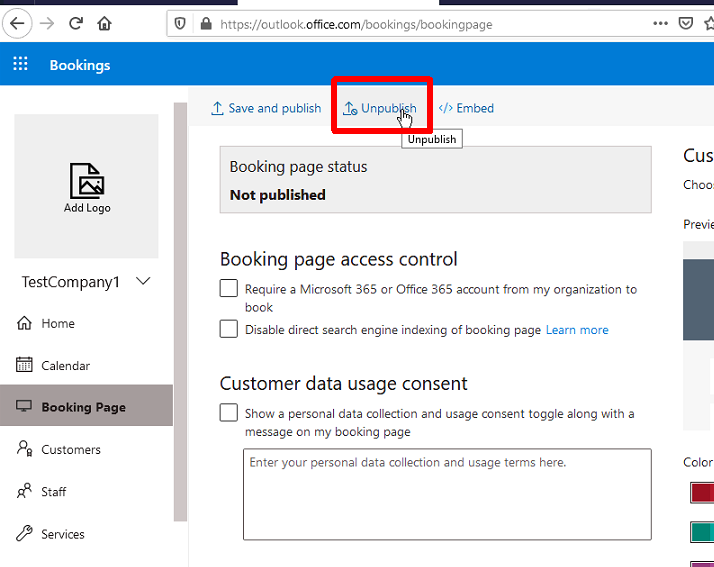
Now we need to unpublish and re-publish the company booking page so that it starts using the new address.
After re-publishing the page we need to wait a little bit for it to pick up the new email address. Eventually Bookings will start sending emails from the new email address. In testing it took around 10-15 minutes to take effect.
One more thing to note is that Bookings does not give you a method to delete companies after creating them. If you ever need to delete the company you simply need to delete the mailbox/user using the Remove-Mailbox cmdlet.
After implementing Teams last year we were faced with a number of issues to work through. One of the issues we were having was the inability of mailbox delegates to schedule meetings on behalf of mailbox owners. If you are a hybrid Exchange user, the very first step is making sure you have OAuth configured between your on-premises environment and Exchange online. The Hybrid Configuration Wizard should be taking care of this for you. I’ve also written an article on properly securing it externally. You will also need create and configure a service principal to allow Teams to interact with your on-premises Exchange environment. Steps 2-3 in this article must be preformed to set this up. If one of these items are not configured, you will receive the error ‘Sorry, but we can’t connect to the server right now. Please try again later.‘
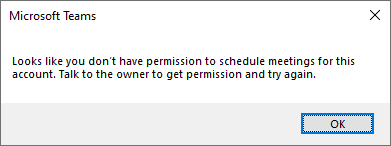
Once these pre-requisites are configured, you may find users are still receiving errors when trying to schedule Teams meetings on behalf of other users. An error that many of our users were experiencing was ‘Looks like you don’t have permission to schedule meetings for this account. Talk to the owner to get permission and try again.‘
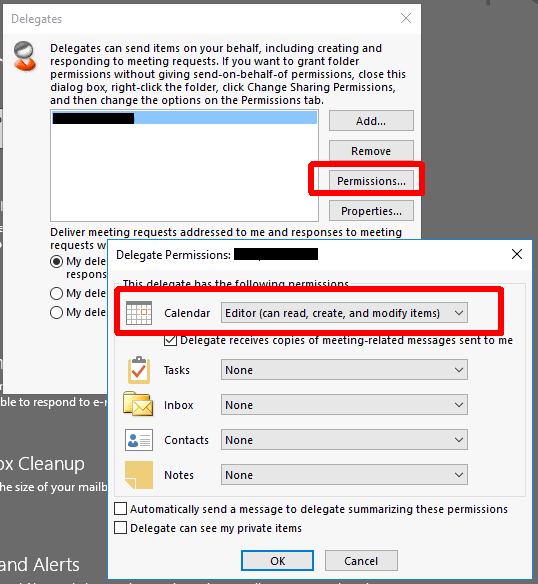
During testing we found that Teams was looking for a specific set of permissions on the owner’s mailbox when generating the Teams meeting in Outlook. In order to create a meeting as a delegate, the delegate must be a true ‘delegate’ under the owner’s mailbox AND have either ‘Author‘ or ‘Editor‘ access to the calendar like the example below. If the user is not present in this list or if they are present but show a calendar permission such as ‘Custom‘ in this dialog, they will receive an error like the one above when creating the Teams portion of the meeting even if they technically have all the required permissions to create a meeting on behalf of the organizer. Many times permissions are granted either by giving full access (Add-MailboxPermission) to the mailbox or by granting folder level permissions (Add-MailboxFolderPermission) and by granting Send-On-Behalf/SendAs permissions.
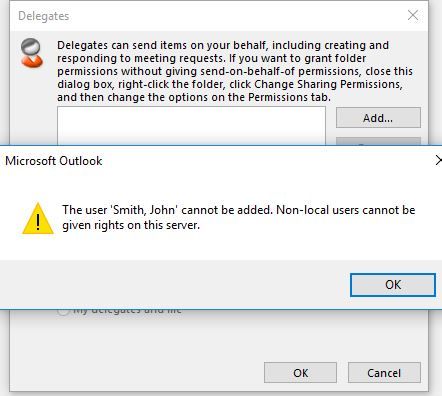
NOTE: If you are getting the error like the one below: ‘The user ‘Smith, John’ cannot be added. Non-local users cannot be given rights on this server‘ when trying to add an EXO user as a delegate to an on-prem mailbox you need to make the mailbox ACLable per this KB: A remote mailbox created in on-premises AD DS is not ACLable in Exchange Online.
Error encountered when adding an EXO user as a delegate to an on-prem mailbox
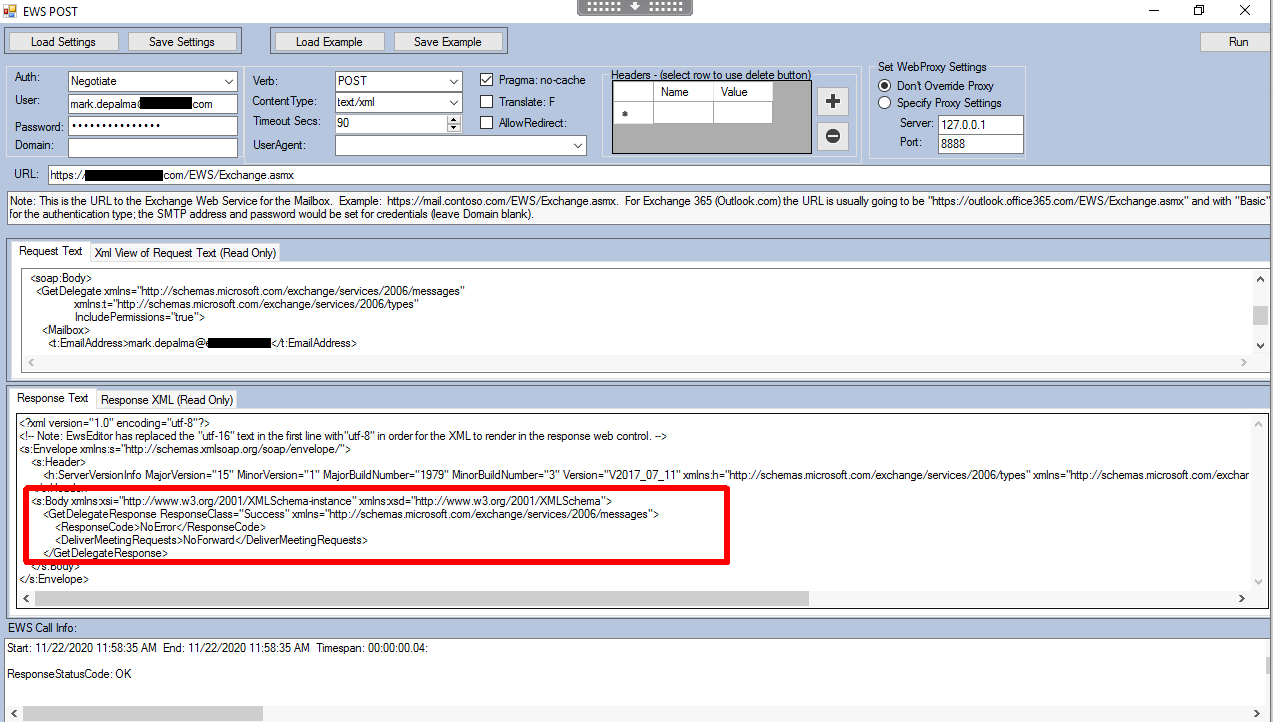
To understand why Teams requires such a specific configuration, let’s look at what is happening in the background… When you are creating a new Teams meeting via Outlook, the Teams back-end actually does a OAuth-authenticated EWS (Exchange Web Services) ‘GetDelegate‘ call to your on-premises Exchange environment to verify that the user creating the meeting actually has access to the mailbox. The request look like this:
Exchange will respond with delegate list and associated permissions (similar to the view you see in Outlook).
<?xml version="1.0" encoding="utf-8"?>
<!-- Note: EwsEditor has replaced the "utf-16" text in the first line with"utf-8" in order for the XML to render in the response web control. -->
<s:Envelope xmlns:s="http://schemas.xmlsoap.org/soap/envelope/">
    <s:Header>
        <h:ServerVersionInfo MajorVersion="15" MinorVersion="1" MajorBuildNumber="1979" MinorBuildNumber="3" Version="V2017_07_11" xmlns:h="http://schemas.microsoft.com/exchange/services/2006/types" xmlns="http://schemas.microsoft.com/exchange/services/2006/types" xmlns:xsd="http://www.w3.org/2001/XMLSchema" xmlns:xsi="http://www.w3.org/2001/XMLSchema-instance" />
    </s:Header>
    <s:Body xmlns:xsi="http://www.w3.org/2001/XMLSchema-instance" xmlns:xsd="http://www.w3.org/2001/XMLSchema">
        <GetDelegateResponse ResponseClass="Success" xmlns="http://schemas.microsoft.com/exchange/services/2006/messages">
            <ResponseCode>NoError</ResponseCode>
            <ResponseMessages>
                <DelegateUserResponseMessageType ResponseClass="Success">
                    <ResponseCode>NoError</ResponseCode>
                    <DelegateUser>
                        <UserId xmlns="http://schemas.microsoft.com/exchange/services/2006/types">
                            <SID>S-1-5-21-2061111111-1111111111-222222222-33333</SID>
                            <PrimarySmtpAddress>delegateuser@domain.com</PrimarySmtpAddress>
                            <DisplayName>User, Delegate</DisplayName>
                        </UserId>
                        <DelegatePermissions xmlns="http://schemas.microsoft.com/exchange/services/2006/types">
                            <CalendarFolderPermissionLevel>Editor</CalendarFolderPermissionLevel>
                            <TasksFolderPermissionLevel>None</TasksFolderPermissionLevel>
                            <InboxFolderPermissionLevel>None</InboxFolderPermissionLevel>
                            <ContactsFolderPermissionLevel>None</ContactsFolderPermissionLevel>
                            <NotesFolderPermissionLevel>None</NotesFolderPermissionLevel>
                        </DelegatePermissions>
                        <ReceiveCopiesOfMeetingMessages xmlns="http://schemas.microsoft.com/exchange/services/2006/types">false</ReceiveCopiesOfMeetingMessages>
                        <ViewPrivateItems xmlns="http://schemas.microsoft.com/exchange/services/2006/types">false</ViewPrivateItems>
                    </DelegateUser>
                </DelegateUserResponseMessageType>
            </ResponseMessages>
            <DeliverMeetingRequests>NoForward</DeliverMeetingRequests>
        </GetDelegateResponse>
    </s:Body>
</s:Envelope>
The important things here are that the user is present and has either ‘Author‘ or ‘Editor‘ permissions to the calendar. Remember, even having ‘Custom‘ permissions to the calendar will result in an error during meeting creation.
Another issue you can run into is one where you have already added the user as a delegate with the appropriate calendar permissions, but still receive the error ‘Looks like you don’t have permission to schedule meetings for this account. Talk to the owner to get permission and try again.‘ To troubleshoot this, let’s look at the mailbox from the perspective of Teams and perform the EWS ‘GetDelegate‘ call ourselves. We can use EwsEditor to do this.
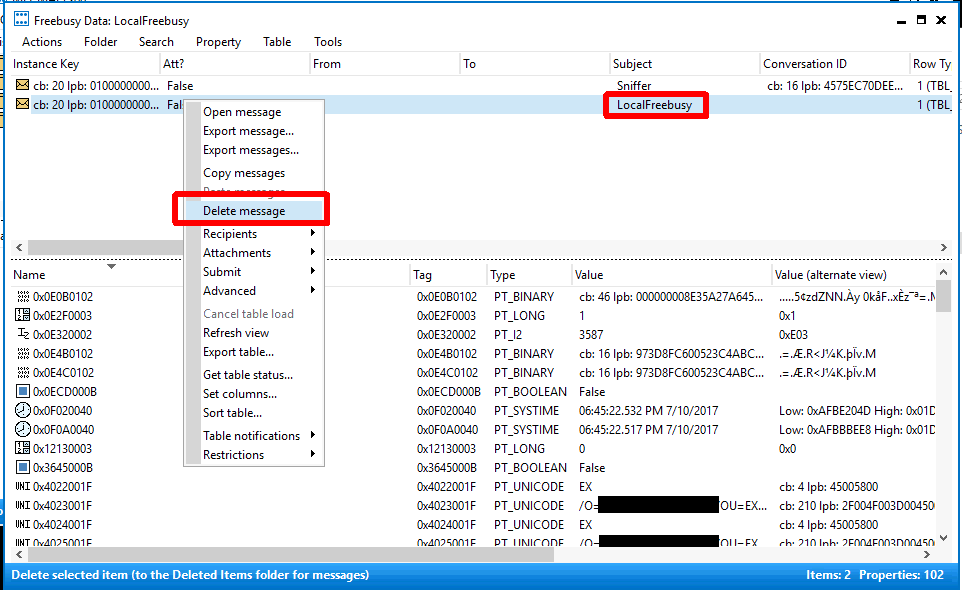
In this example we receive an empty response from EWS even though we have properly configured the delegate permissions. This is indicative of mailbox corruption and to resolve this we have to understand how delegates are actually stored in the mailbox. Delegates actually translate to a number of things, but at the center of all of this is the ‘LocalFreebusy‘ object in the mailbox which can only be viewed with a tool like MFCMapi. The reason EWS is returning a blank list is because the object in the mailbox is corrupt and missing the delegate information. In order to resolve this we will use MFCMapi to delete the object. You can perform this on behalf of the user if you have full mailbox permissions and write access to their AD account, but in this example we will run as the mailbox owner using their default MAPI profile. To reset/repair the delegates list we will perform the following steps:
Before anything, record all of the users delegates from Outlook along with all the permissions for each one
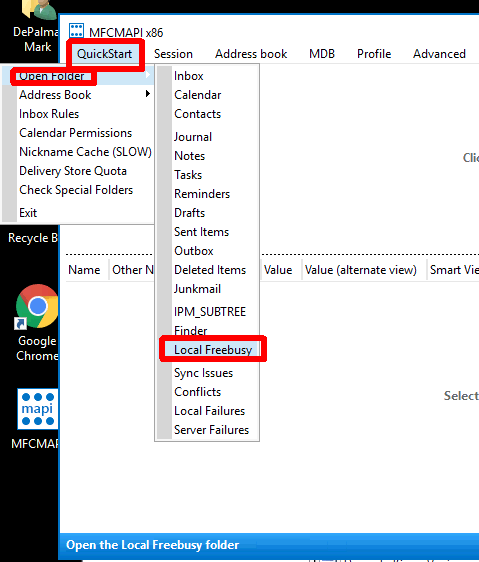
Go to QuickStart -> Open Folder -> Local Freebusy
Choose the item with the subject ‘LocalFreebusy‘
Choose ‘Delete message‘ and when prompted with options choose ‘Permanent delete passing DELETE_HARD_DELETE…’
Go back into Outlook and re-create the user’s delegate(s)
After recreating the user’s delegates we can issue the EWS call again and see if they now show properly. The response should contain every delegate user along with their ‘Author‘ or ‘Editor‘ calendar permissions. Once you have verified EWS is returning the correct information you can try creating a new Teams meeting request.
Back in April, at the beginning of the pandemic, I started putting a lot of focus into getting Windows Autopilot to work with Hybrid Join clients and Microsoft Always On VPN. I was looking at both for different reasons but also looking at them as a combined solution. The issue with Autopilot was that technically you were still required to have line of sight to a domain controller even though the domain join happened via an offline blob using the on-prem Intune connector. Sifting through logs I could see the only thing holding back a successful enrollment was a little function at the end of enrollment that was simply looking for a domain controller. I was able to sometimes get an enrollment to work via device tunnel MS VPN policies, but success wasn’t consistent and relied on policies/certificates coming down in a timely manner. In the logging I also saw references to a configuration parameter that would disable the DC check. Soon after, I found a post from Microsoft saying that they had this setting in private beta and would be releasing it in the coming months. After this I decided to put everything on the backburner and abandon MS VPN (I found the MS VPN solution using RRAS to be clunky and inconsistent with a lot to be desired).
Fast forward a few months and Microsoft finally released the new ‘functionality‘. At its core it is really just a flag telling OOBE not to perform a DC connectivity check. After enrollment is completed you are on your own to establish pre-login connectivity to facilitate an initial logon to your domain as there are no cached credentials yet on the machine. We are already a Palo Alto GlobalProtect customer and have been happy with the solution, so getting the two to work together just made sense. At the same time there has also been a push to implement a proper Always On VPN configuration. I’ll be writing a post dedicated to the full technical and security architecture around a cert-based Palo Alto Always On VPN configuration, so I’ll only briefly touch on the relevant parts here. Please refer to Palo Alto documentation on the missing pieces. There are a number of security aspects that should be taken into account like revocation, key storage, etc., and you should already have a proper certificate authority. I am not going over those in this article. You should also already have configured your Autopilot profiles, Intune Connector for Active Directory, etc. as per this document.
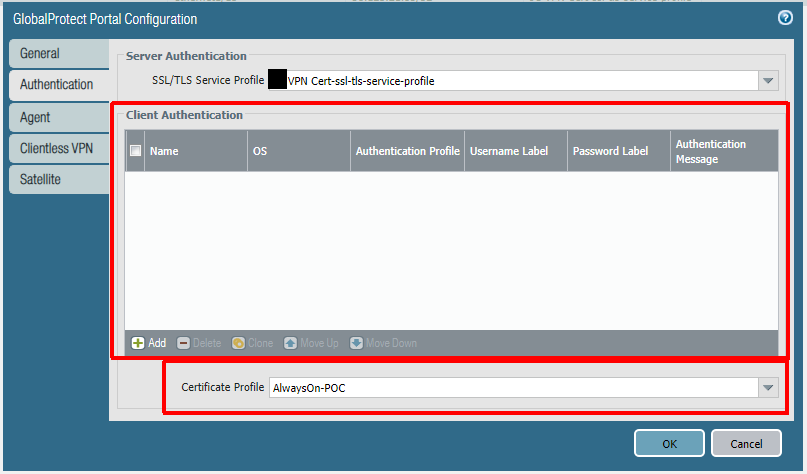
In this configuration I use a certificate-only approach (only using certificate profiles and no other authentication methods) for both the portal and the gateway. Remember, our first GlobalProtect connection after an Autopilot enrollment will be a pre-logon connection via certificate. There are no other authentication methods available for this first connection and the portal -> gateway authentication flow needs to support this. Before configuration of the portal and gateway you need to configure zones, interfaces, policies, and a certificate profile. These steps are documented here (steps 1-3 and 5-6).
Below is the portal config. Notice how there are no client authentication methods present. If you were to add any method here, it would be layered on top of the certificate authentication and would prevent the pre-logon connection. PAN-OS 9.0 has implemented mixed authentication support so that you can implement an either/or type of configuration here. The other important note is that your user connection (post-logon) will be connecting to the same portal/gateway and because of this we will be using certificates for the user as well.
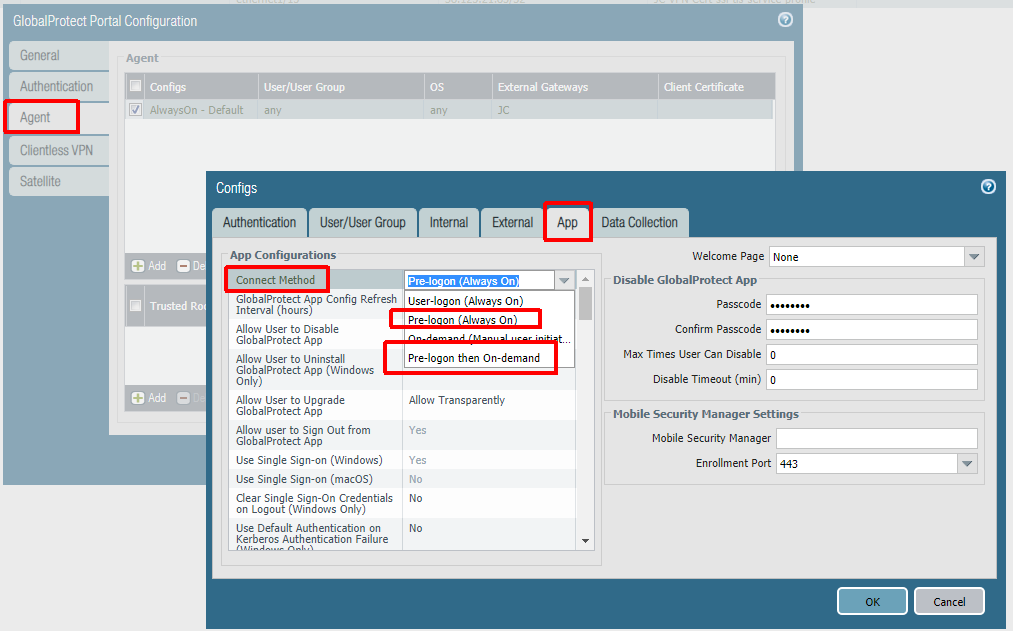
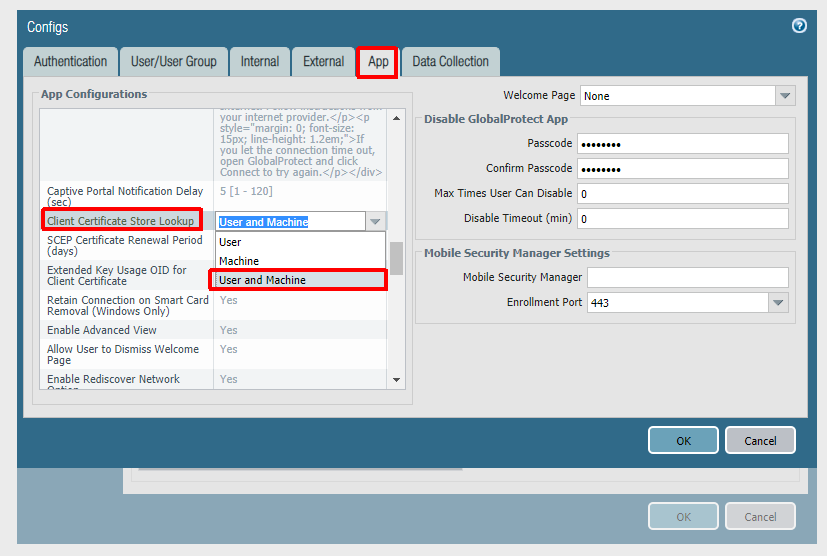
The next step is to configure the agent settings within the portal config. Our config is being configured as Always On, but this is not technically required for Autopilot to work. If you do not want an Always On user connection, set ‘Connect Method‘ to ‘Pre-logon then On-Demand‘. Some Palo-Alto documents mention using multiple agent configurations for pre-logon and post-logon that use different connect methods, but this is not necessary here (and will not always work as expected due to the order of operations). The other important thing is to set ‘Client Certificate Store Lookup‘ to ‘User and Machine‘ so that the client will be able to use user and device certificate. The client seems to do a good job at using the proper certificate depending on if the connection is pre-logon or post-logon.
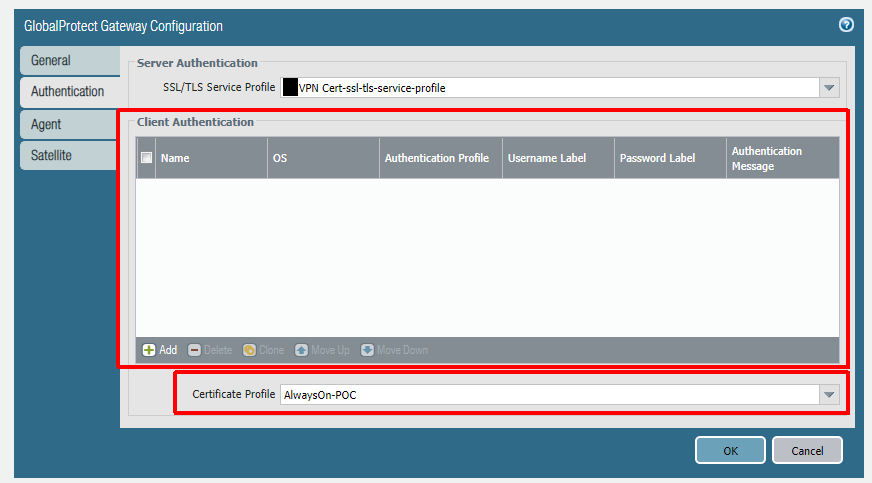
After the portal you will configure the gateway. Authentication will be identical to the portal to allow for a seamless authentication flow.
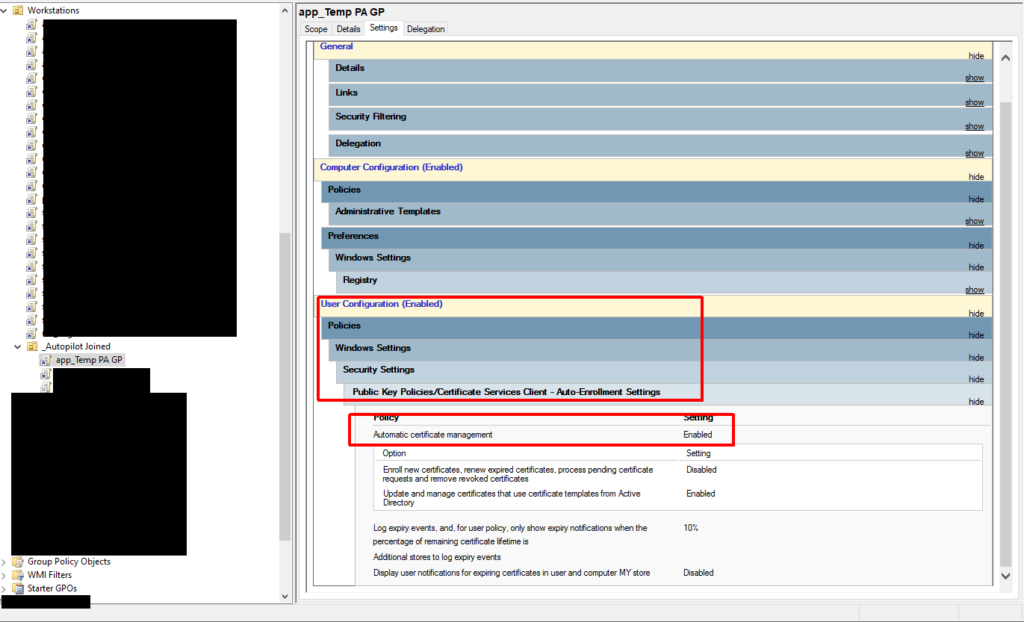
To deliver a device certificate to the device we will use an Intune PKCS certificate profile. I won’t go into great detail here as Microsoft has done a good job of documenting the steps involved. The profile will need to be assigned to the device properly, and the easiest way to do this is by using an Azure AD dynamic group. I am using a custom EKU value in the screenshot below (Extended Key Usage) which you do not need to replicate. I had a specific reason for doing this.
You will also need to deliver a user certificate to the device. You can use another Intune PKCS certificate profile to do this or you can use GPO/User Certificate Autoenrollment. I chose the latter because I like the granular control it provides. If you use an Intune profile, but target the machine, every user that logs on to the machine will get a certificate and VPN access. If I target the user, every Intune-managed machine they log on to will get a user certificate. Both of these were undesirable. With autoenrollment I’m only enabling autoenrollment for the computers I want (using a user policy and loopback processing), and I’m controlling the users that can enroll/autoenroll via the ACL on the certificate template itself.
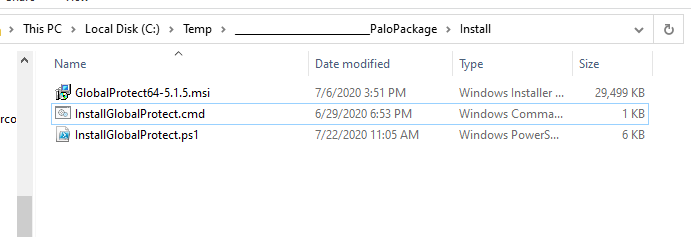
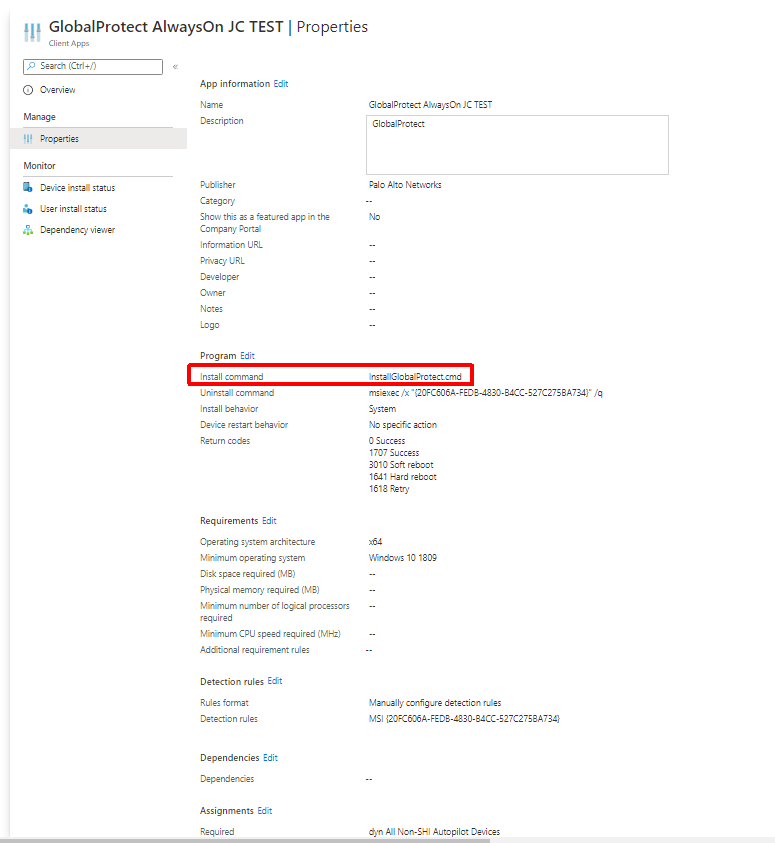
To get the GlobalProtect client deployed to our Autopilot device we will be using Intune to deploy it via a ‘Windows app (Win32)’ deployment. We need the Microsoft-Win32-Content-Prep-Tool utility, the GlobalProtect MSI (I am using version 5.1.5 at this time), and two wrapper scripts to complete the package.
The first wrapper script is InstallGlobalProtect.ps1. This is the one responsible for installing the MSI and pre-configuring some registry values. I thought this part would be very straightforward, but I had trouble getting the pre-logon credential provider to kick in initially when installing the client via Intune. If I manually installed the client, it worked the first time without an issue. It was only acting this way when being deployed via Intune during Autopilot. After a few hours of procmon traces and some reverse engineering of the client I figured out the issue. There is a post-setup process that runs that doesn’t process some registry changes correctly until the client is executed in the context of a user at least once. I use the wrapper to stage these two registry values (LogonFlag + LogonState) along with the others needed to make this configuration work. I also enable User-initiated Pre-Logon (via the ShowPrelogonButton value), so it gives the user a chance to verify they have internet connectivity and so that they can perform a retry of the pre-logon connection on demand. I later turn this off via GPO making pre-logon completely automatic after the first successful login. This value is totally optional.
The next wrapper script is a batch script that launches the script above. It is called InstallGlobalProtect.cmd. This script is needed because Intune will launch the installer in 32-bit mode and we want everything kicking off in 64-bit mode (mainly for the registry work above).
Once the three files are ready, we can create our package which generates a .intunewin file.
We then take this file and upload it to Intune to create our application. The application will need to be assigned to a group. Again, I am using a dynamic group that targets my Autopilot devices. As you can see below some of the MSI info is pulled in automatically because it was read by the Microsoft-Win32-Content-Prep-Tool utility. We must also change the ‘Install command‘ to point to the batch file we created earlier.
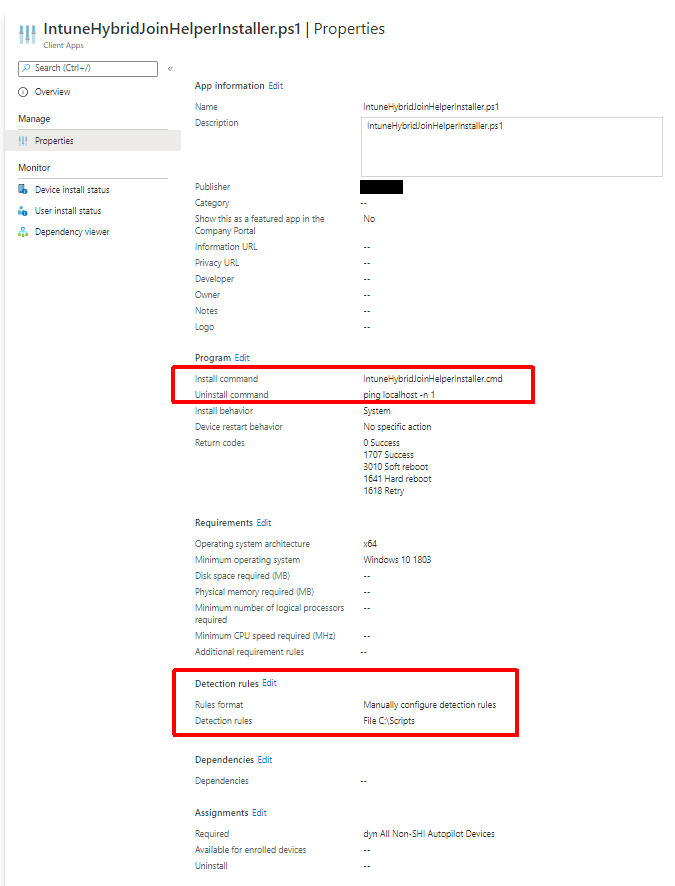
In testing I came across multiple issues due to machine GPO not being applied before the first login. One of these was loopback processing not applying which caused multiple user GPOs not to apply. Others were trusted root certs not installing (used for things like SSL decryption) and User Certificate Autoenrollment not working (I touched on this earlier). The trusted root issue actually caused my hybrid join to get stuck (SSL decryption is being used here). I decided to create IntuneHybridJoinHelperInstaller.ps1 to solve all of this.
Modifies the SACL of the directory to remove modify access from ‘Authenticated Users‘ (someone could use this directory to execute malicious code in the context of ‘LOCAL SYSTEM‘ if you do not do this)
Create a script in the directory above called IntuneHybridJoinHelper.ps1 with an accompanying scheduled task that executes at any user logon in the context of ‘LOCAL SYSTEM‘
At the next logon, this newly deployed script is triggered by the scheduled task, checking to see if the computer group policy cache has ever been provisioned (has ever received computer policies) and if not it will do the following:
Perform a gpupdate for computer policies
Get the interactive logged on user
Create a task to run gpupdate as the currently logged on user which will perform a gupdate of their user policies
Re-run ‘Automatic-Device-Join‘ task to complete the device registration in case it failed at logon
It is best to deploy this as a Win32 app, like the GlobalProtect client, so that we can ensure it is on the machine before the first logon. Like GlobalProtect, we are using a batch wrapper (IntuneHybridJoinHelperInstaller.cmd) to launch the PowerShell script as a 64-bit process. I used the same dynamic group that I used for the GlobalProtect client as the target here. I also used a dummy uninstall command since we never need to ever uninstall this. For install detection I am just using the script path (C:\Scripts\IntuneHybridJoinHelperInstaller.ps1). We will build our package using the utility like we did for GlobalProtect.
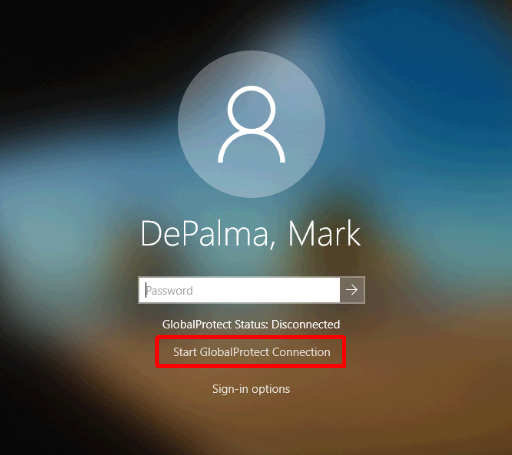
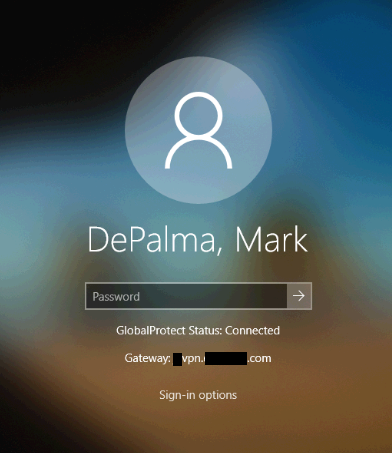
Now that we have everything in place we can test an enrollment. If everything is configured properly, you’ll be asked to sign-in to your corporate environment right after establishing network connectivity. After everything completes you should wind up at a logon screen. Because I am using User-initiated Pre-Logon I will need to switch to the GlobalProtect logon provider, click ‘Start GlobalProtect Connection’, and wait for the status to change to ‘Connected’.
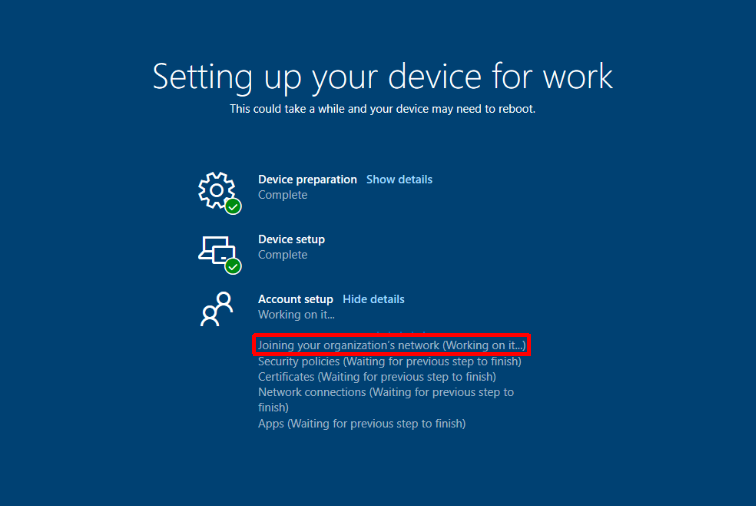
After logging on you are presented with the User ESP (Enrollment Status Page). This is when our helper script kicks in to resolve GPO issues and moves our device registration along. This process can take a bit because after the ‘Automatic-Device-Join‘ completes you still have to wait for the on-prem computer object to sync up to Azure AD via AD Connect. Steve Prentice came up with a little script to help speed this up called SyncNewAutoPilotComputersandUsersToAAD.ps1. It just forces an AD Connect sync after computer object has its ‘userCertificate‘ attribute populated.
Once this is completed you should be left at a functioning desktop and GlobalProtect should have switched over to a full tunnel using the user certificate. At this point I would be using my primary endpoint management product, Ivanti Endpoint Manager, to perform any additional application installs/configurations. I have its agent being deployed via Win32 app as part of my Autopilot process.
In the past many organizations completely blocked or limited external access to on-premises Exchange servers because of the lack of multi-factor authentication. Protocols like OutlookAnywhere (also known as RPC-over-HTTP, now MAPI-over-HTTP) and EWS had no native methods to accomplish multi-factor authentication. Failure to protect these protocols from external exposure has led to many breaches like FIN4 and London Blue.
HMA to the rescue… In 2017 Microsoft finally answered this deficiency with Hybrid Modern Authentication. I briefly touched on modern authentication in two previous articles (here and here). With Hybrid Modern Authentication Microsoft gave you the ability to use new technologies like modern authentication and conditional access for on-premises Exchange. Clients will connect using modern authentication by default once Exchange is on a supported version, supported clients are implemented, and the configuration is implemented. The issue here is that legacy Windows authentication is still available. You can simply disable modern authentication in the client or use a different client and you are now connected to on-premises Exchange with a simple username and password completely bypassing conditional access. Conditional access is only invoked when you are authenticating with modern authentication. Exchange 2019 implemented Authentication Policies which allow you turn off legacy authentication methods. If you are using Exchange 2019, you can use these to lock down your environment.
We were in the situation where we wanted to allow secure external access to Exchange (mainly for OutlookAnywhere, but also Outlook Mobile), but we couldn’t have any legacy authentication exposure. The solution we came up with was creating a set of externally facing Exchange 2016 mailbox servers (think Client Access Servers from the pre-Ex2016 days) that have all legacy authentication methods disabled (only OAuth available). These servers are the only ones exposed to the internet. The protocols we want to expose but lock down are ActiveSync (needed for Outlook Mobile), EWS (Exchange Web Services), MAPI, and OAB (Offline Address Book). To lock these down we ran the following against the externally facing servers:
After this is completed, Windows and basic authentication should now fail for these virtual directories.
IMPORTANT: It is VERY important to regularly check that these settings are still in place. You should always re-run these commands after any kind of Exchange update. If you do not do this, you could inadvertently expose your Exchange environment. A simple script could be run on a schedule to check and report on any changes to the authentication configuration of these virtual directories.
The second step is disabling or blocking the other virtual directories that do not need to be accessed externally. For us, these were ECP, OWA, PowerShell, and RPC. We have an on-premises load balancer with SSL bridging configured for our Exchange environment, so we used that to block access to these virtual directories. Another option is to use IP restrictions in IIS on these virtual directories. A third option is to disable the virtual directories via PowerShell. For those of you who want to allow secure access to OWA (Outlook Web Access) you can use Azure App Proxy to accomplish this or an ADC like NetScaler or F5 Big-IP.
The final step in this configuration is allowing the O365 servers to reach an unaltered version of EWS for the IntraOrganizationConnector used for Exchange Online to pull free/busy data (and other data like photos) from your on-premises environment. I found that for some reason the IntraOrganizationConnector fails to authenticate from EXO->on-premises when it uses the modified virtual directory even though all OAuth tests pass. I also use this configuration for my MRS endpoint when doing mailbox migrations since MRS wants to do traditional Windows authentication to EWS. If you are using the Microsoft Hybrid Agent, you shouldn’t have to do this since Azure App Proxy is taking care of the MRS and free/busy communication. I have still have an ongoing ticket open with Microsoft to understand the root cause of this. The workaround is fairly simple:
Create a namespace that can be used for EXO->on-premises communications. (Ex. exocomm.domain.com)
Configure this namespace to point to your regular INTERNAL and unaltered mailbox servers
Lock down this namespace in your firewall, so that ONLY Microsoft O365 servers can reach it. NOTE: This is very important and failure to do so will undermine all of the work done above and leave you exposed.We use a combination of PaloAlto firewalls and MineMeld to accomplish this, but this can be accomplished with a static/maintained ACL as well.
Configure the IntraOrganizationConnector in EXO to not use Autodiscover and to use this new namespace as its endpoint with the following commands:
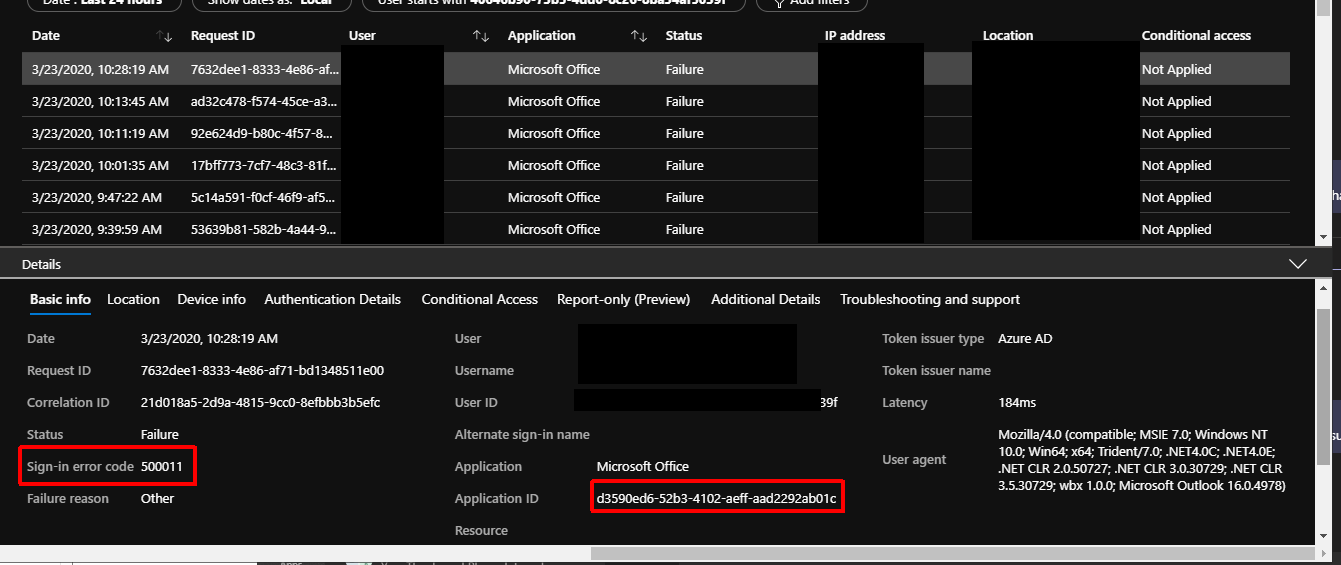
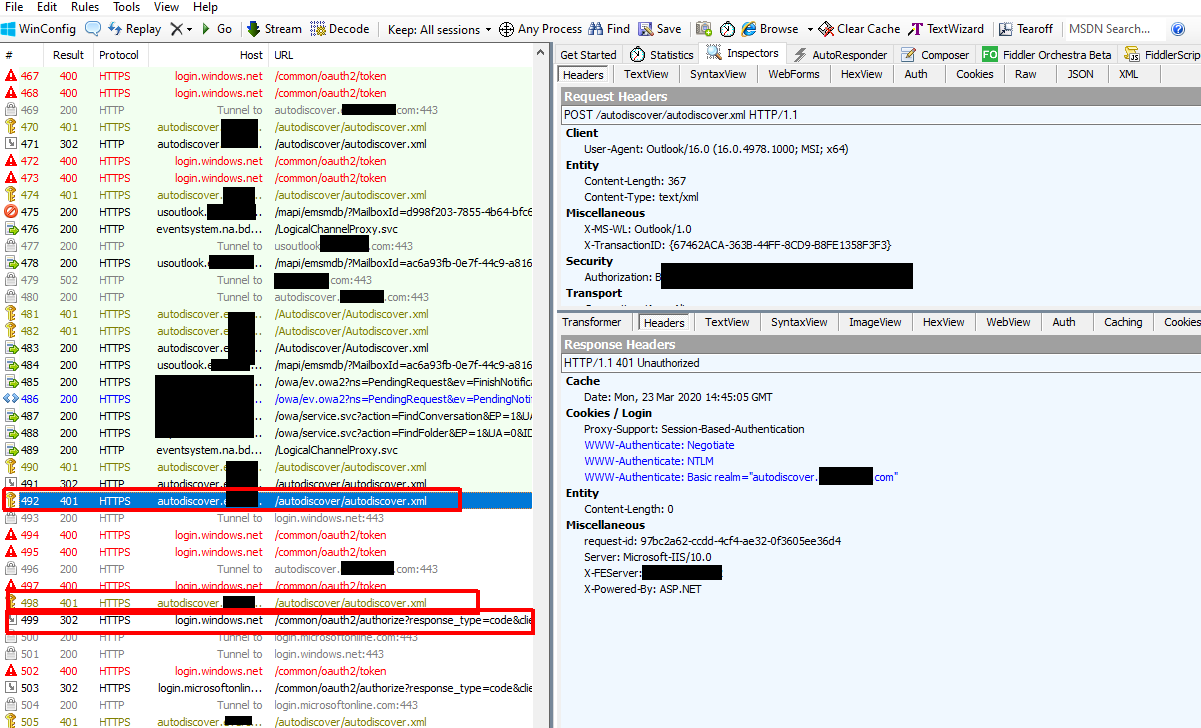
We are in the process of selectively turning on ADAL for Outlook clients. We have already gone through enabling Hybrid Modern Authentication for Exchange (https://docs.microsoft.com/en-us/exchange/configure-oauth-authentication-between-exchange-and-exchange-online-organizations-exchange-2013-help) a while back. We recently ran into an issue where specific users were getting a white box about a minute after launching Outlook. I have seen this issue where all of Outlook freezes, but this was not the same. They receive this error while Outlook continues to run in the background. The error is also accompanied by an Azure AD sign-in failure for the user. The error received is 500011. When looking this up in the documentation (https://login.microsoftonline.com/error?code=500011) you can see it is referring to the error ‘The resource principal named {name} was not found in the tenant named {tenant}‘.
I decided to do a Fiddler trace to get to the bottom of this and this is where the issue started becoming clearer. In the trace you see Outlook reaching out to autodiscover.domainname.com (which is on-prem), getting a 401 response, reaching out to login.windows.net/login.microsoftonline.com, and looping in this manner. This part of the capture aligned exactly with the mysterious white box.
In my case this specific set of users had a different primary SMTP address (and UPN) than the other users we had already enabled ADAL for and their autodiscover.domain.com URL was never added to our Azure AD service principals for the ‘Office 365 Exchange Online‘ application ID. Microsoft documentation talks about this in Step 5 of the link I added at the beginning of this post. Using the ‘MSOnline‘ PowerShell module I was able to add the URL to the service principal list.
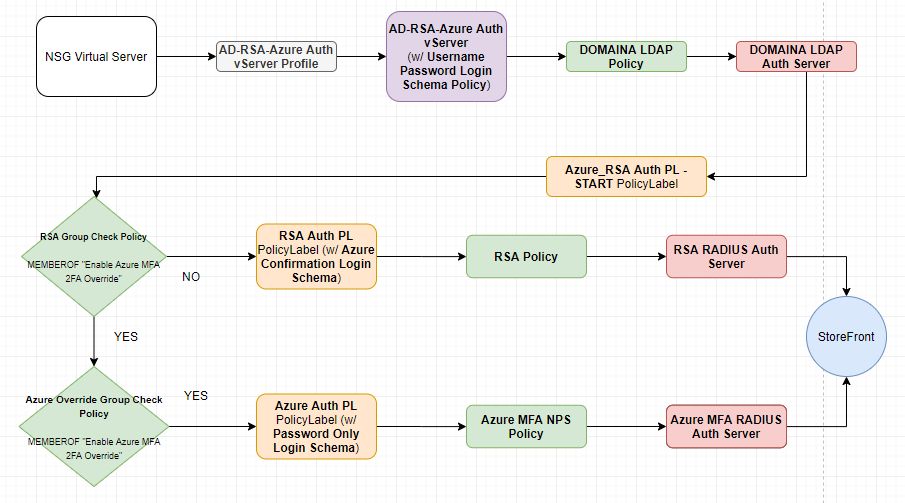
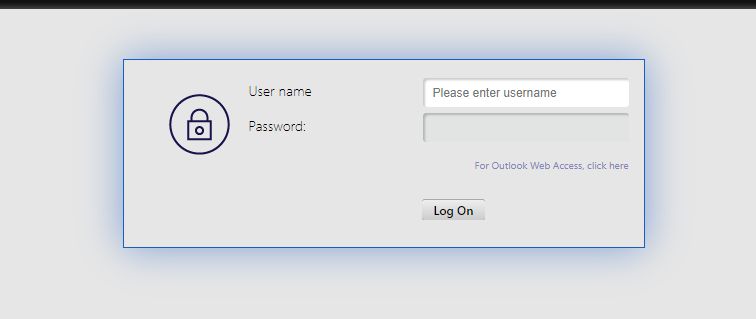
I have been working on implementing services like Azure AD and O365 in my work place. One of the services we are are adopting is Azure MFA. We currently use RSA SecurID company-wide for multiple remote access services and needed a way move users over in batches. One of the larger services to integrate Azure MFA with was Citrix NetScaler. Our original NSG (NetScaler Gateway) authentication configuration consisted of multiple LDAP policies and a set of RADIUS polices for RSA SecurID. Our goal was to create a configuration where we could control where users authenticate for their second factor via an Active Directory group. To do this kind of dynamic authentication in NSG we would have to move authentication from the basic model to an advanced nFactor-based configuration. The other requirement we had was to have a landing page before an Azure MFA authentication. We needed this because if your default sign-in method is set to ‘notification’ the RADIUS authentication could easily time out if the user doesn’t have their device running Microsoft Authenticator next to them. The page would let the user know to have their device ready before initiating authentication.
Below is a flowchart of the configuration end result. Objects of the same type share the same color (Gray – Authentication Virtual Server Profile, Purple – Authentication Virtual Server, Green – Advanced Authentication Policy, Orange – Advanced Authentication PolicyLabel, Red – Authentication Server (LDAP/RADIUS).
The first step in setting up Azure MFA is to stand up one or multiple NPS (Network Policy Server) instances and install the Azure MFA NPS Extension. I won’t go into the whole setup of this since it is documented, but I will comment on the policy config within NPS. It could be a little confusing because we are just going to pass the username to NPS, NPS will not be authenticating the user against AD. Azure MFA authentication in NPS happens AFTER NPS authenticates the user against AD. To make this work we will have to create a Connection Request Policy that just passes the user without authentication. The steps involved are as follows:
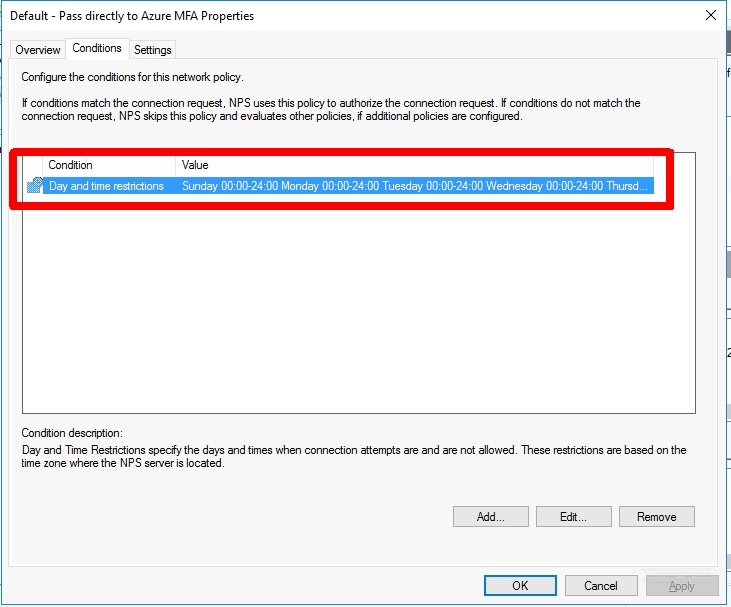
Create a new Connection Request Policy called ‘Default – Pass directly to Azure MFA‘
Add a Day and time restriction that covers 24 hours and 7 days
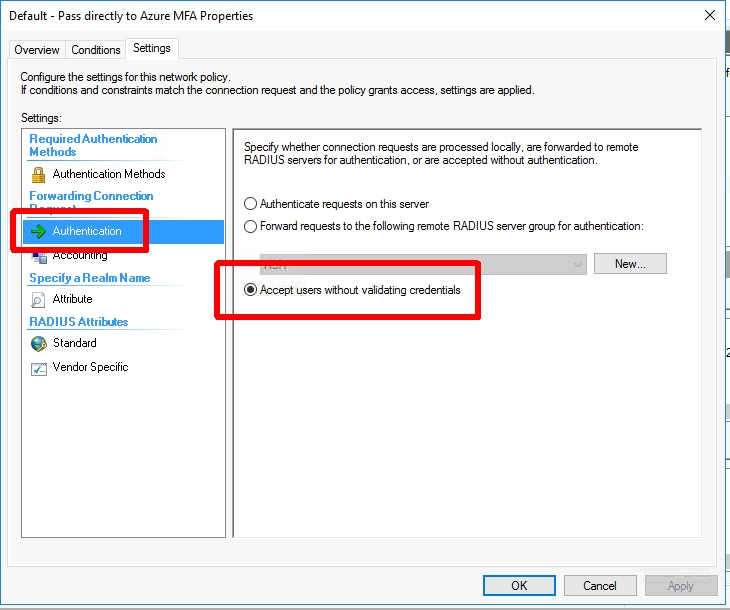
Set the ‘Authentication’ settings‘ to ‘Accept users without validating credentials‘. (This will not perform an AD authentication and just pass the username along to the Azure MFA NPS Extension)
Now we can add this new Azure MFA RADIUS server to NetScaler.
Go to ‘NetScaler -> System -> Authentication -> Basic Policies -> RADIUS‘
Create a new Server using the settings from the NPS server above
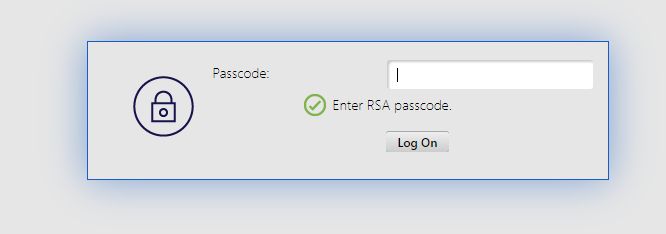
Next we will create our Login Schemas. We will need an initial logon schema for the LDAP credentials, a login schema for the RSA SecurID token, and a prompt only login schema for the page we want to show before authentication is passed to the NPS RADIUS server we setup earlier for Azure MFA.
Go to ‘NetScaler -> Security -> AAA – Application Traffic -> Login Schema‘
Create a login schema profile called ‘Username Password Login Schema‘
Set the authentication schema to ‘SingleAuth.xml‘
Set ‘User Credential Index‘ to 11
Set ‘Password Credential Index‘ to 12
Create a login schema policy called ‘Username Password Login Schema Policy‘
Set the profile to be the schema profile you just created above (‘Username Password Login Schema‘)
Set the ‘Rule’ expression to ‘REQ.HTTP.HEADER User-Agent NOTCONTAINS CitrixReceiver‘ (Receiver does not support the nFactor flow, this will be for web clients only)
Create a login schema profile called ‘Password Only Login Schema‘
Create a new XML file called ‘RSAOnly.xml‘ using the XML below
Upload this to ‘/flash/nsconfig/loginschema/LoginSchema‘
Set the user expression to ‘HTTP.REQ.USER.ATTRIBUTE(11)‘. (This will carry the username from the first logon page to the RSA logon page)
Create a login schema profile called ‘No Prompt Login Schema‘
Set authentication schema to ‘noschema‘
Leave everything else blank
Create a login schema profile called ‘Azure Confirmation Login Schema‘
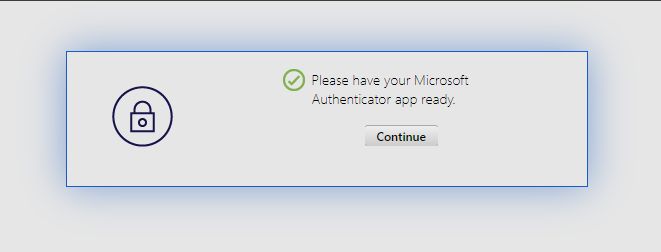
Create a new XML file called ‘Azure.xml‘ using the XML below
Upload this to ‘/flash/nsconfig/loginschema/LoginSchema‘
Set the user expression to ‘HTTP.REQ.USER.NAME‘. (This will pass the UPN to NPS after acknowledging the prompt)
<?xml version="1.0" encoding="UTF-8"?>
<AuthenticateResponse xmlns="http://citrix.com/authentication/response/1">
<Status>success</Status>
<Result>more-info</Result>
<StateContext></StateContext>
<AuthenticationRequirements>
<PostBack>/nf/auth/doAuthentication.do</PostBack>
<CancelPostBack>/nf/auth/doLogoff.do</CancelPostBack>
<CancelButtonText>Cancel</CancelButtonText>
<Requirements>
<Requirement><Credential><Type>none</Type></Credential><Label><Text>Please have your Microsoft Authentcator app ready.</Text><Type>confirmation</Type></Label><Input /></Requirement>
<Requirement><Credential><ID>loginBtn</ID><Type>none</Type></Credential><Label><Type>none</Type></Label><Input><Button>Continue</Button></Input></Requirement>
</Requirements>
</AuthenticationRequirements>
</AuthenticateResponse>
Now we are going to create our Policy/PolicyLabel chain. The important thing here is to understand how they relate to each other. A Policy is exactly that… an authentication policy. You can define an expression and an authentication request server to use once the expression is matched. A PolicyLabel contains one or more Policy bindings with priorities, goto expressions (like NEXT/END), and a ‘Next Factor’ which gives you the ability to link to ANOTHER PoilcyLabel. First, we will start with our Policies.
Go to ‘NetScaler -> Security -> AAA – Application Traffic -> Policies -> Authentication -> Advanced Policies -> Policy‘
Create an LDAP authentication policy
Set Name to be specific to the domain it is servicing (ex. ‘DOMAINA LDAP Policy‘)
Set Action Type to ‘LDAP‘
Set Action to your existing LDAP server
Set Expression to ‘REQ.HTTP.HEADER User-Agent NOTCONTAINS CitrixReceiver‘
Create a Azure MFA RADIUS authentication policy
Set Name to ‘Azure MFA NPS Policy‘
Set Action Type to ‘RADIUS‘
Set Action to the NPS RADIUS server you created earlier
Set Expression to ‘true‘
Create a RSA RADIUS authentication policy
Set Name to ‘RSA Policy‘
Set Action Type to ‘RADIUS‘
Set Action to your existing RSA RADIUS server
Set Expression to ‘true‘
Create an Active Directory group that will contain the users you are cutting over to Azure MFA. I used the name ‘Enable Azure MFA 2FA Override’. We will use this group in the next two policies
Create the RSA check policy
Set Name to ‘RSA Group Check Policy‘
Set Action Type to ‘NO_AUTHN‘
Set Expression to ‘HTTP.REQ.USER.IS_MEMBER_OF(“Enable Azure MFA 2FA Override”).NOT‘
Create the Azure override check policy
Set Name to ‘Azure Override Group Check Policy‘
Set Action Type to ‘NO_AUTHN‘
Set Expression to ‘HTTP.REQ.USER.IS_MEMBER_OF(“Enable Azure MFA 2FA Override”)‘
Next we can create our PolicyLabels. These objects will reference Login Schemas/Policies and will chain together.
Go to ‘NetScaler -> Security -> AAA – Application Traffic -> Policies -> Authentication -> Advanced Policies -> PolicyLabel‘
Create the Azure PolicyLabel
Set Name to ‘Azure Auth PL‘
Set Login Schema to ‘Azure Confirmation Login Schema‘ (we created this earlier)
Set Feature Type to ‘AAATM_REQ‘
Click Continue
Add a policy binding for ‘Azure MFA NPS Policy‘ (we created this earlier)
Set Priority to 100
Set Goto Expression to NEXT
Leave Next Factor empty
Create the RSA Policy
LabelSet Name to ‘RSA Auth PL‘
Set Login Schema to ‘Password Only Login Schema ‘ (we created this earlier)
Set Feature Type to ‘AAATM_REQ‘
Click Continue
Add a policy binding for ‘RSA Policy‘ (we created this earlier)
Set Priority to 100
Set Goto Expression to NEXT
Leave Next Factor empty
Create the primary PolicyLabel
Set Name to ‘Azure_RSA Auth PL – START‘
Set Login Schema to ‘No Prompt Login Schema‘ (we created this earlier)
Set Feature Type to ‘AAATM_REQ‘
Click Continue
Add a policy binding for ‘RSA Group Check Policy‘ (we created this earlier)
Set Priority to 100
Set Goto Expression to NEXT
Set Next Factor to ‘RSA Auth PL‘ (we created this earlier)
Add a policy binding for ‘Azure Override Group Check Policy‘ (we created this earlier)
Set Priority to 110
Set Goto Expression to NEXT
Set Next Factor to ‘Azure Auth PL‘ (we created this earlier)
Now we are going to create an authentication vServer and profile.
Create the authentication vServer
Go to ‘NetScaler -> Security -> AAA – Application Traffic -> Authentication Virtual Servers‘ and click ‘Add‘
Set the name to ‘AD-RSA-Azure Auth vServer‘
Set ‘IP Address Type‘ to ‘Non Addressable‘. (This authentication vServer will only be used internally, so we don’t need an IP address)
Under Advanced Authentication Policies add a binding for the LDAP policy you created above (ex. DOMAINA LDAP Policy)
Set the priority to 100
Set the Goto Expression to NEXT
Set the Next Factor to ‘Azure_RSA Auth PL – START‘ PolicyLabel we created this above
Under Login Schemas add a binding for the ‘Username Password Login Schema Policy‘ policy we created this earlier
Create an authentication profile
Go to ‘NetScaler -> Security -> AAA – Application Traffic -> Authentication Profile‘ and click ‘Add‘
Set the name to ‘AD-RSA-Azure Auth vServer Profile‘
Set Authentication Host to ‘fake‘ (this won’t be used)
Set Virtual Server Type to ‘Authentication Virtual Server‘
Set the Authentication Virtual Server to the ‘AD-RSA-Azure Auth vServer‘ we created above
Leave Authentication Domain blank
Leave Authentication Level to set 0
Now that everything has been created all that is left is to configure the NetScaler Gateway Virtual Server. If you already have one setup you can simply remove all authentication profile bindings and add the Authentication Profile we just created above.
With everything created we can test the authentication flow…
This is the login flow when the user IS NOT a member of the ‘Enable Azure MFA 2FA Override‘ group.
This is the login flow when the user IS a member of the ‘Enable Azure MFA 2FA Override‘ group. Depending on what the Azure AD user’s ‘Default sign-in method’ is set to they may or may not receive a prompt after the 2nd prompt. If their default method is set to something like SMS or Authenticator App code they will receive a 3rd window asking for that code. This prompt is automatically generated, so we did not have to create it like we did for the RSA prompt. In the case below the user’s default method was set to ‘Microsoft Authenticator – notification’, so the login flow will wait until the prompt is acknowledged, denied, or times out on the user’s Microsoft Authenticator instance.
The last thing to mention is that a little extra configuration needs to be added to support Citrix Receiver clients (Windows/Mac/Android/iOS). In 11.1 52.x+ NetScaler AAA servers need to be configured with a separate set of polices for requests where the User-Agent header contains ‘CitrixReceiver’. It is fairly straightforward and Citrix has a write up on this, so I won’t write it all out. I will say the one thing to consider is that you will not be able to support multiple second factor methods using the AD group. For these clients you will have to choose one or the other. In our case we will be sticking with RSA until the majority of users are moved over meaning those users connecting Receiver directly to NSG will need to have that method available. Fortunately for us we do not have many users that access our environment this way. Citrix’s documentation on this can be found here: https://support.citrix.com/article/CTX223386.
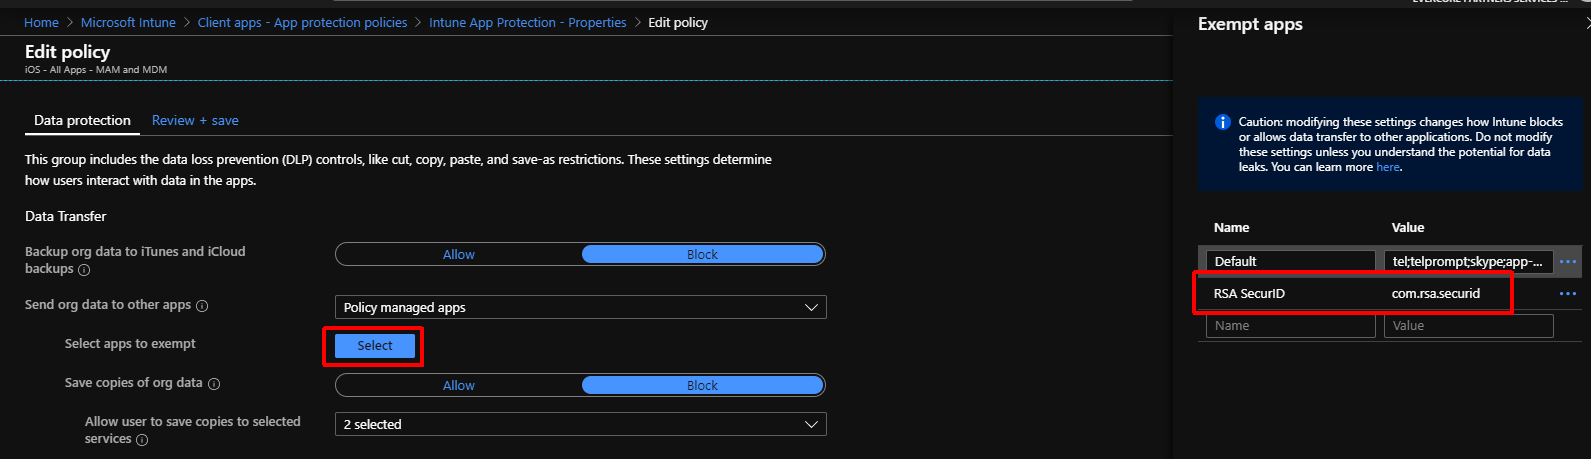
One issue we ran into during our Intune/Outlook pilot for Android/iOS devices was the inability to click RSA SecurID token links used to import tokens. We will eventually be moving away from RSA, but in the meantime this was a challenge. I was able to come up with a workaround that allowed an import from Intune/Outlook into RSA SecurID while using MAM policies an iOS device.
In the MAM policy (Application Protection policy) that targets Outlook/Edge create a ‘Data Transfer‘ exemption for ‘com.rsa.securid‘
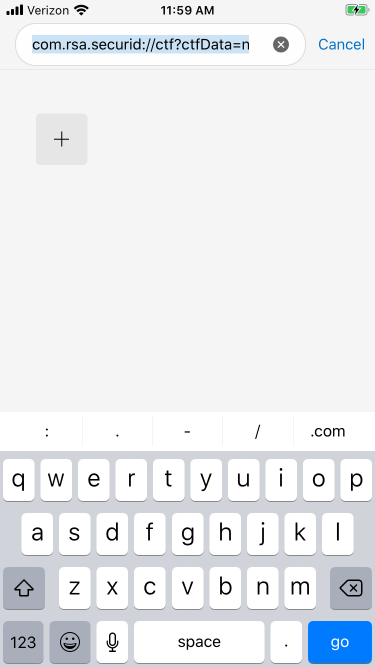
Email the RSA SecurID token to the user using the format: com.rsa.securid://ctf?ctfData=xxxxxxxxxxxxxxxxxxxxxx
Copy this link (be sure to not copy any spaces or) into Edge and hit ‘go‘
After hitting ‘go‘ Edge should prompt you to open up the token in RSA SecurID.
The other day one of our NetScaler appliances was unable to boot up after a power down. It was getting stuck during the FreeBSD bootup phase (before the NetScaler software actually loads) with the error:
Fatal trap 9: general protection fault while in kernel mode
The only information I could find on this specific issue was here: https://support.citrix.com/article/CTX238252, but this was not relevant to us. I could not find anything else online talking about receiving this error on a NetScaler appliance. Restoring to previous snapshots of the appliance didn’t resolve the issue. After some digging I found that this VM was set to the highest VM compatibility level. At some point someone had set the comparability level of the VM to be upgraded to version 15, but this didn’t take effect until the VM was actually powered down (it had been rebooted many times since without issues).
To remediate this issue I did the following:
Removed the VM from inventory
Manually edited the vmx file ‘virtualHW.version‘ line to say virtualHW.version = “4”. I chose a lower version, so that I could use the GUI to upgrade the version later. This can be done using WinSCP or something similar to download/edit the file
Added VM back to inventory
Upgraded VM compatibility to version 7 in vCenter to let the system actually run through the VMX and check settings
After doing all of the above I was able to successfully boot up the NetScaler appliance. The main takeaway here is that the ‘fatal trap’ error was directly related to the VM compatibility setting in ESXi in this particular case.
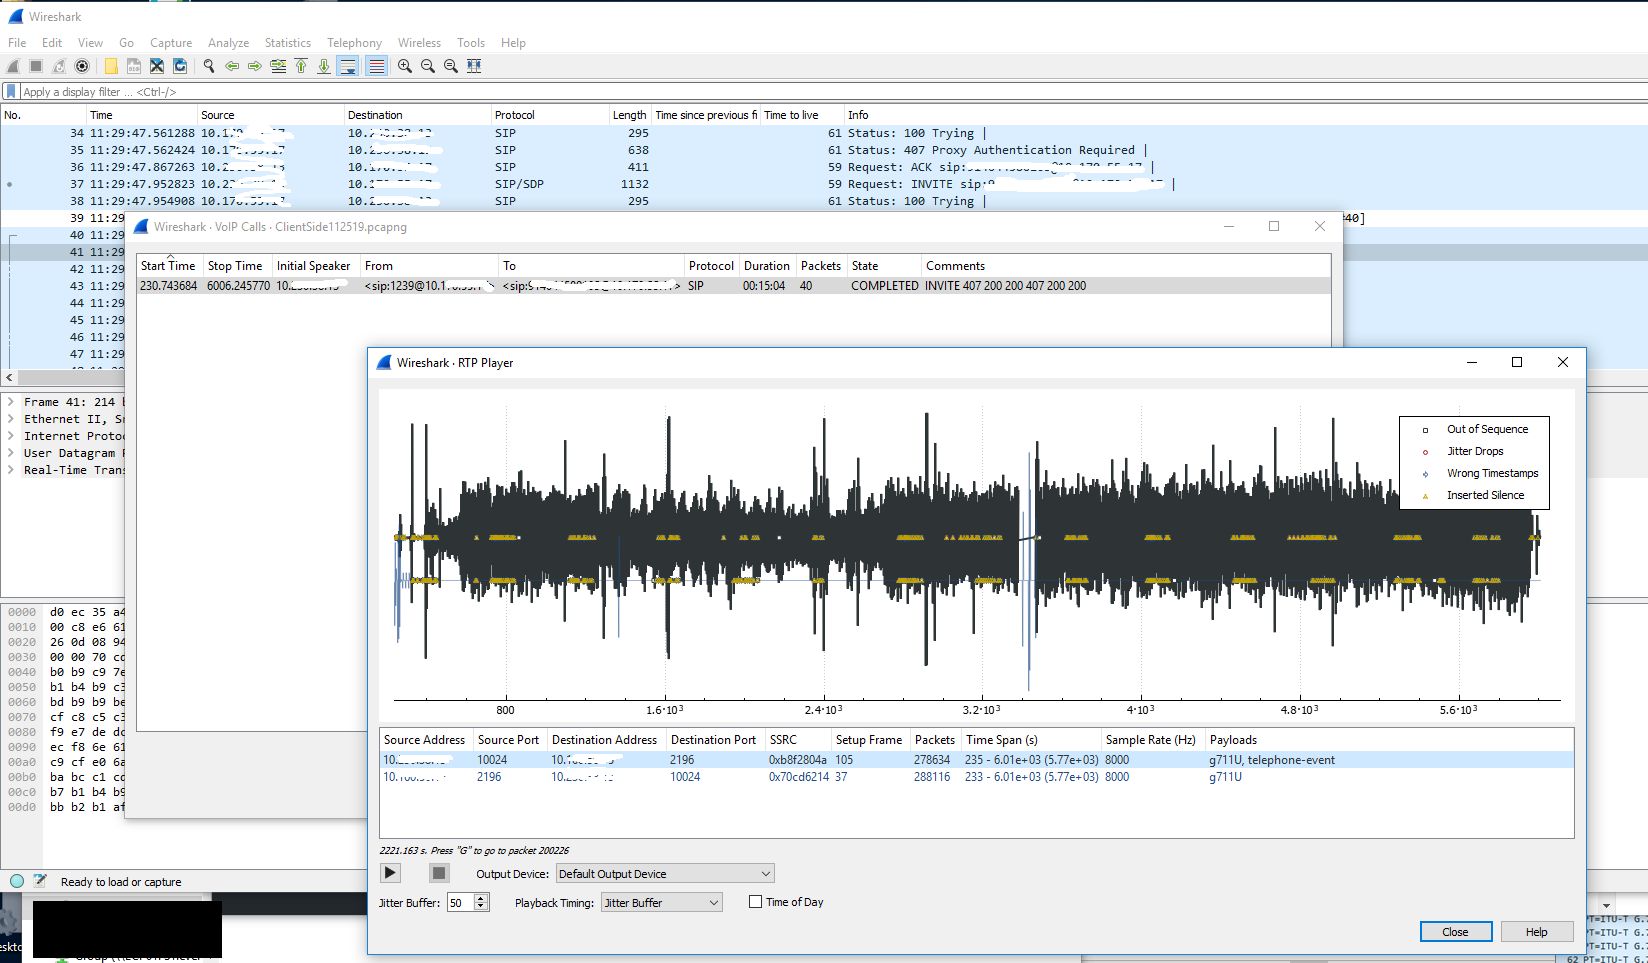
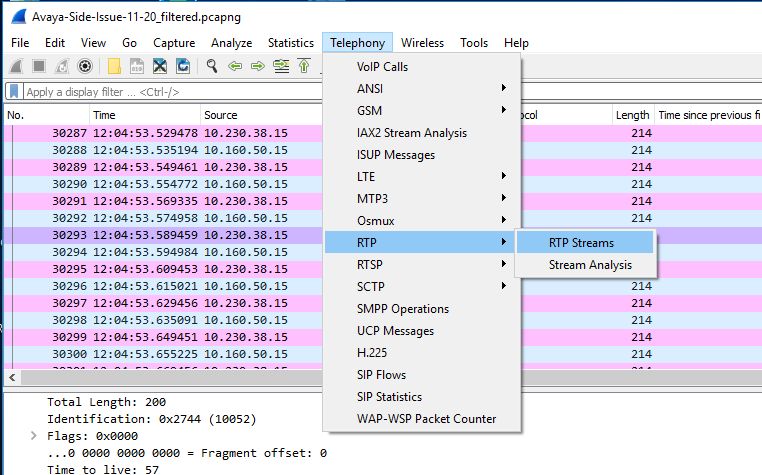
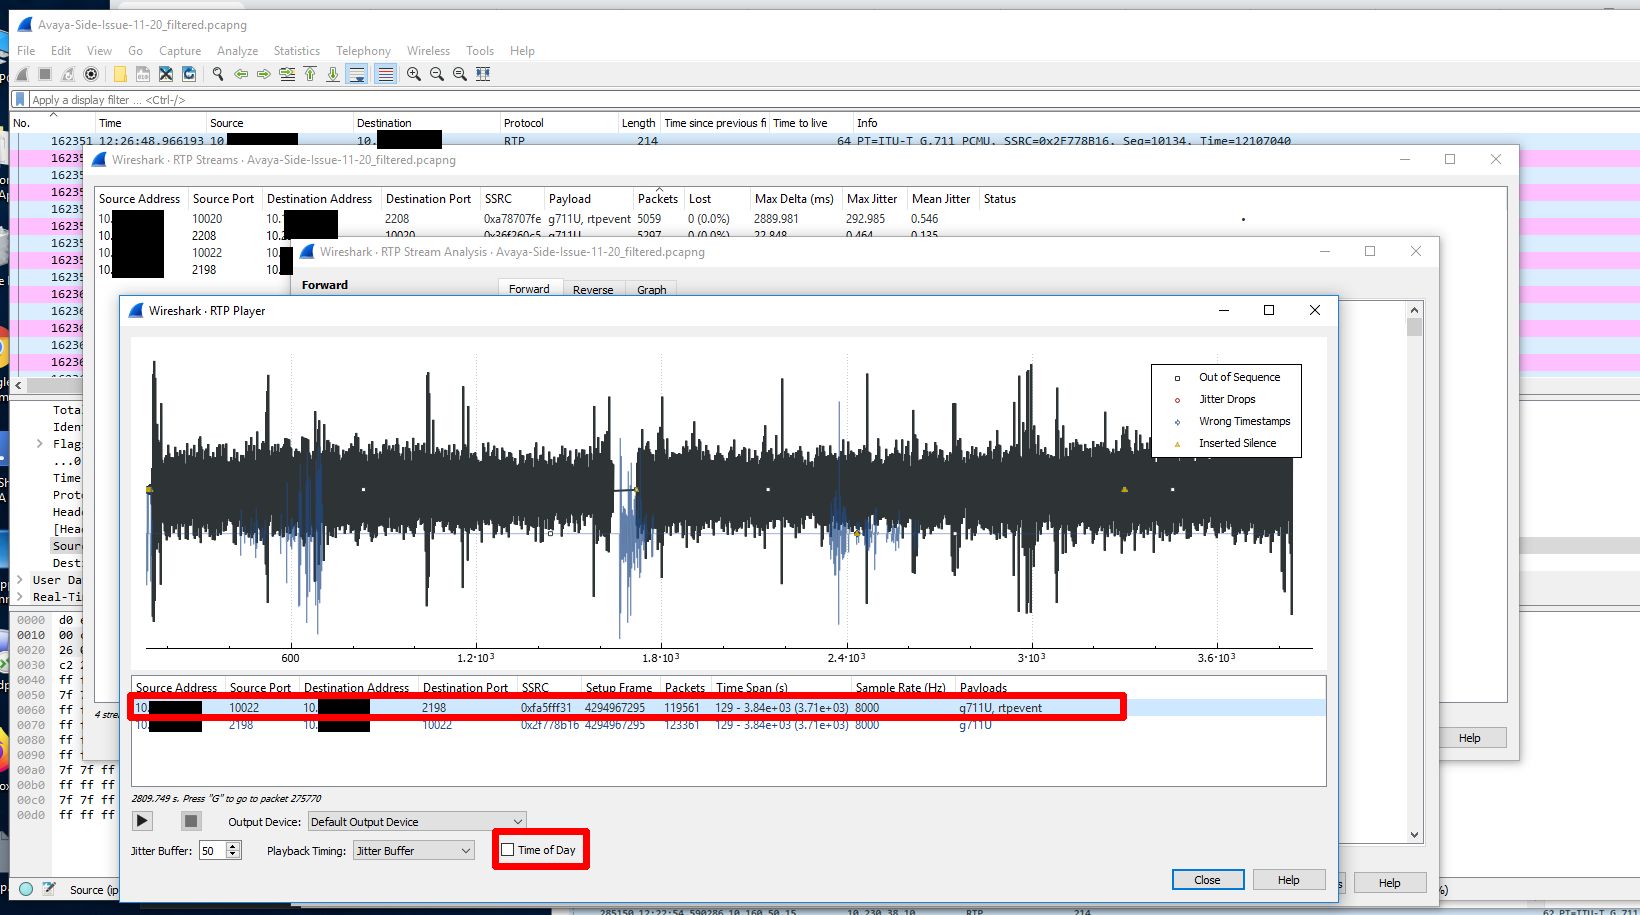
My company recently started using new Biamp TesiraFORTE devices for their newer conference rooms. I have little experience with VoIP (besides my fun with Google Voice and GVSIP) or these types of devices, but I was asked to assist in diagnosing a strange issue where audio going from the Biamp device to the Avaya gateway would randomly cut out for 1-3 minutes. Audio going from the gateway to the device would continue to work during this drop. I started by looking at a Wireshark capture of a span port of the Biamp device. This trace initially looked fine to me. I was able to view the RTP traffic and use the RTP player (Telephony -> VoIP Calls). During the time of drop there was no loss of audio.
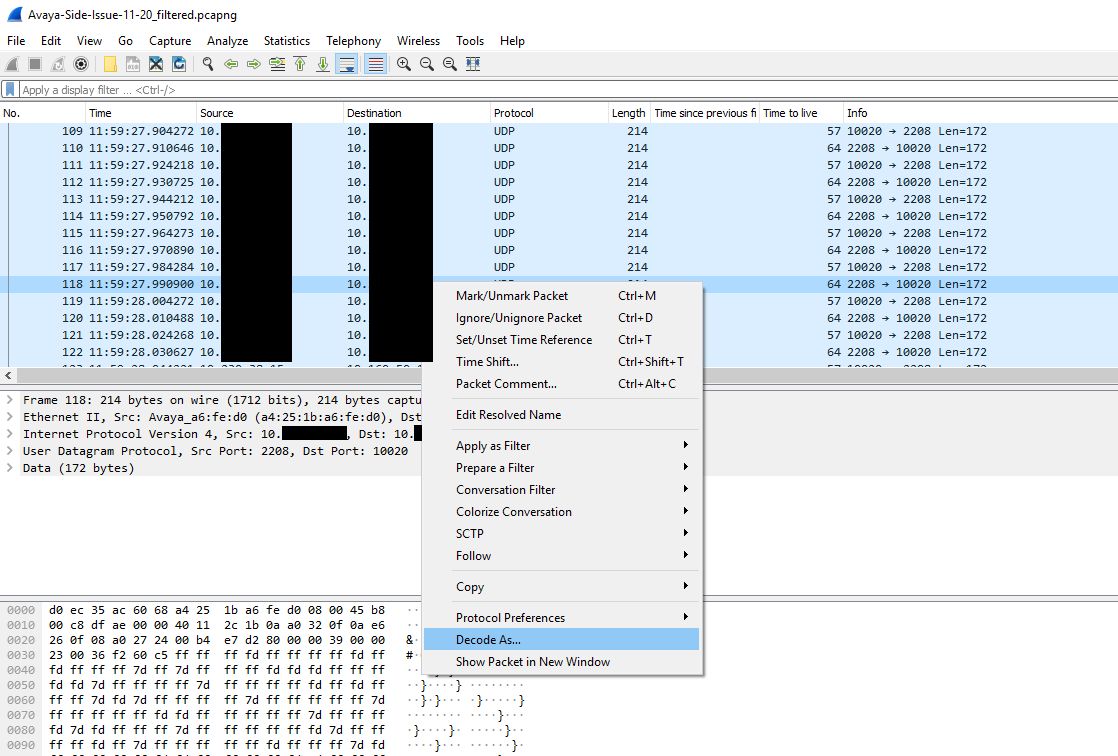
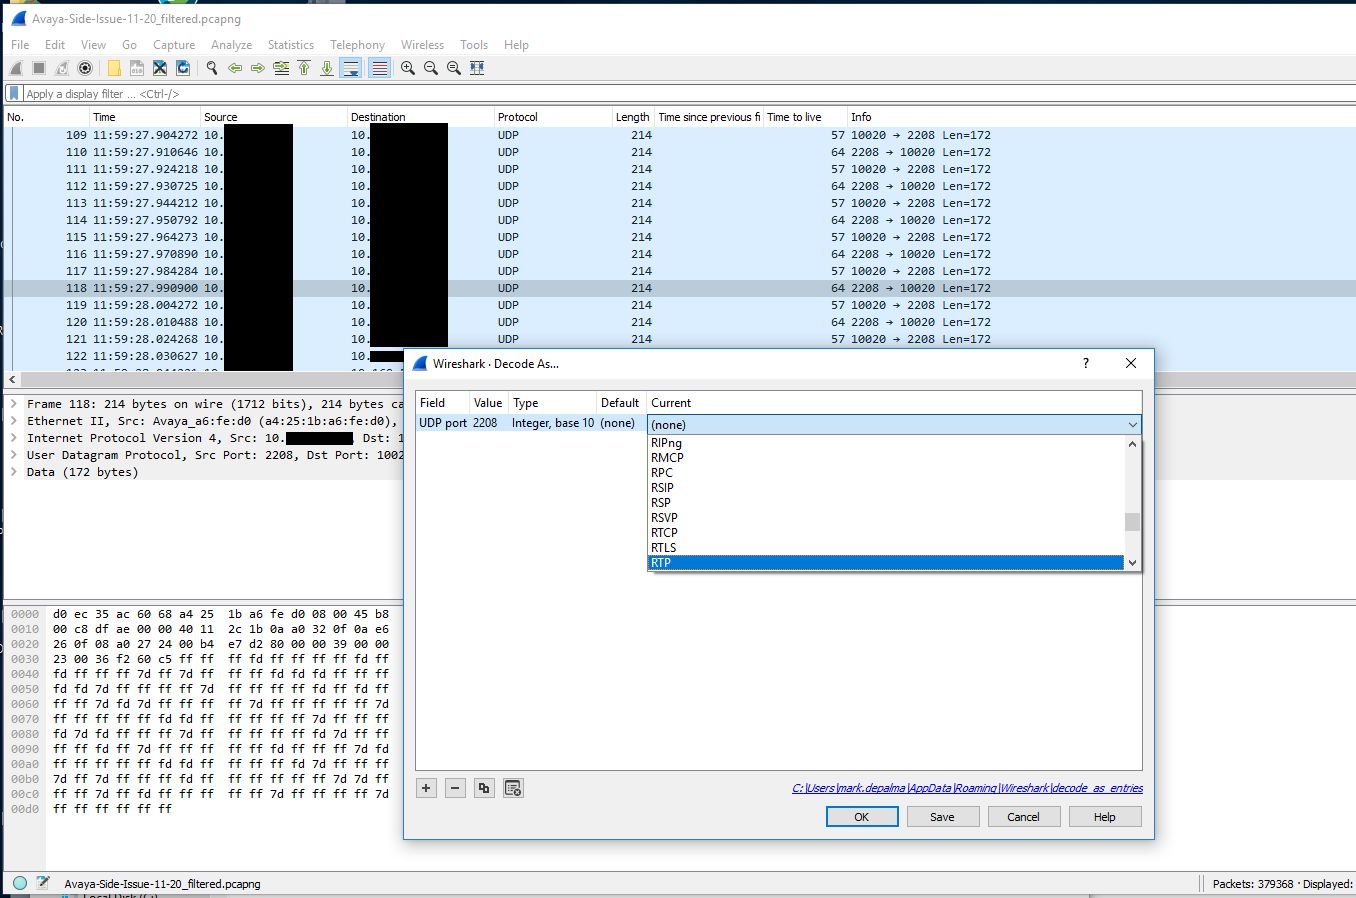
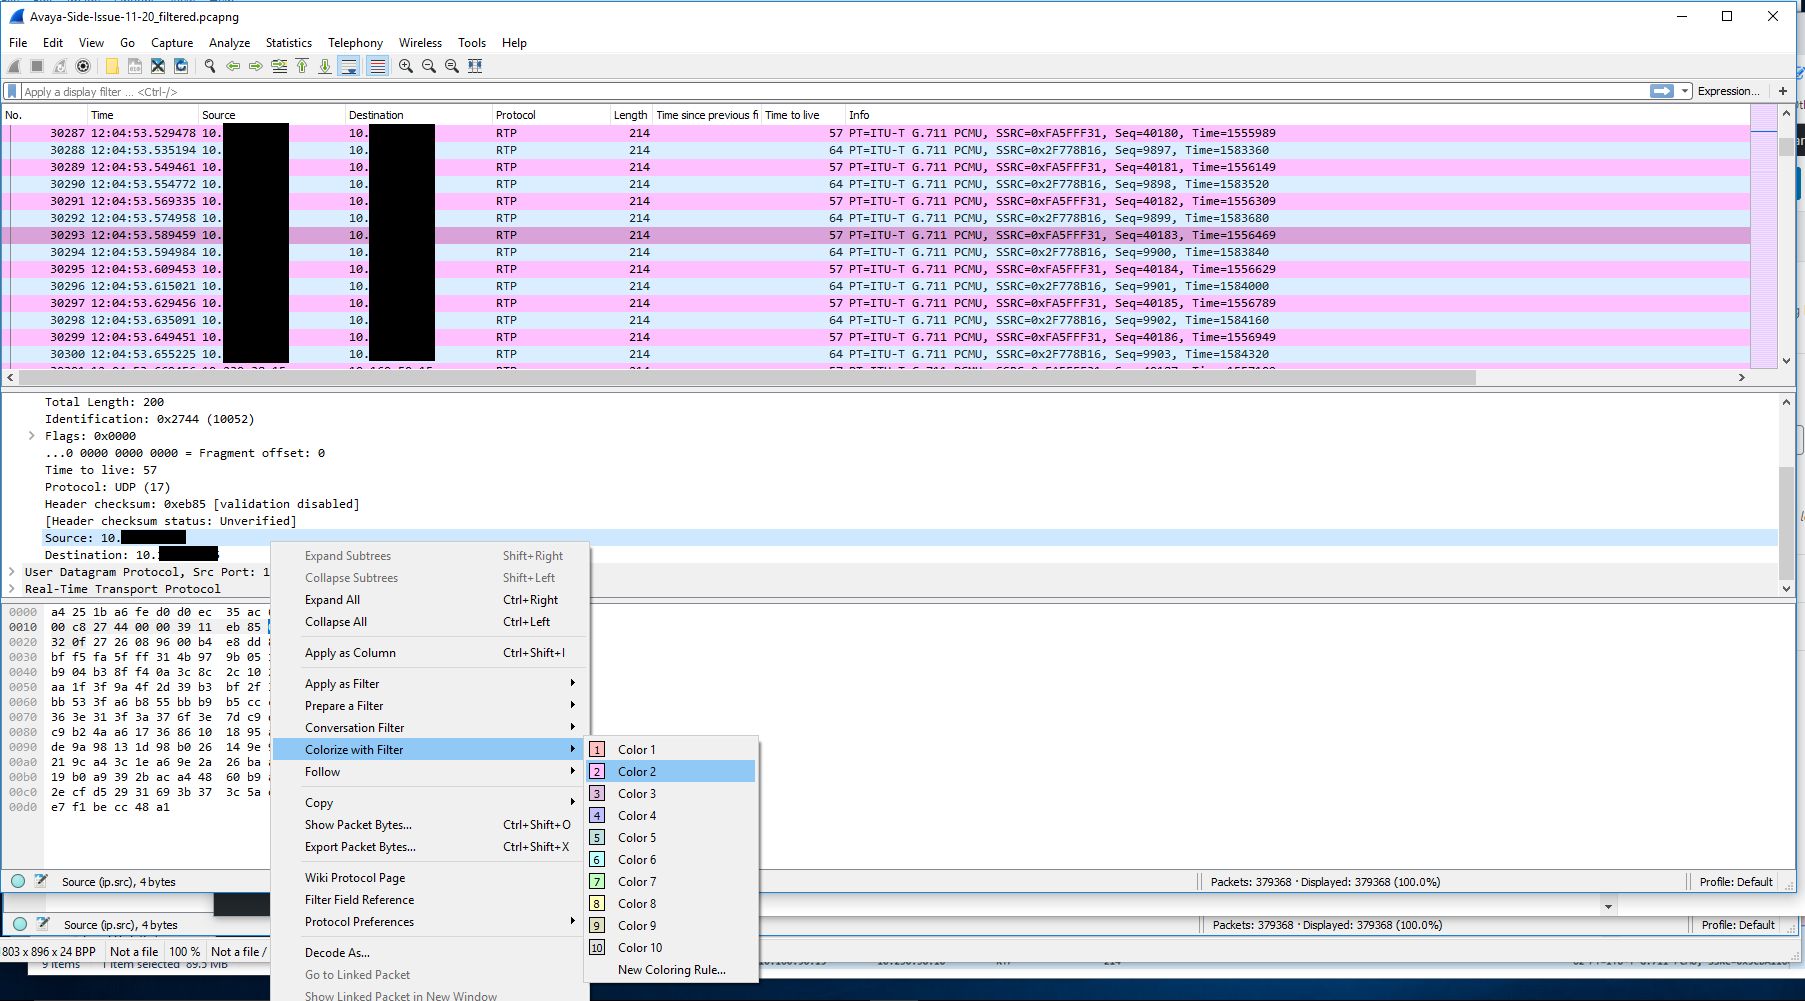
The next step was to get a trace of the other side involved. To do this we created a span of the interface on the switch that the gateway was sitting on. We then ran a packet capture of that, but using a capture filter to reduce the size of the capture since many other devices (mainly phones) were communicating with this gateway. We just used the filter ‘host <IP address of Biamp device>’ as the capture filter. I colorized traffic Biamp -> gateway traffic in this capture to make it easier to read. I also had to decode the traffic into RTP since the gateway traffic didn’t contain the initial SIP handshake.
After decoding the raw UDP traffic into RTP traffic and colorizing the Biamp -> gateway traffic we are left with a nice back and forth to look at.
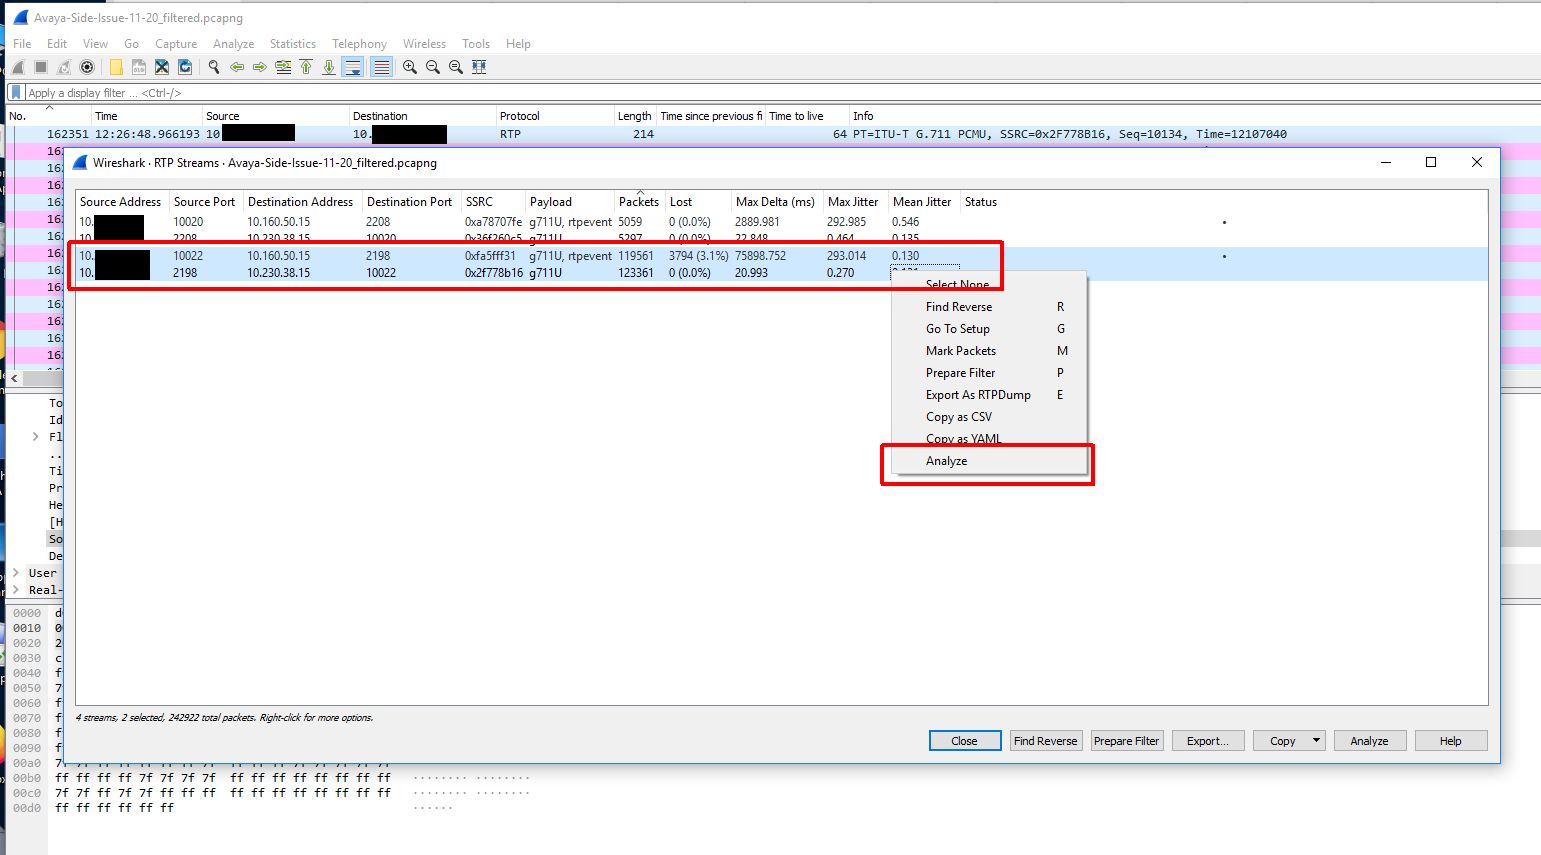
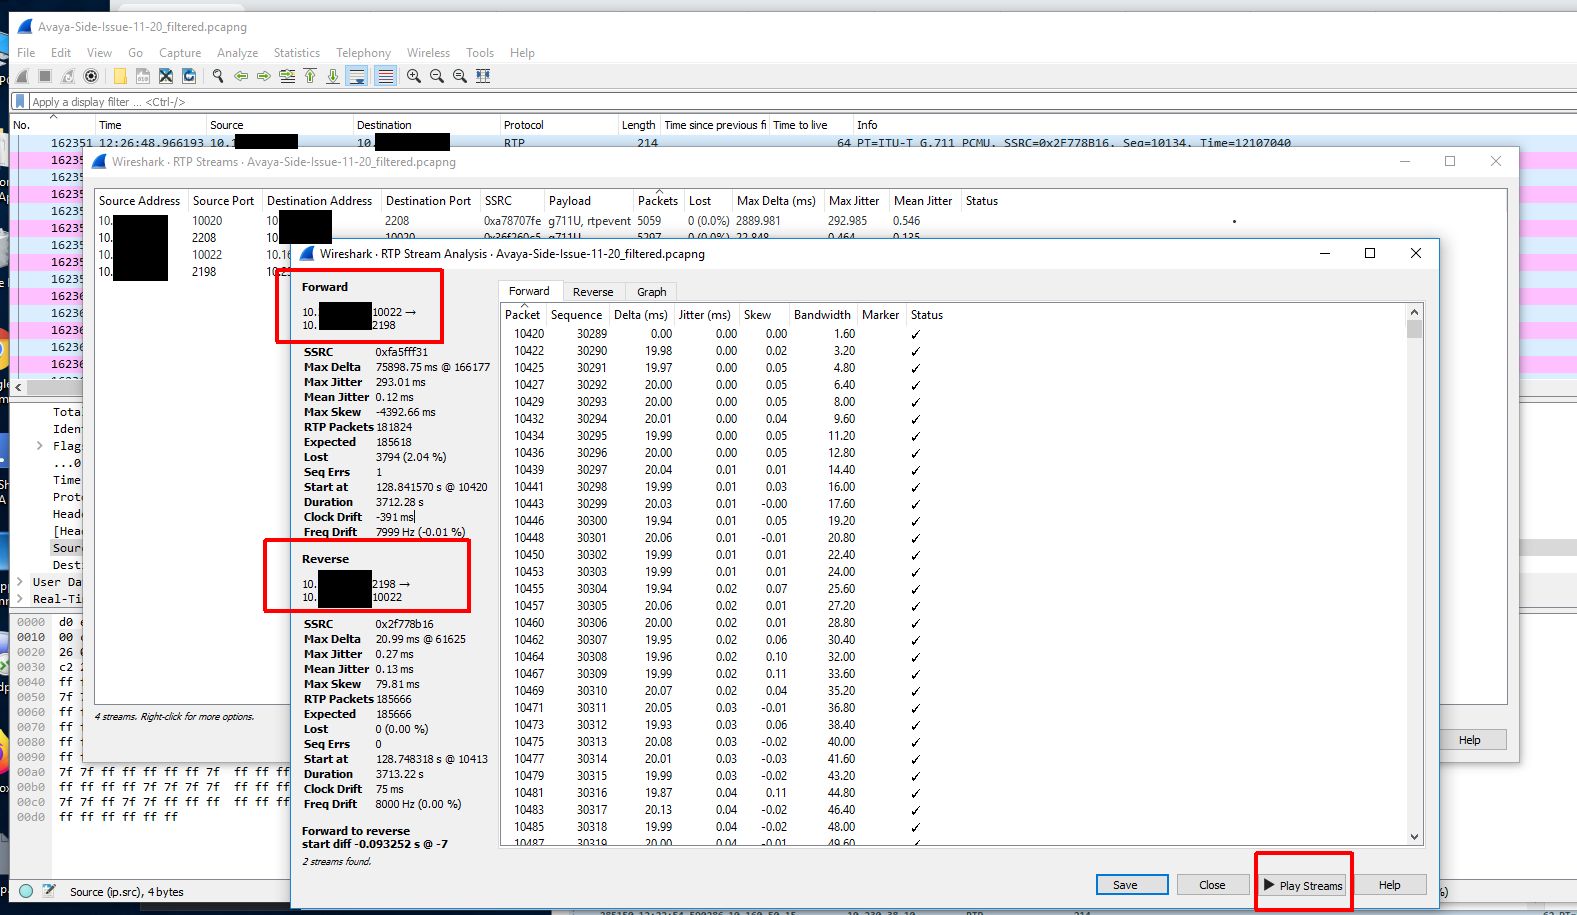
Because we didn’t capture the entire SIP handshake (the SIP gateway actually being dialed is another gateway in a different datacenter and that SIP gateway is actually handing off the call to a local gateway in the same building as the Biamp device) we need to reconstruct the RTP streams to be able to view them on a graph and play them back.
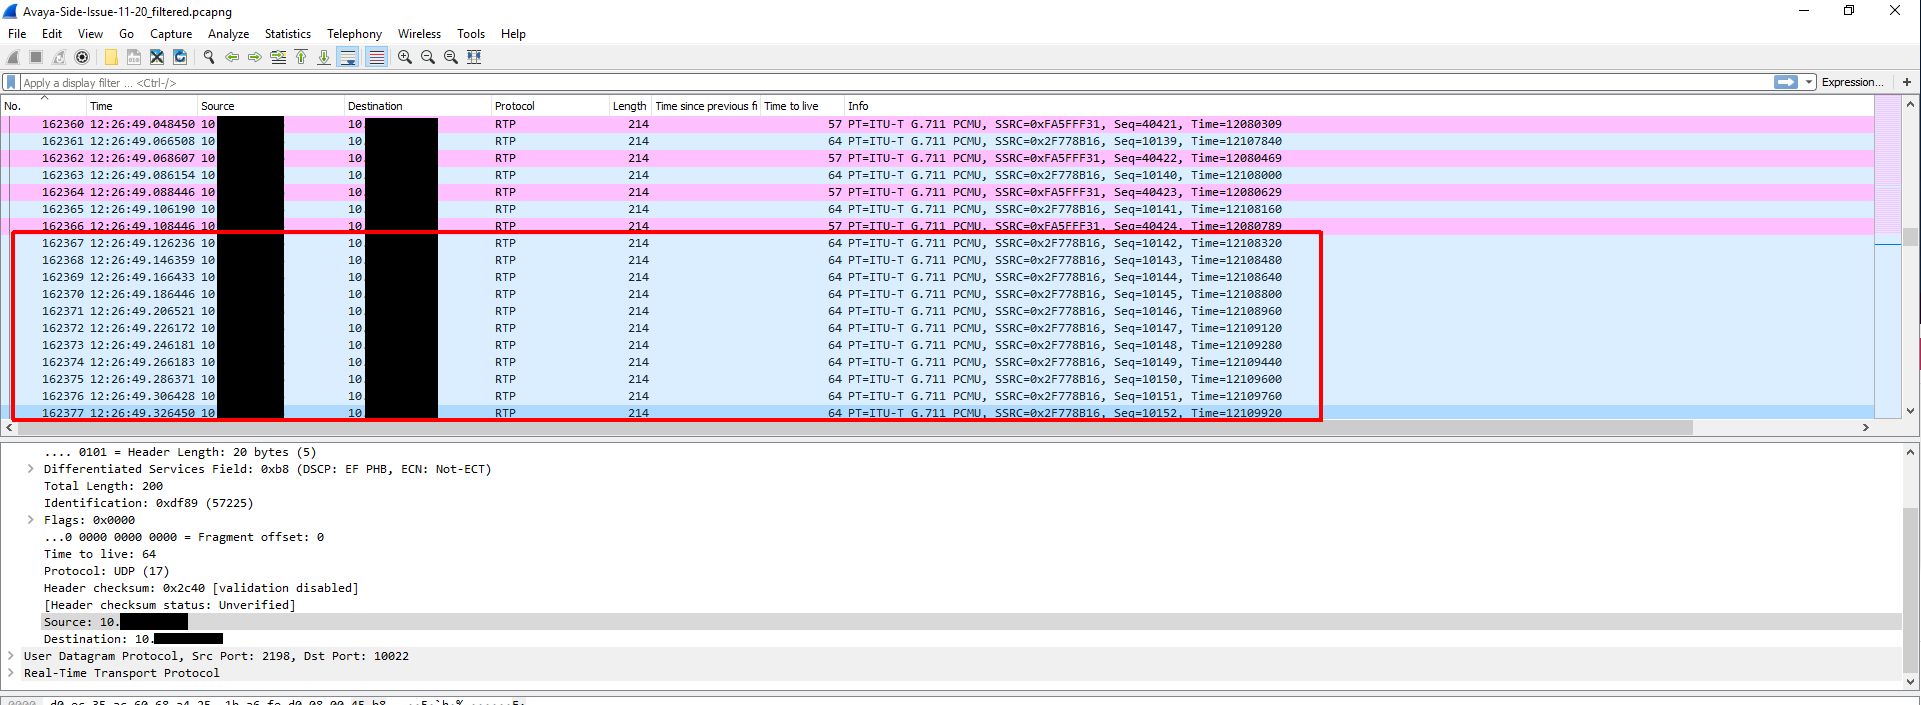
Now that we have a nice graph to look at and audio to look at we can hone in on the time of the audio loss which was about 12:26PM. When we do this we can clearly see a loss of sound and traffic at that time.
Now that we have this we can confirm that traffic isn’t actually getting to the gateway and it is not a problem with the gateway. This means somewhere between the first switch and the last switch in the path the traffic is being lost. The next step was to create a span of the trunk leaving the first switch (the switch that the Biamp device was sitting on). We actually saw the same loss of outbound traffic here as well. When the Biamp devices were installed they were actually hard set with a 100mb/full duplex configuration because they supposedly weren’t negotiating correctly and were negotiating to 10mb/half duplex. I decided we should work on that because hard setting like this can actually hide interface drops. After resolving this issue we realized the negotiation issue was actually a cosmetic issue in the configuration GUI. We upgraded firmware on the device to resolve this issue.
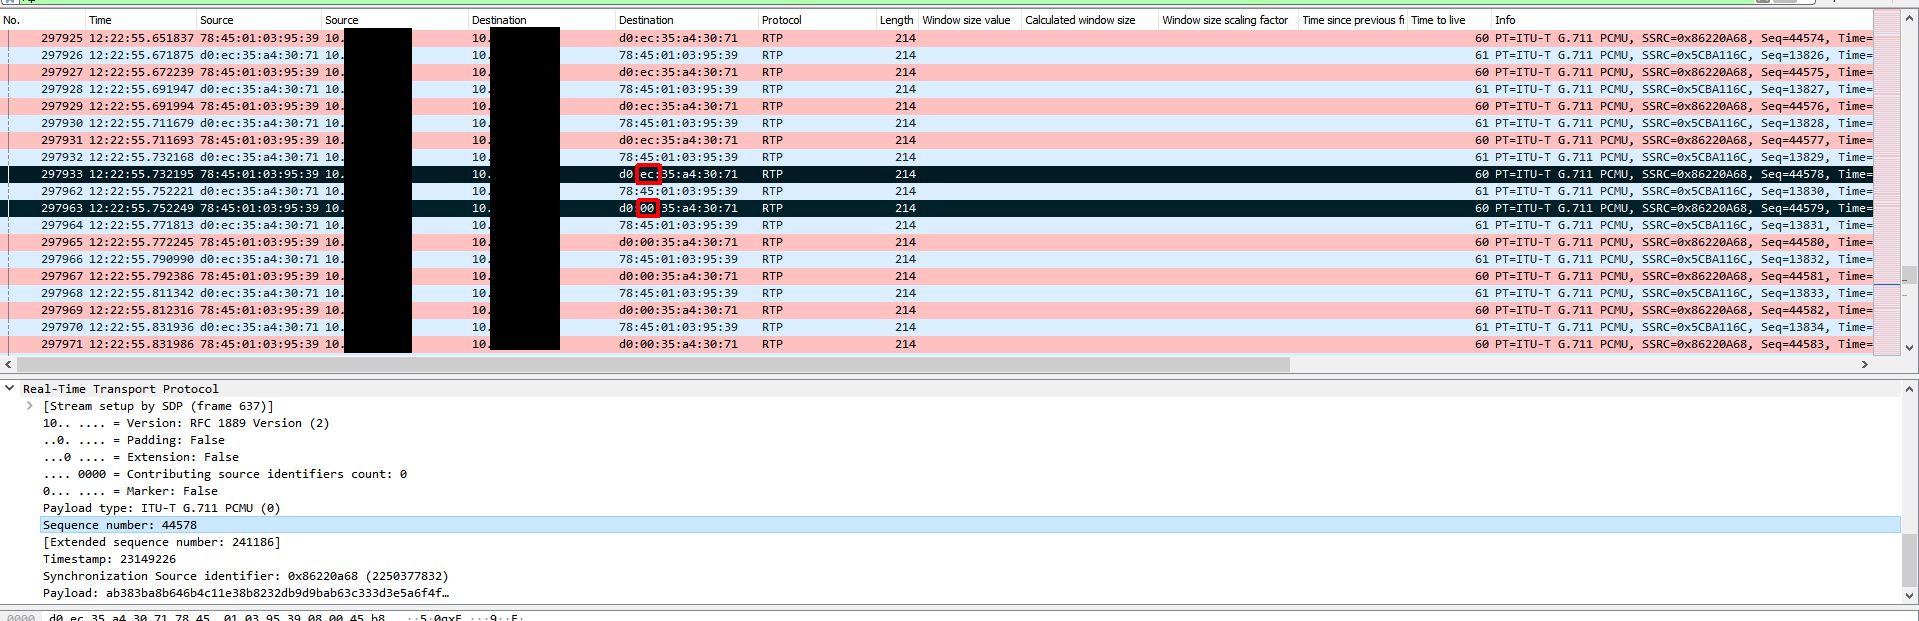
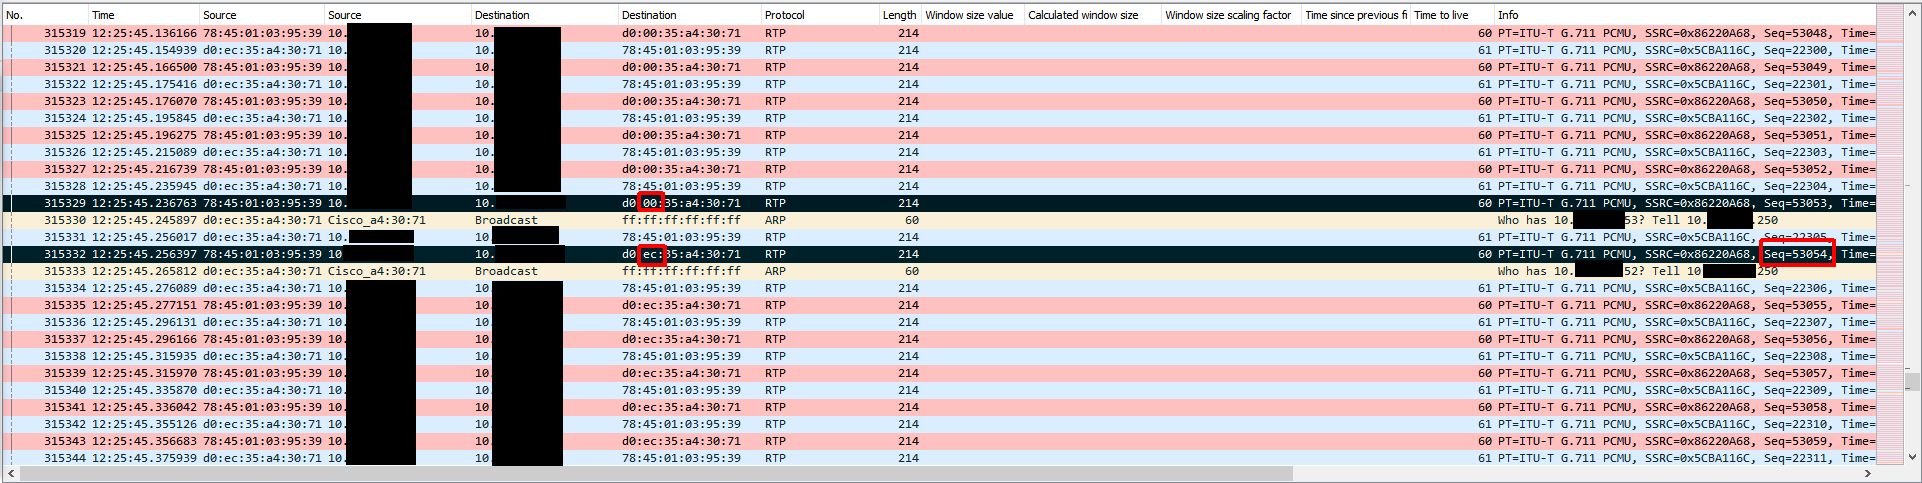
At this point I was a little baffled and had to retrace my steps since this wasn’t making any sense. To do this I took the last received RTP packet before an instance of audio loss on the gateway side capture and made note of the RTP sequence number. I used this sequence number to locate the outgoing packet on the Biamp device capture. I then marked this packet and marked the very next outgoing packet and started comparing them. This is when it got interesting. The destination MAC address changed between the two packets and remained that way for the duration of the audio loss. What made it even more interesting is the only thing that changed in the MAC address was the second byte which went from EC to 00. This MAC address was the address of the VLAN SVI (gateway). At this point I created new columns that included MAC addresses in my Wireshark view.
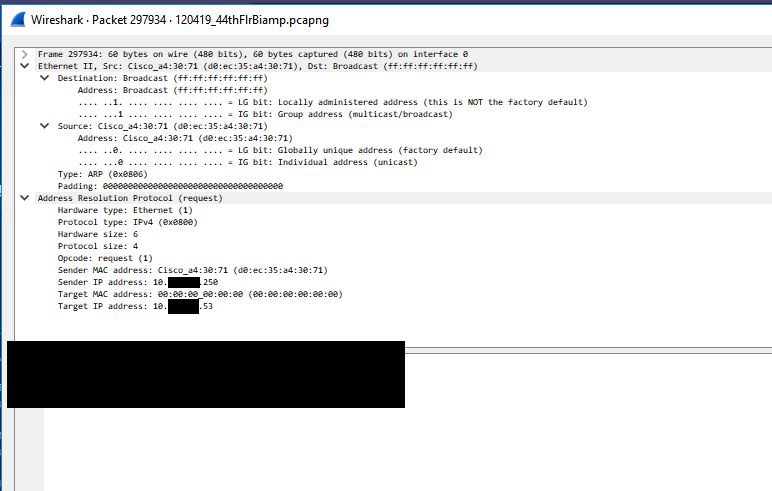
To figure out what could have caused this let’s keep this first marked packet highlighted and remove our filter (I was filtering down to SIP + RTP traffic in most of these screenshots) to see all traffic on the Biamp device span. The ONLY traffic that is visible to the Biamp device in between the last ‘good’ RTP packet and the first ‘bad’ RTP packet is a series of ARP request broadcasts from the switch. These ARP requests were normal requests looking for who had a series of IP addresses. It seems that when the Biamp device sees a number of these ARP request broadcasts it relearns the switch’s MAC address incorrectly or these APR request broadcasts somehow trigger a software bug that essentially poisons the Biamp device’s ARP cache by causing that second byte to go from EC to 00.
Even though it is normal and shouldn’t cause any issues we traced the reason for these ARP requests back to a network scan happening on this subnet at the time. None of these IP addresses are valid addresses and network scan is what triggered the switches to start searching for these addresses via ARP requests. Below is one of the ARP request packets. There is nothing in this packet that references the ‘bad’ switch MAC address with the second byte having 00 instead of EC.
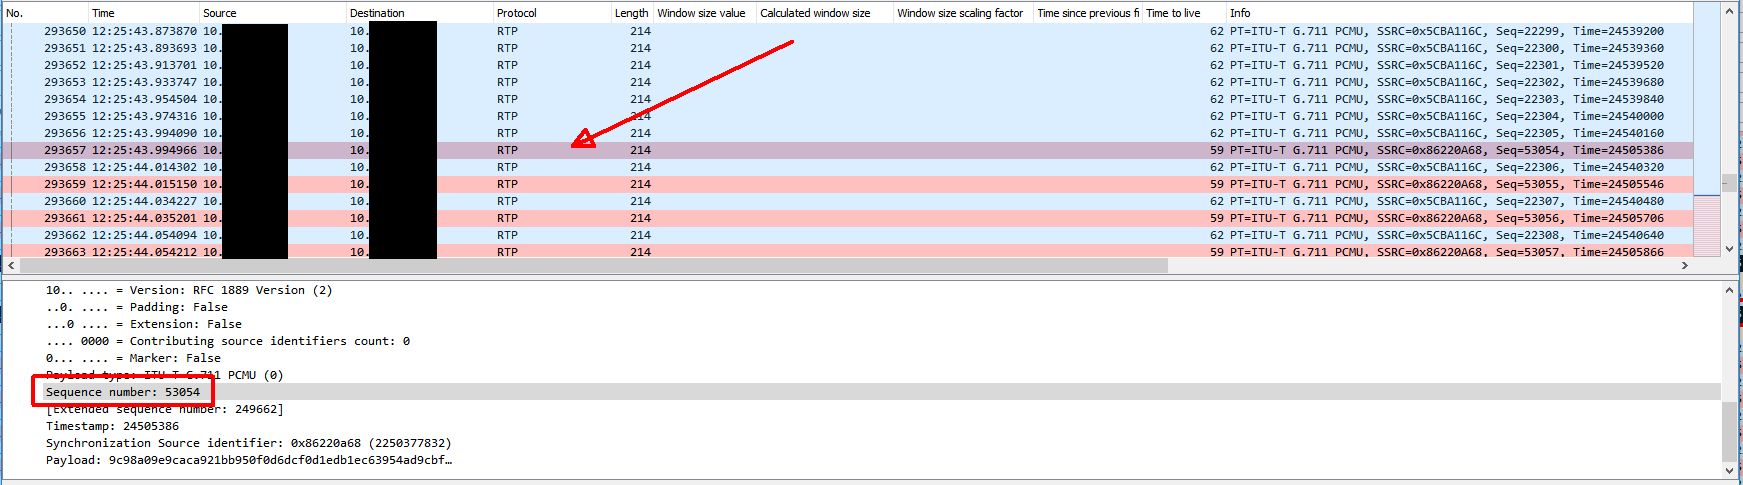
The next thing to look at is what actually causes the audio to be restored after a few minutes. Below is the same trace, but later on when the audio loss ends. The first marked (black) packet is the last ‘bad’ RTP packet and the last marked (black) packet is the first ‘good’ RTP packet when audio is restored. With no filter applied we can see that the ONLY thing happening between these two packets is ANOTHER ARP request broadcast. This ARP request seems to cause the Biamp device to re-learn the switch’s MAC address properly which restores RTP traffic delivery. The first ‘good’ RTP packet is the RTP packet with sequence number 53054. We can use the capture on the gateway side to find this packet.
With this new knowledge we were able to reproduce the issue on demand by scanning 20-30 non-existent IPs on the subnet which triggered the ARP requests. We could then restore audio by doing the same scan. Sometimes it would take a few extra scans to trigger the behavior.
We handed all of this information off to Biamp and they are still investigating the issue. When they come back with more information and/or a resolution I will update this thread. An important lesson here is to pay attention to the details. I technically had all the data I needed to figure out the issue in the original capture on the first day I was involved, but I wasn’t forced to look more closely until I looked at many other things.
UPDATE (2/7/20): Biamp eventually was able to reproduce the issue in their lab after we handed over the findings. They have since released a firmware update (3.14.1) that resolves this issue. The fix is listed as ‘Fixed issue where unsolicited ARPs impact the VoIP ARP table‘.
As part of piloting O365 I was tasked with implementing hybrid modern authentication in our Exchange org in order to leverage functionality like the Outlook mobile application and MFA within the Windows version of Outlook for on-prem mailboxes. One caveat of enabling hybrid modern authentication in Exchange is that once this is flipped on any compatible client (ex. Outlook 2016) will begin using modern authentication (ADAL) exclusively by default. This switch can potentially be disruptive and we did not want to run into issues with the general user base. To do this we needed to disable modern authentication in Outlook on the client-side while being able to selectively enable it for certain users. This is easily handled with a ‘EnableADAL’ registry setting via GPO/Group Policy Preferences (GPP)/AD group. The issue is when you use an AD group with a group policy any member addition/removal needs to be coupled with a logoff/logon (or a reboot if it involves in a computer object in an AD group) to generate a new Kerberos token. I wanted to be able to quickly enable/disable ADAL for a user without requiring them to logoff/logon.
In order to get around this requirement I used GPP targeting with an LDAP query that looked for the group membership rather than standard group membership check. This LDAP query is completely dynamic and isn’t tied to the group list in user’s Kerberos token.
To do this you can do the following:
Create your GPP setting
Enable ‘Item-level targeting‘ on the setting
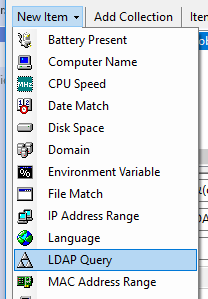
Create a new ‘LDAP Query‘ item
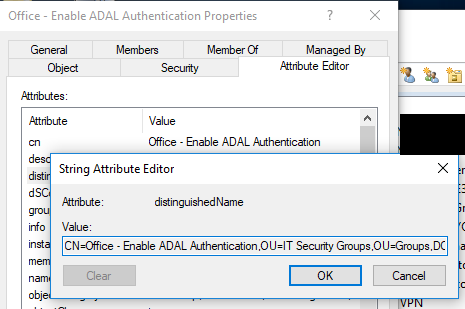
Create your filter using the distinguished name of your AD group and the ‘%LogonUser% variable
Create LDAP QueryCreate LDAP Query conditionRetrieve group distinguishedName
This method could also be used for traditional GPO settings as well, but you’d have to use GPP to directly target GPO registry value(s) (ex. HKCU\Software\Policies\Microsoft\Windows\Control Panel\Desktop – ScreenSaveActive=0/1). This method could also be used for computer-based settings, but the LDAP query would have to be adjusted to target a ‘computer‘ objectCategory and the name of the computer (%ComputerName%). I wouldn’t use this method for everything, but can be very helpful for those one-off situations where you want a setting to take effect immediately without requiring a logoff/logon or reboot.