I recently was doing a PoC for Microsoft Purview Information Protection and when I started I realized I was no longer able to see sensitivity labels in the desktop version of Office. I had access to them months back without any issue. Of course I had already followed instructions on creating and publishing the labels to my user account. When I checked Office for Web, the button was available and functional. This issue was specific to desktop C2R Office clients. While troubleshooting I decided to turn off TLS decryption (handled by our Palo Alto firewalls) just to rule it out and to my surprise the button became available. When I looked at the firewall logs while decryption was on, I noticed some traffic failure hits for a sub-domain under protection.outlook.com. I looked through the documentation and eventually found this in the Azure Information Protection documentation:
Unified labeling client. To download labels and label policies, allow the following URL over HTTPS: *.protection.outlook.com
Sadly, the documentation says nothing about this needing to be excluded from any firewall/proxy inspection. The only mention of excluding hostnames from inspection was this (which we were already doing):
TLS client-to-service connections. Do not terminate any TLS client-to-service connections, for example to perform packet-level inspection, to the aadrm.com URL.
We actually did have a specific sub-domain under protection.outlook.com excluded from decryption, but that was not the one being used. I removed the specific sub-domain, added *.protection.outlook.com, and everything was working after that. I tried to log a case to force Microsoft to update their documentation, but I got the usual runaround and they have yet to update.
Over the last few months we have gone through a Defender pilot and rollout. I’ll admit I was surprised how relatively painless the rollout has been. Major problems were scarce and we have been able to enable most features for the general landscape. One feature that is not turned on by default that we decided to turn on was Network Protection. This features provides filtering and detection around web traffic. When we first enabled this in our pilot a number of us were on persistent Citrix VDIs and would randomly experience disconnects and reconnects to our machines. Sometimes this would go away for days or weeks and then randomly come back. Another issue we had was when we were trying to roll out Defender to some of our backup servers. These servers were physical servers with a number of iSCSI volumes mounted on them (using the Microsoft iSCSI Initiator). When the server would boot up they would hang at logon and the system event log would report a ton of iScsiPrt/Event ID: 9 errors around timeouts while trying to mount the storage. Both of these issues were immediately resolved simply by enabling asynchronous inspection. I have found almost nothing on the internet about this, but it resolved two major issues for us. This setting doesn’t seem to be exposed in GPO or other the other management methods and needs to be done manually on the machine. This setting can be enabled in PowerShell using this command:
I recently had a call with another company attempting to setup Autopilot following my previous post (Windows Autopilot with User-Driven Hybrid Azure AD Domain Join using Palo Alto GlobalProtect VPN). While speaking to them I learned that are currently using basic credentials (LDAP+RADIUS) with GlobalProtect and are only attempting to setup certificate authentication to get Autopilot working. They were still planning on having the user perform two-factor basic authentication after the Autopilot-based deployment. This configuration was the perfect use-case for GlobalProtect’s new “Use Connect Before Logon” functionality. This functionality was introduced version 5.2 and works by registering a Pre-Login Access Provider (PLAP). With PLAP you now have interactive access to the GlobalProtect client at the logon screen. A huge plus with this method is that it requires NO back-end changes to your existing GlobalProtect configuration. The functionality is completely client-side and only really requires an additional step during installation. This PLAP functionality works with basic credentials, certificates, and even SAML! I will be using basic two factor credentials below.
The first step will be to create a new GlobalProtect package in Intune. I am using the newest version below, 5.2.7. You can use the same steps for creating the package that I laid out in my first post, but we will be using an alternate wrapper script, InstallGlobalProtect_PLAP.ps1. InstallGlobalProtect_PLAP.ps1, will install GlobalProtect, set our default GlobalProtect portal, and register the Pre-Login Access Provider (PLAP). Everything else non-certificate related in my original post will still apply (ex. IntuneHybridJoinHelperInstaller.ps1).
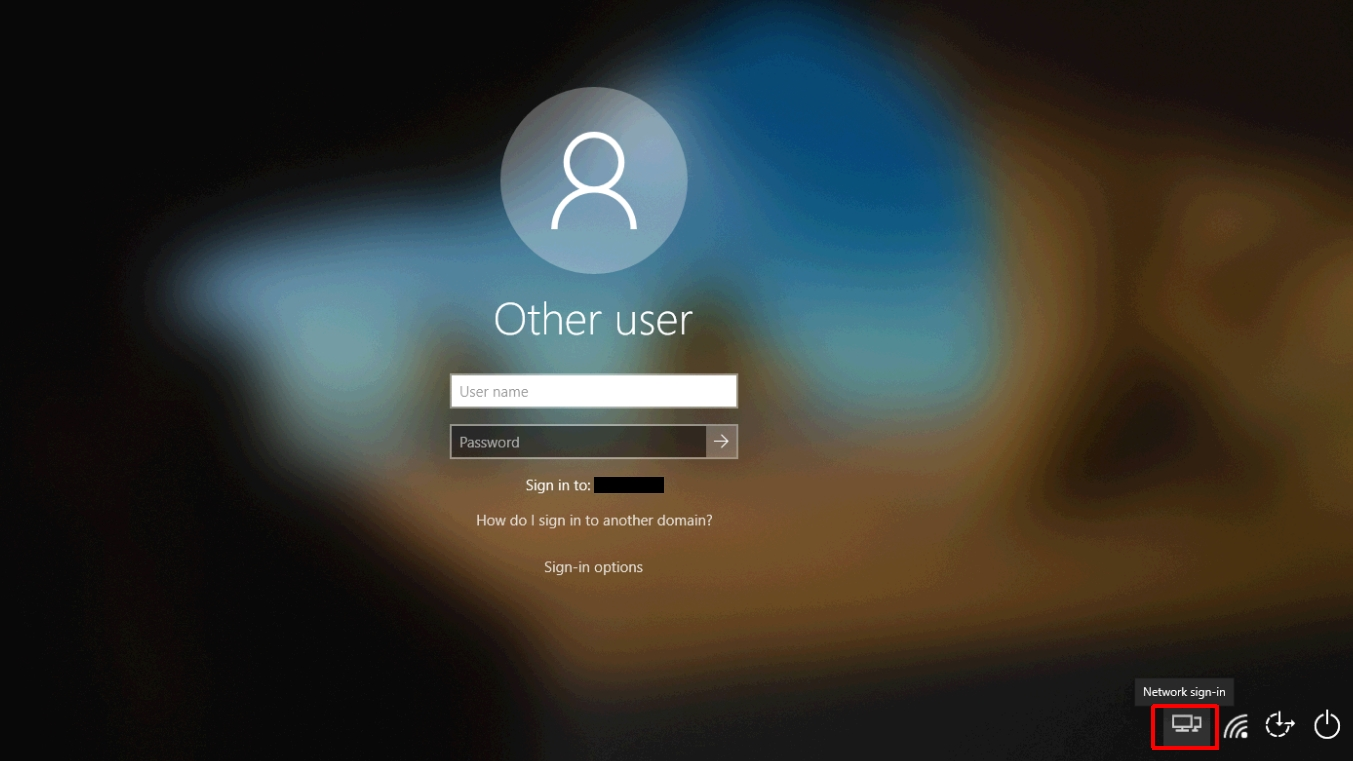
Once the machine has been deployed you will notice an extra button in the lower right. This is the PLAP.
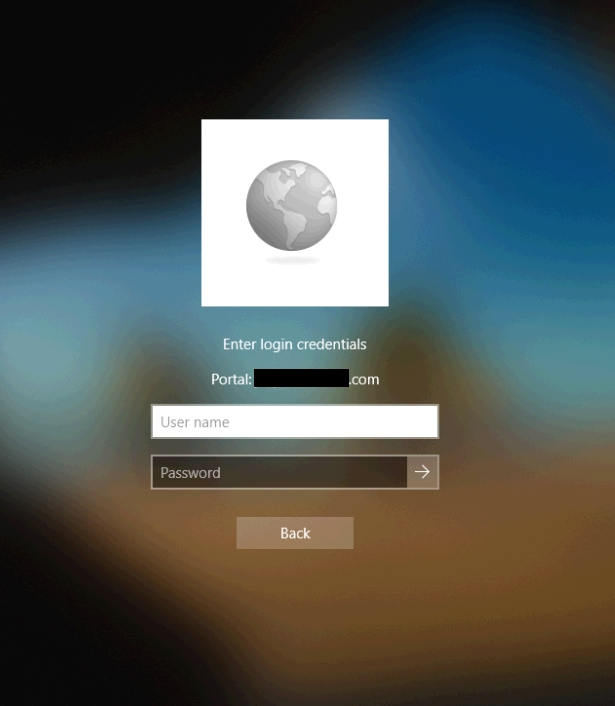
When clicked, GlobalProtect will attempt to connect to the portal configured in the wrapper script and you will be presented with a screen like the one below. The prompts here will vary based on your authentication method. Here I am being prompted for my LDAP credentials to authenticate to the portal.
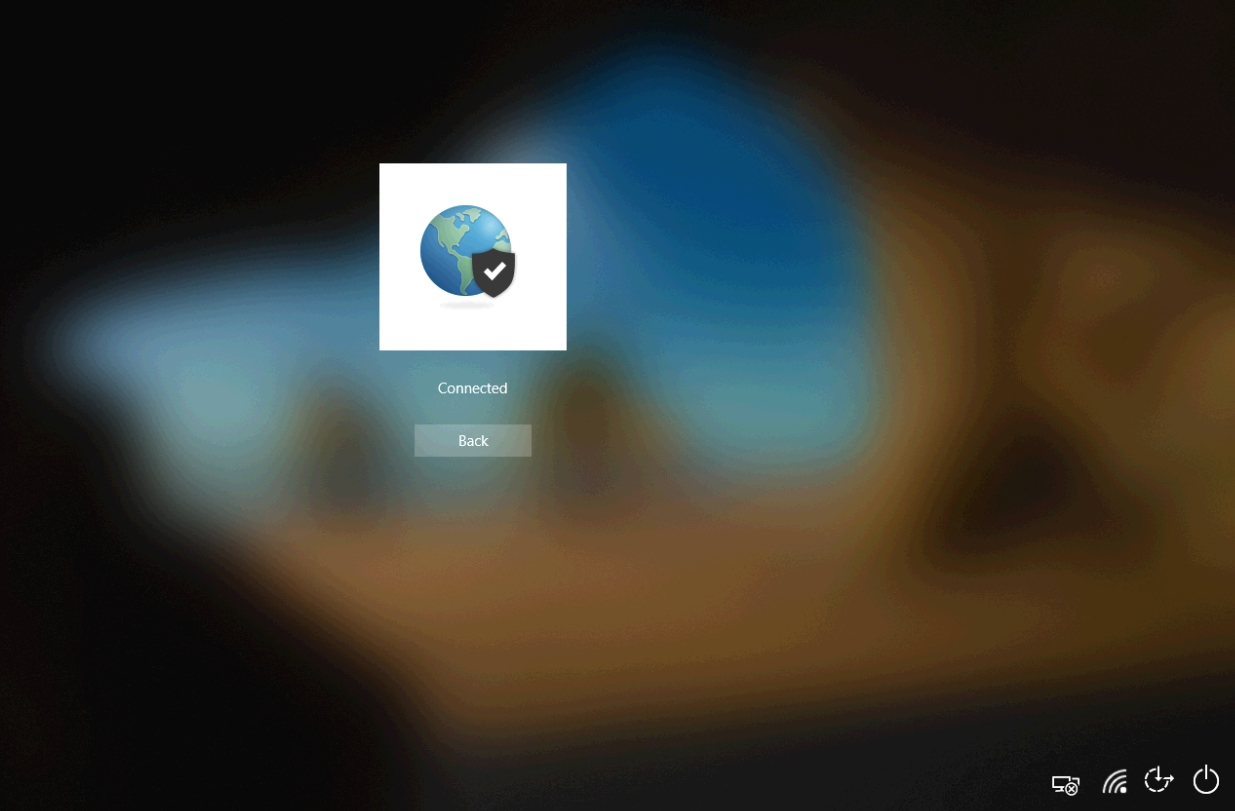
Once I passed the correct credentials here (and the correct second set of credentials at a second screen for two-factor) I was connected.
At this point you can click the ‘Back’ button and continue to log in to the device. That’s all there is to it! This is a great option for those of you who are lacking the desire to use certificates in your existing GlobalProtect configuration, but want to start using Autopilot.
Some months back I was faced with an interesting challenge in Microsoft Teams. How do we prevent chats for users that have access to an external tenant? The background here is that certain industries like mine require you to capture and archive electronic communications. Depending on how you interpret the requirement this could include chats taking place in a tenant other than your own. An administrator naturally has zero access to the data in a tenant other than their own. You can use tenant restrictions to prevent a user (who you have some network or proxy control over) from accessing a tenant other than your own, but there are cases where a user needs this access for external collaboration. The challenge here was finding a way to prevent certain actions while working in another tenant… and so came TeamsFirewall.
I started analyzing Teams traffic in my free time and got a feel for how it works. I quickly realized that I could approach the issue with a scriptable proxy server that supported HTTPS. I chose mitmproxy for this task. In the first iteration of the product I broke traffic down to actions (like sending a message or deleting a message) and location (internal tenant or external tenant). After I had that working I wanted to expand the functionality to control actions based on not only location, but on other things like conversation type and participants. After more development I came up with a process that learns the environment by looking at action -> conversation -> participants. The system caches API tokens from the users it supervises to make requests on their behalf in order to learn what it does not know about the environment. The product does not need any credentials or direct access to a tenant to function. This data is then saved in the cache database (teamsfirewall_cache.db). The cache is used for lookups so that faster decisions can be made on the fly. Cache lifetime of both the user table and the conversation table can be configured via the config file.
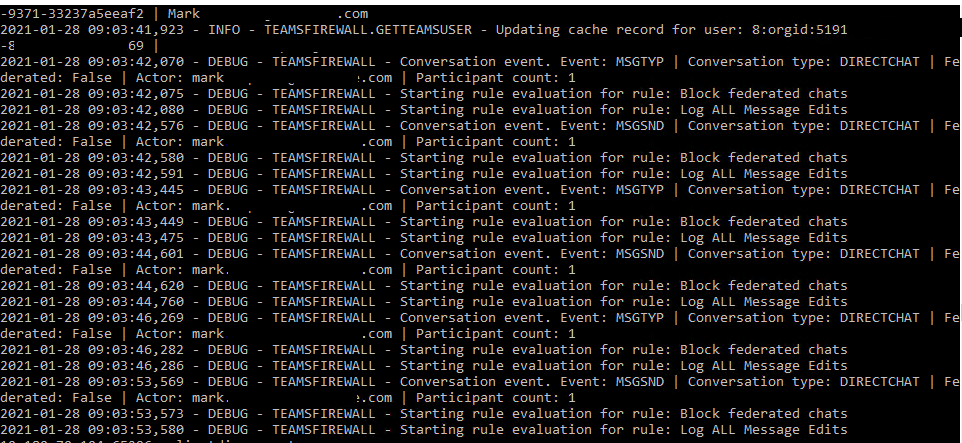
An example of console output with core level logging set to debug
The rule engine of the product allows for extremely granular rulesets. You can get as granular as saying user A cannot edit messages sent to user B or as broad as user A/B/C cannot communicate with anyone @companyA.com. I would like to note that M365 Information Barriers perform some basic ethical wall functions, but it does not have much granularity and does not address examples like the the one above with external tenants.
Some next steps are improving the scalability of the product and developing an easily deployable package. I am currently looking at adding an option to use a central database for the cache database and using Docker containers with a load balancer to add more workers. You can see some of this upcoming work in the TODO file within the project repository (below).
All development and documentation will be maintained at the TeamsFirewall GitHub here: https://github.com/markdepalma/TeamsFirewall. Please feel free to post issues/questions and contribute!
Back in April, at the beginning of the pandemic, I started putting a lot of focus into getting Windows Autopilot to work with Hybrid Join clients and Microsoft Always On VPN. I was looking at both for different reasons but also looking at them as a combined solution. The issue with Autopilot was that technically you were still required to have line of sight to a domain controller even though the domain join happened via an offline blob using the on-prem Intune connector. Sifting through logs I could see the only thing holding back a successful enrollment was a little function at the end of enrollment that was simply looking for a domain controller. I was able to sometimes get an enrollment to work via device tunnel MS VPN policies, but success wasn’t consistent and relied on policies/certificates coming down in a timely manner. In the logging I also saw references to a configuration parameter that would disable the DC check. Soon after, I found a post from Microsoft saying that they had this setting in private beta and would be releasing it in the coming months. After this I decided to put everything on the backburner and abandon MS VPN (I found the MS VPN solution using RRAS to be clunky and inconsistent with a lot to be desired).
Fast forward a few months and Microsoft finally released the new ‘functionality‘. At its core it is really just a flag telling OOBE not to perform a DC connectivity check. After enrollment is completed you are on your own to establish pre-login connectivity to facilitate an initial logon to your domain as there are no cached credentials yet on the machine. We are already a Palo Alto GlobalProtect customer and have been happy with the solution, so getting the two to work together just made sense. At the same time there has also been a push to implement a proper Always On VPN configuration. I’ll be writing a post dedicated to the full technical and security architecture around a cert-based Palo Alto Always On VPN configuration, so I’ll only briefly touch on the relevant parts here. Please refer to Palo Alto documentation on the missing pieces. There are a number of security aspects that should be taken into account like revocation, key storage, etc., and you should already have a proper certificate authority. I am not going over those in this article. You should also already have configured your Autopilot profiles, Intune Connector for Active Directory, etc. as per this document.
In this configuration I use a certificate-only approach (only using certificate profiles and no other authentication methods) for both the portal and the gateway. Remember, our first GlobalProtect connection after an Autopilot enrollment will be a pre-logon connection via certificate. There are no other authentication methods available for this first connection and the portal -> gateway authentication flow needs to support this. Before configuration of the portal and gateway you need to configure zones, interfaces, policies, and a certificate profile. These steps are documented here (steps 1-3 and 5-6).
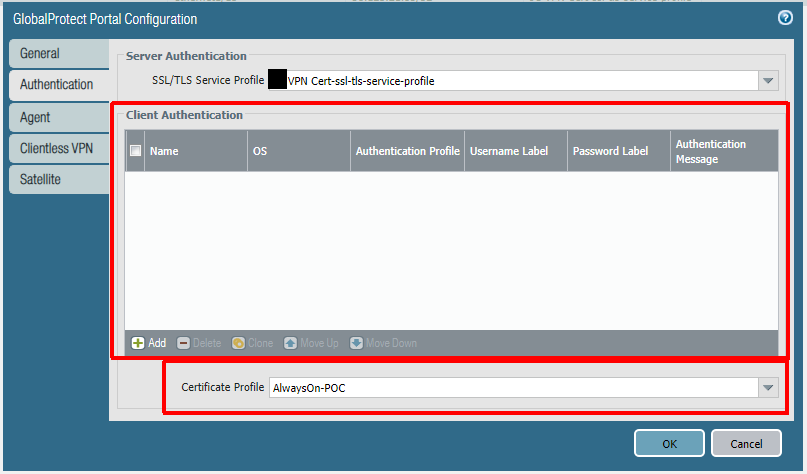
Below is the portal config. Notice how there are no client authentication methods present. If you were to add any method here, it would be layered on top of the certificate authentication and would prevent the pre-logon connection. PAN-OS 9.0 has implemented mixed authentication support so that you can implement an either/or type of configuration here. The other important note is that your user connection (post-logon) will be connecting to the same portal/gateway and because of this we will be using certificates for the user as well.
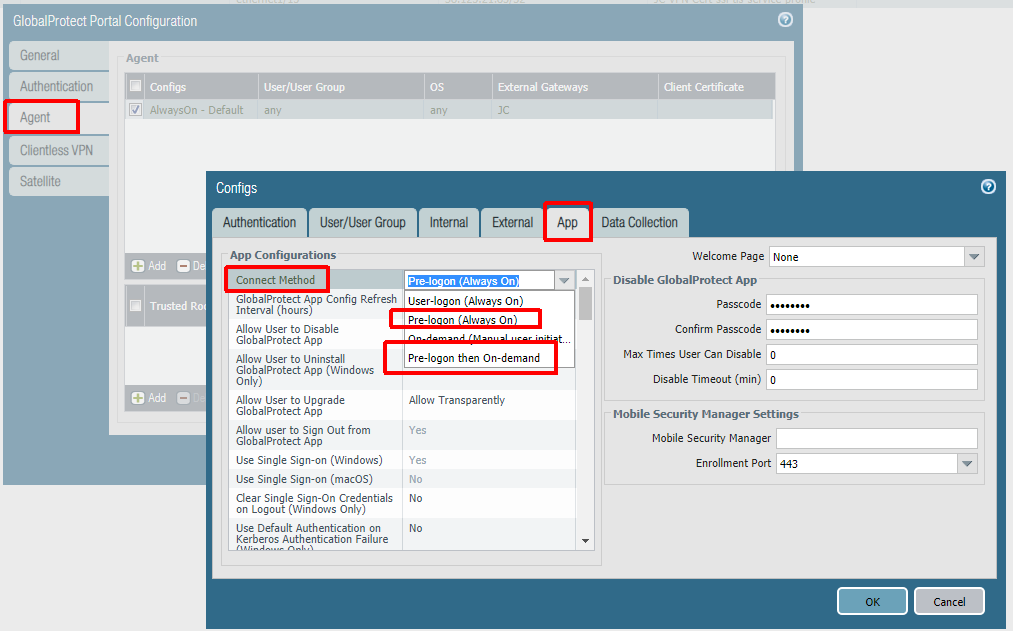
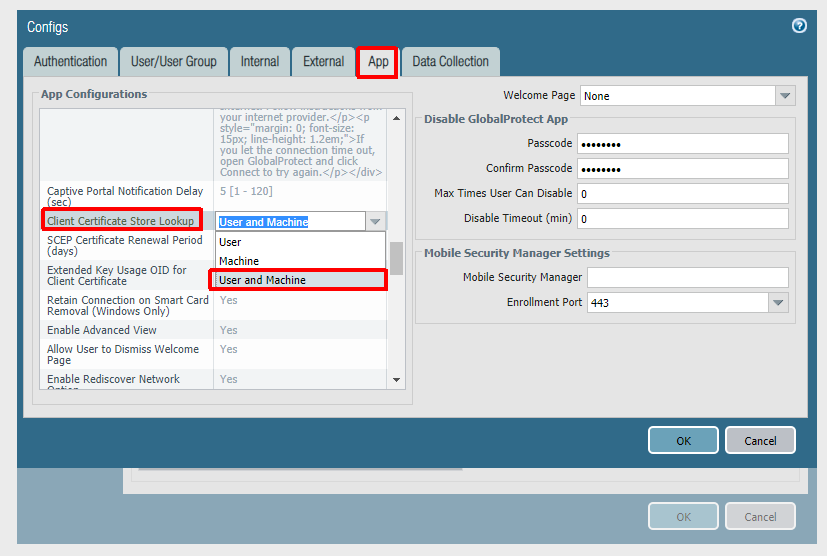
The next step is to configure the agent settings within the portal config. Our config is being configured as Always On, but this is not technically required for Autopilot to work. If you do not want an Always On user connection, set ‘Connect Method‘ to ‘Pre-logon then On-Demand‘. Some Palo-Alto documents mention using multiple agent configurations for pre-logon and post-logon that use different connect methods, but this is not necessary here (and will not always work as expected due to the order of operations). The other important thing is to set ‘Client Certificate Store Lookup‘ to ‘User and Machine‘ so that the client will be able to use user and device certificate. The client seems to do a good job at using the proper certificate depending on if the connection is pre-logon or post-logon.
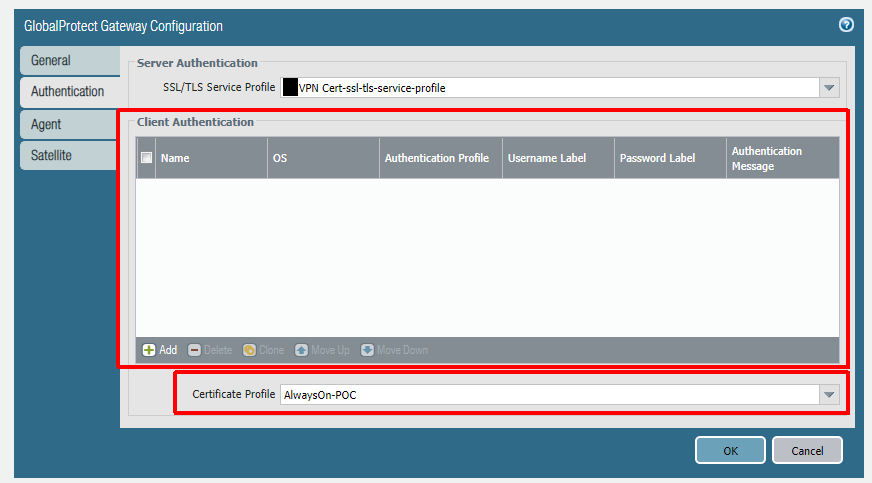
After the portal you will configure the gateway. Authentication will be identical to the portal to allow for a seamless authentication flow.
To deliver a device certificate to the device we will use an Intune PKCS certificate profile. I won’t go into great detail here as Microsoft has done a good job of documenting the steps involved. The profile will need to be assigned to the device properly, and the easiest way to do this is by using an Azure AD dynamic group. I am using a custom EKU value in the screenshot below (Extended Key Usage) which you do not need to replicate. I had a specific reason for doing this.
You will also need to deliver a user certificate to the device. You can use another Intune PKCS certificate profile to do this or you can use GPO/User Certificate Autoenrollment. I chose the latter because I like the granular control it provides. If you use an Intune profile, but target the machine, every user that logs on to the machine will get a certificate and VPN access. If I target the user, every Intune-managed machine they log on to will get a user certificate. Both of these were undesirable. With autoenrollment I’m only enabling autoenrollment for the computers I want (using a user policy and loopback processing), and I’m controlling the users that can enroll/autoenroll via the ACL on the certificate template itself.
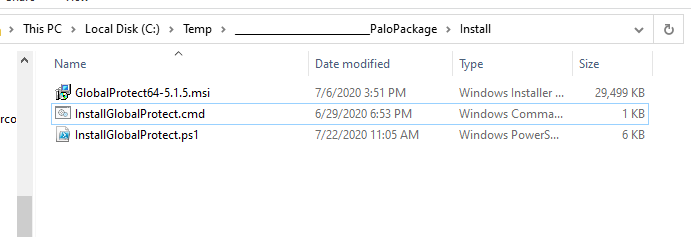
To get the GlobalProtect client deployed to our Autopilot device we will be using Intune to deploy it via a ‘Windows app (Win32)’ deployment. We need the Microsoft-Win32-Content-Prep-Tool utility, the GlobalProtect MSI (I am using version 5.1.5 at this time), and two wrapper scripts to complete the package.
The first wrapper script is InstallGlobalProtect.ps1. This is the one responsible for installing the MSI and pre-configuring some registry values. I thought this part would be very straightforward, but I had trouble getting the pre-logon credential provider to kick in initially when installing the client via Intune. If I manually installed the client, it worked the first time without an issue. It was only acting this way when being deployed via Intune during Autopilot. After a few hours of procmon traces and some reverse engineering of the client I figured out the issue. There is a post-setup process that runs that doesn’t process some registry changes correctly until the client is executed in the context of a user at least once. I use the wrapper to stage these two registry values (LogonFlag + LogonState) along with the others needed to make this configuration work. I also enable User-initiated Pre-Logon (via the ShowPrelogonButton value), so it gives the user a chance to verify they have internet connectivity and so that they can perform a retry of the pre-logon connection on demand. I later turn this off via GPO making pre-logon completely automatic after the first successful login. This value is totally optional.
The next wrapper script is a batch script that launches the script above. It is called InstallGlobalProtect.cmd. This script is needed because Intune will launch the installer in 32-bit mode and we want everything kicking off in 64-bit mode (mainly for the registry work above).
Once the three files are ready, we can create our package which generates a .intunewin file.
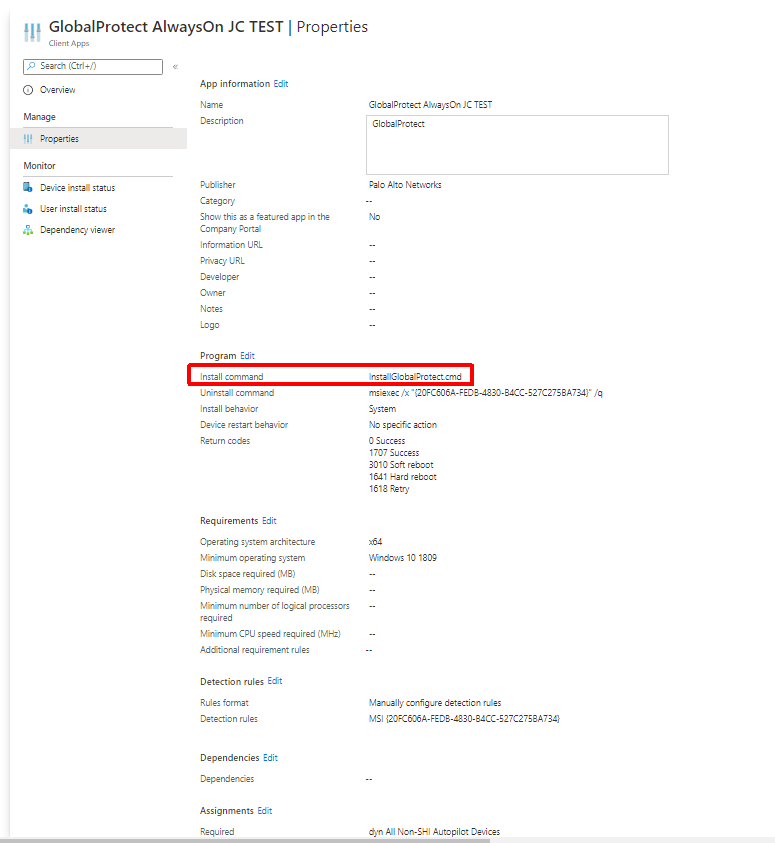
We then take this file and upload it to Intune to create our application. The application will need to be assigned to a group. Again, I am using a dynamic group that targets my Autopilot devices. As you can see below some of the MSI info is pulled in automatically because it was read by the Microsoft-Win32-Content-Prep-Tool utility. We must also change the ‘Install command‘ to point to the batch file we created earlier.
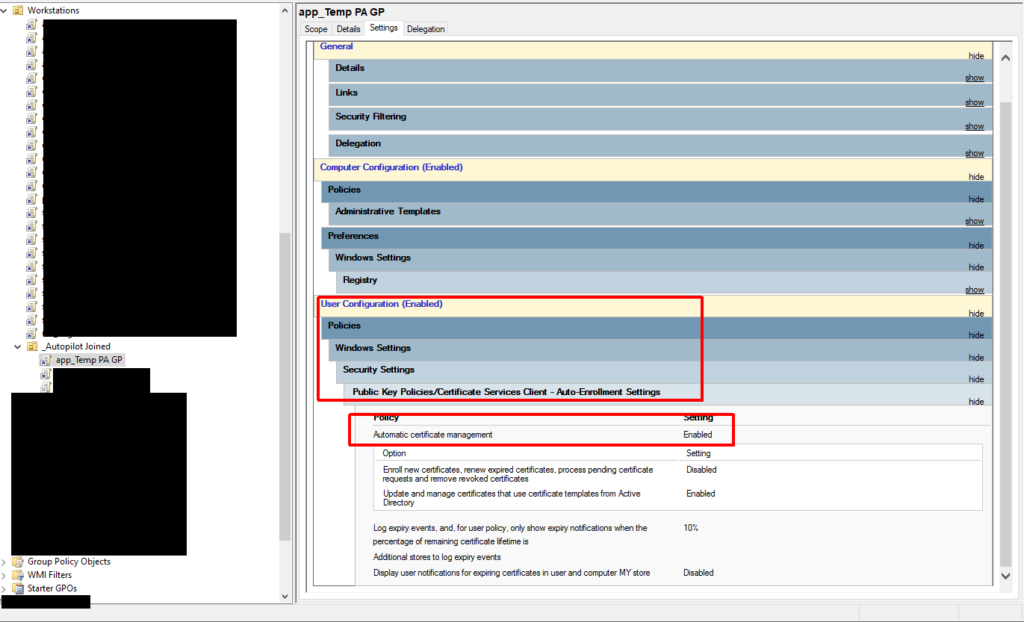
In testing I came across multiple issues due to machine GPO not being applied before the first login. One of these was loopback processing not applying which caused multiple user GPOs not to apply. Others were trusted root certs not installing (used for things like SSL decryption) and User Certificate Autoenrollment not working (I touched on this earlier). The trusted root issue actually caused my hybrid join to get stuck (SSL decryption is being used here). I decided to create IntuneHybridJoinHelperInstaller.ps1 to solve all of this.
Modifies the SACL of the directory to remove modify access from ‘Authenticated Users‘ (someone could use this directory to execute malicious code in the context of ‘LOCAL SYSTEM‘ if you do not do this)
Create a script in the directory above called IntuneHybridJoinHelper.ps1 with an accompanying scheduled task that executes at any user logon in the context of ‘LOCAL SYSTEM‘
At the next logon, this newly deployed script is triggered by the scheduled task, checking to see if the computer group policy cache has ever been provisioned (has ever received computer policies) and if not it will do the following:
Perform a gpupdate for computer policies
Get the interactive logged on user
Create a task to run gpupdate as the currently logged on user which will perform a gupdate of their user policies
Re-run ‘Automatic-Device-Join‘ task to complete the device registration in case it failed at logon
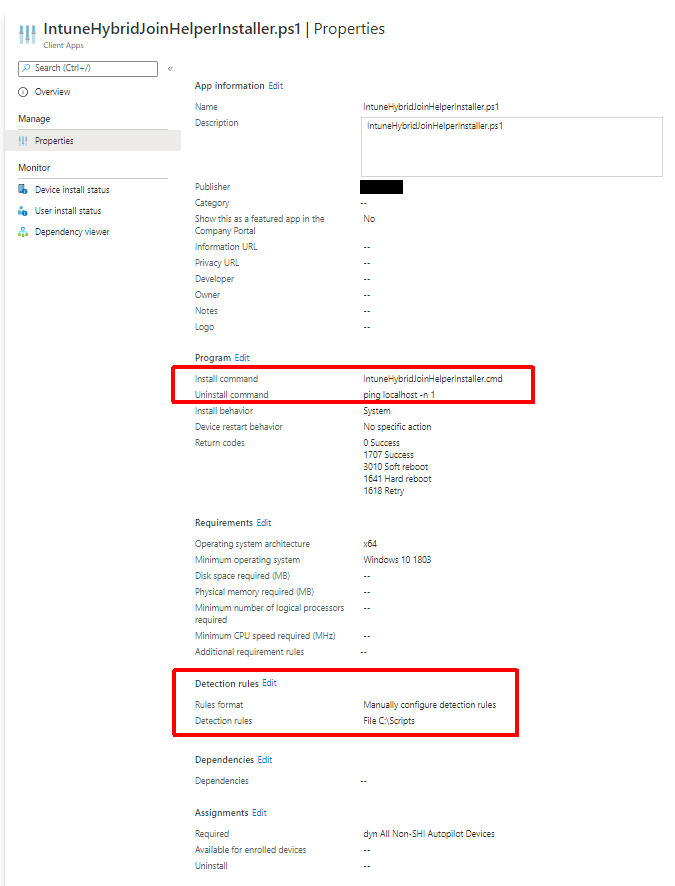
It is best to deploy this as a Win32 app, like the GlobalProtect client, so that we can ensure it is on the machine before the first logon. Like GlobalProtect, we are using a batch wrapper (IntuneHybridJoinHelperInstaller.cmd) to launch the PowerShell script as a 64-bit process. I used the same dynamic group that I used for the GlobalProtect client as the target here. I also used a dummy uninstall command since we never need to ever uninstall this. For install detection I am just using the script path (C:\Scripts\IntuneHybridJoinHelperInstaller.ps1). We will build our package using the utility like we did for GlobalProtect.
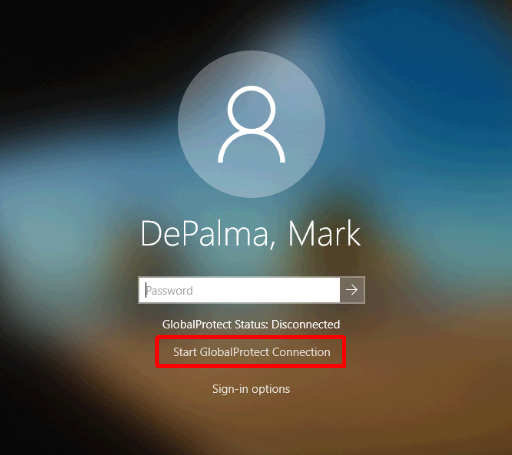
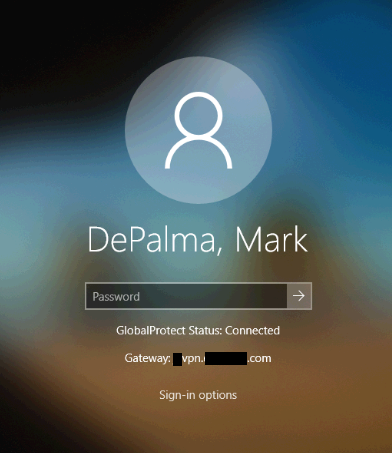
Now that we have everything in place we can test an enrollment. If everything is configured properly, you’ll be asked to sign-in to your corporate environment right after establishing network connectivity. After everything completes you should wind up at a logon screen. Because I am using User-initiated Pre-Logon I will need to switch to the GlobalProtect logon provider, click ‘Start GlobalProtect Connection’, and wait for the status to change to ‘Connected’.
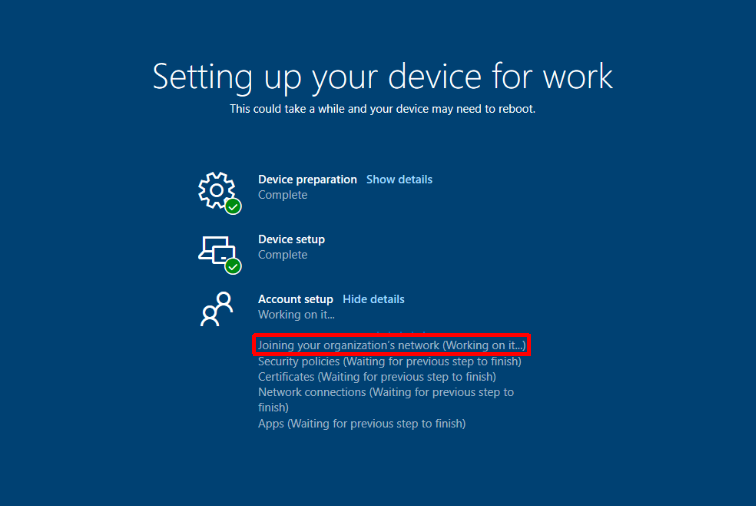
After logging on you are presented with the User ESP (Enrollment Status Page). This is when our helper script kicks in to resolve GPO issues and moves our device registration along. This process can take a bit because after the ‘Automatic-Device-Join‘ completes you still have to wait for the on-prem computer object to sync up to Azure AD via AD Connect. Steve Prentice came up with a little script to help speed this up called SyncNewAutoPilotComputersandUsersToAAD.ps1. It just forces an AD Connect sync after computer object has its ‘userCertificate‘ attribute populated.
Once this is completed you should be left at a functioning desktop and GlobalProtect should have switched over to a full tunnel using the user certificate. At this point I would be using my primary endpoint management product, Ivanti Endpoint Manager, to perform any additional application installs/configurations. I have its agent being deployed via Win32 app as part of my Autopilot process.
My company recently started using new Biamp TesiraFORTE devices for their newer conference rooms. I have little experience with VoIP (besides my fun with Google Voice and GVSIP) or these types of devices, but I was asked to assist in diagnosing a strange issue where audio going from the Biamp device to the Avaya gateway would randomly cut out for 1-3 minutes. Audio going from the gateway to the device would continue to work during this drop. I started by looking at a Wireshark capture of a span port of the Biamp device. This trace initially looked fine to me. I was able to view the RTP traffic and use the RTP player (Telephony -> VoIP Calls). During the time of drop there was no loss of audio.
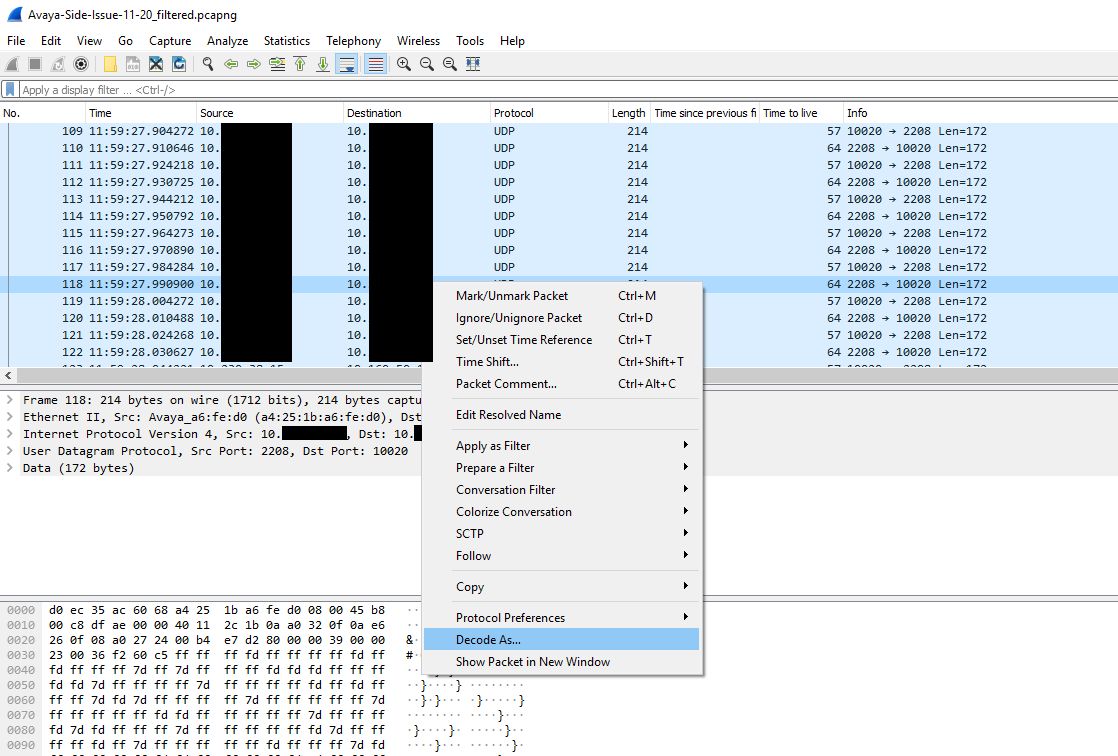
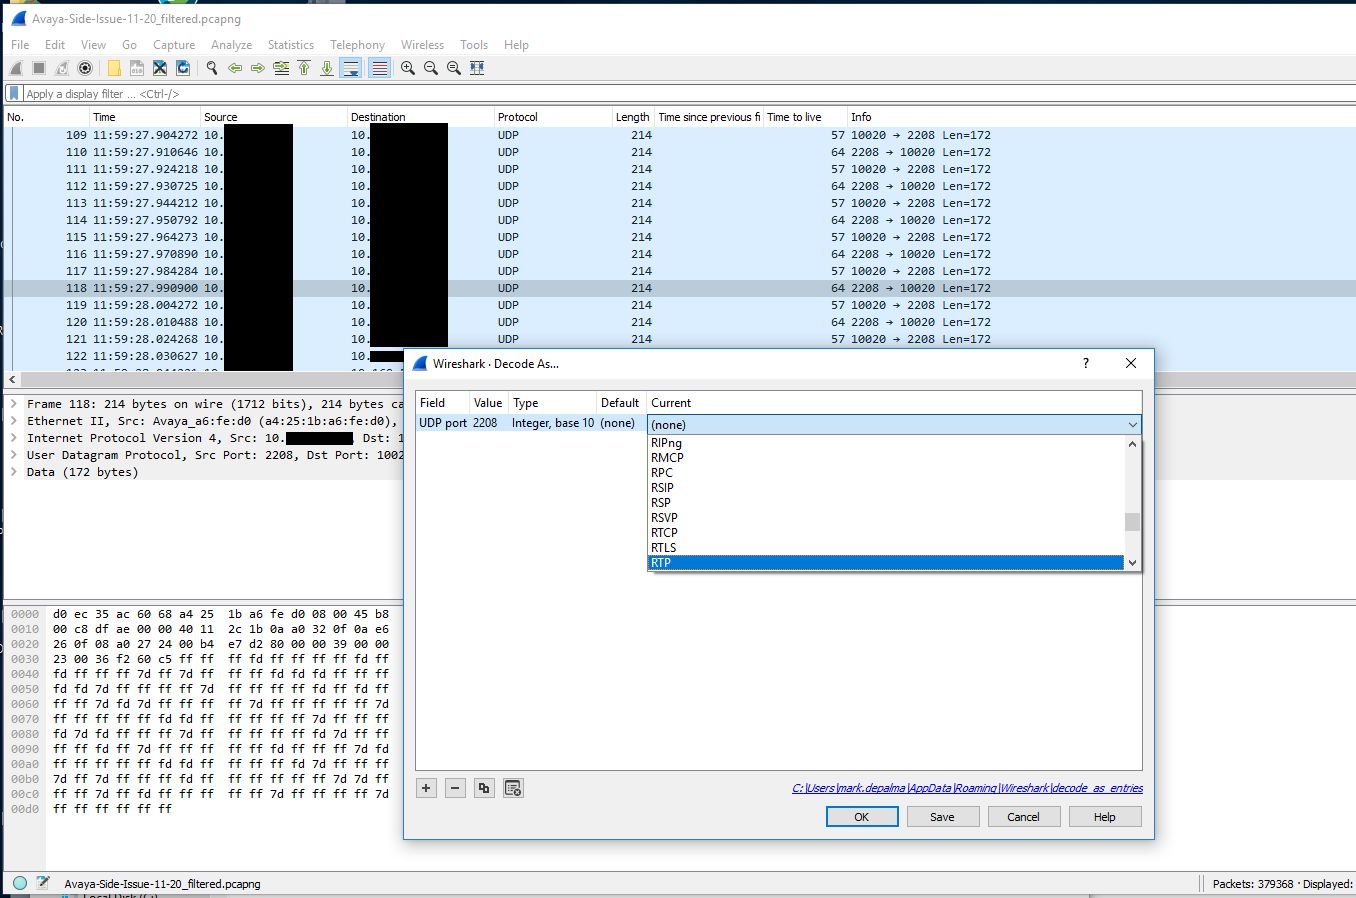
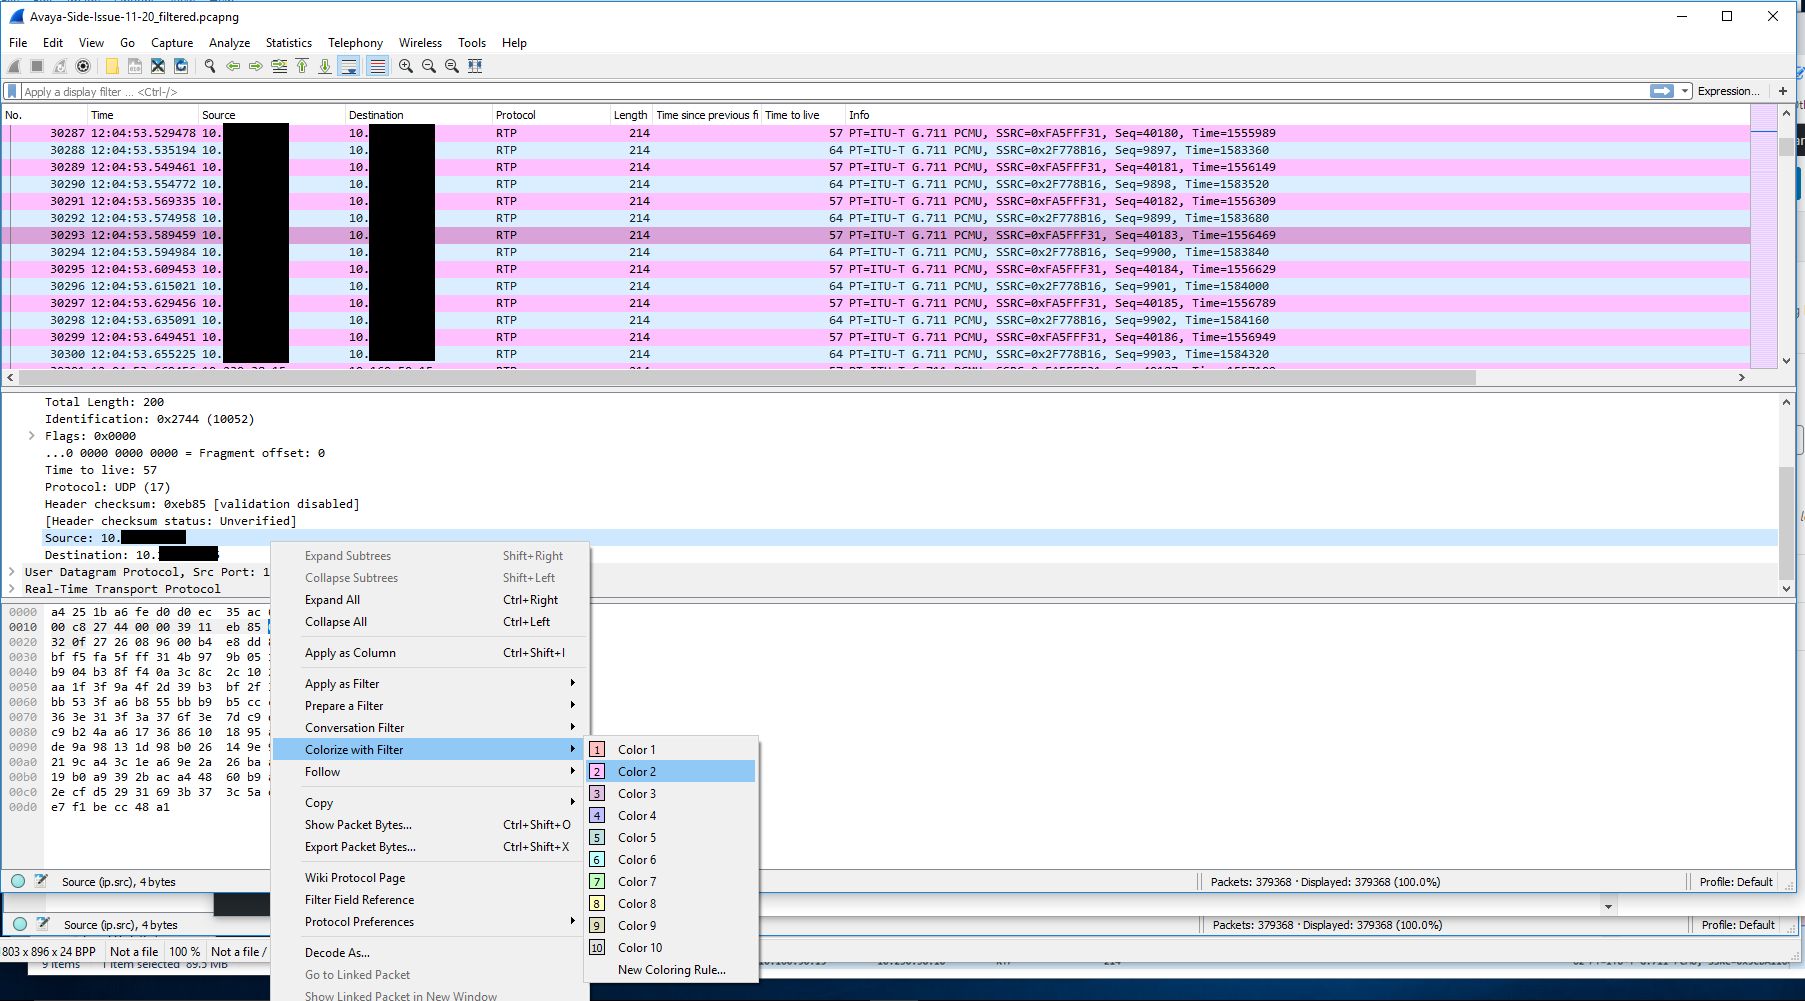
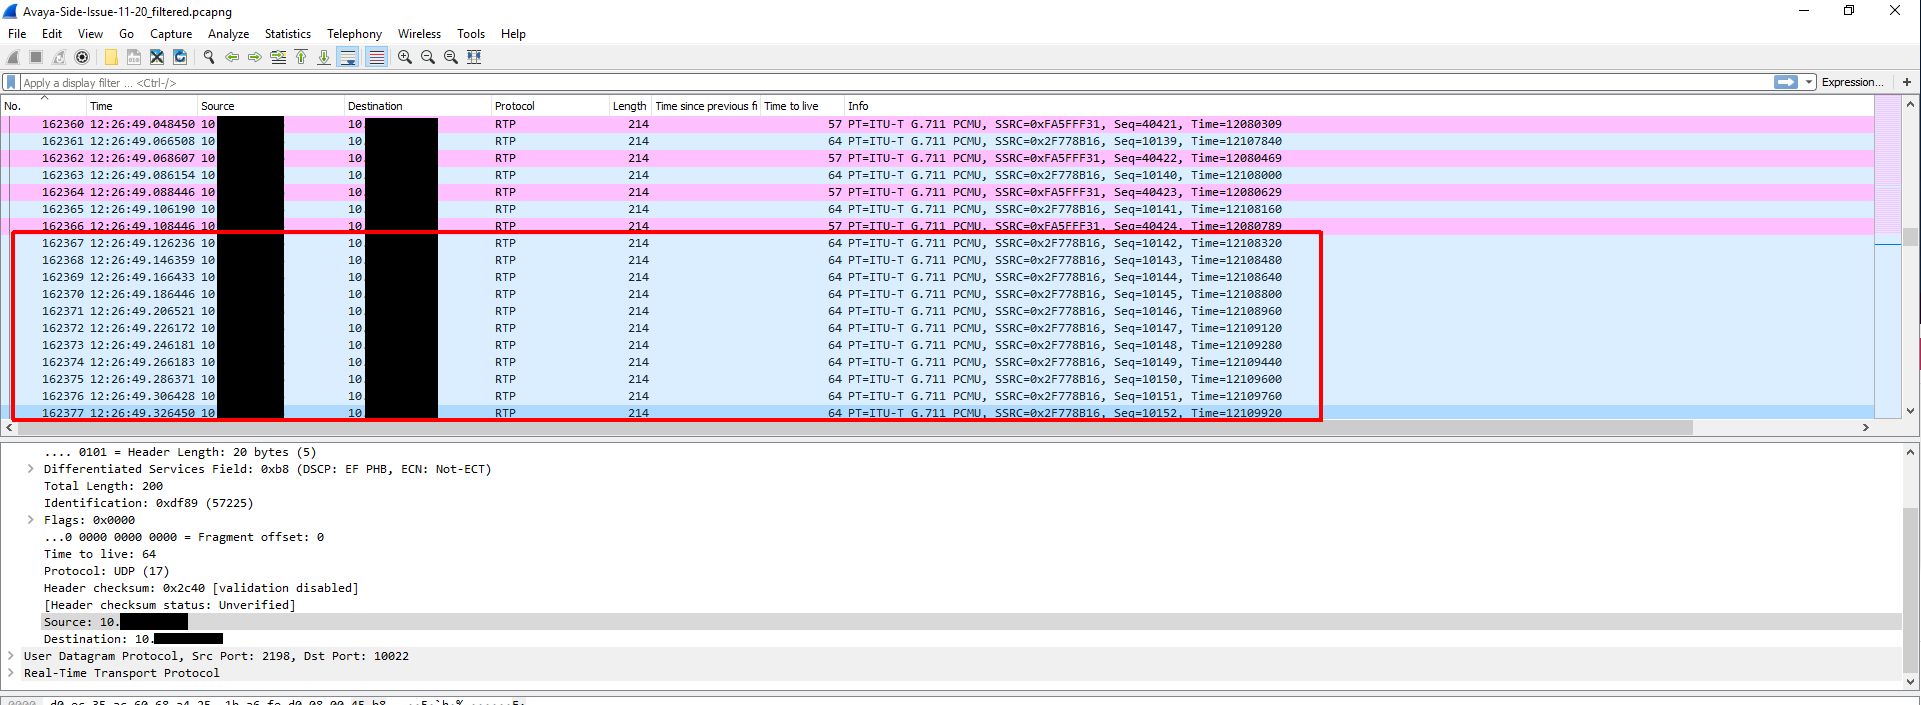
The next step was to get a trace of the other side involved. To do this we created a span of the interface on the switch that the gateway was sitting on. We then ran a packet capture of that, but using a capture filter to reduce the size of the capture since many other devices (mainly phones) were communicating with this gateway. We just used the filter ‘host <IP address of Biamp device>’ as the capture filter. I colorized traffic Biamp -> gateway traffic in this capture to make it easier to read. I also had to decode the traffic into RTP since the gateway traffic didn’t contain the initial SIP handshake.
After decoding the raw UDP traffic into RTP traffic and colorizing the Biamp -> gateway traffic we are left with a nice back and forth to look at.
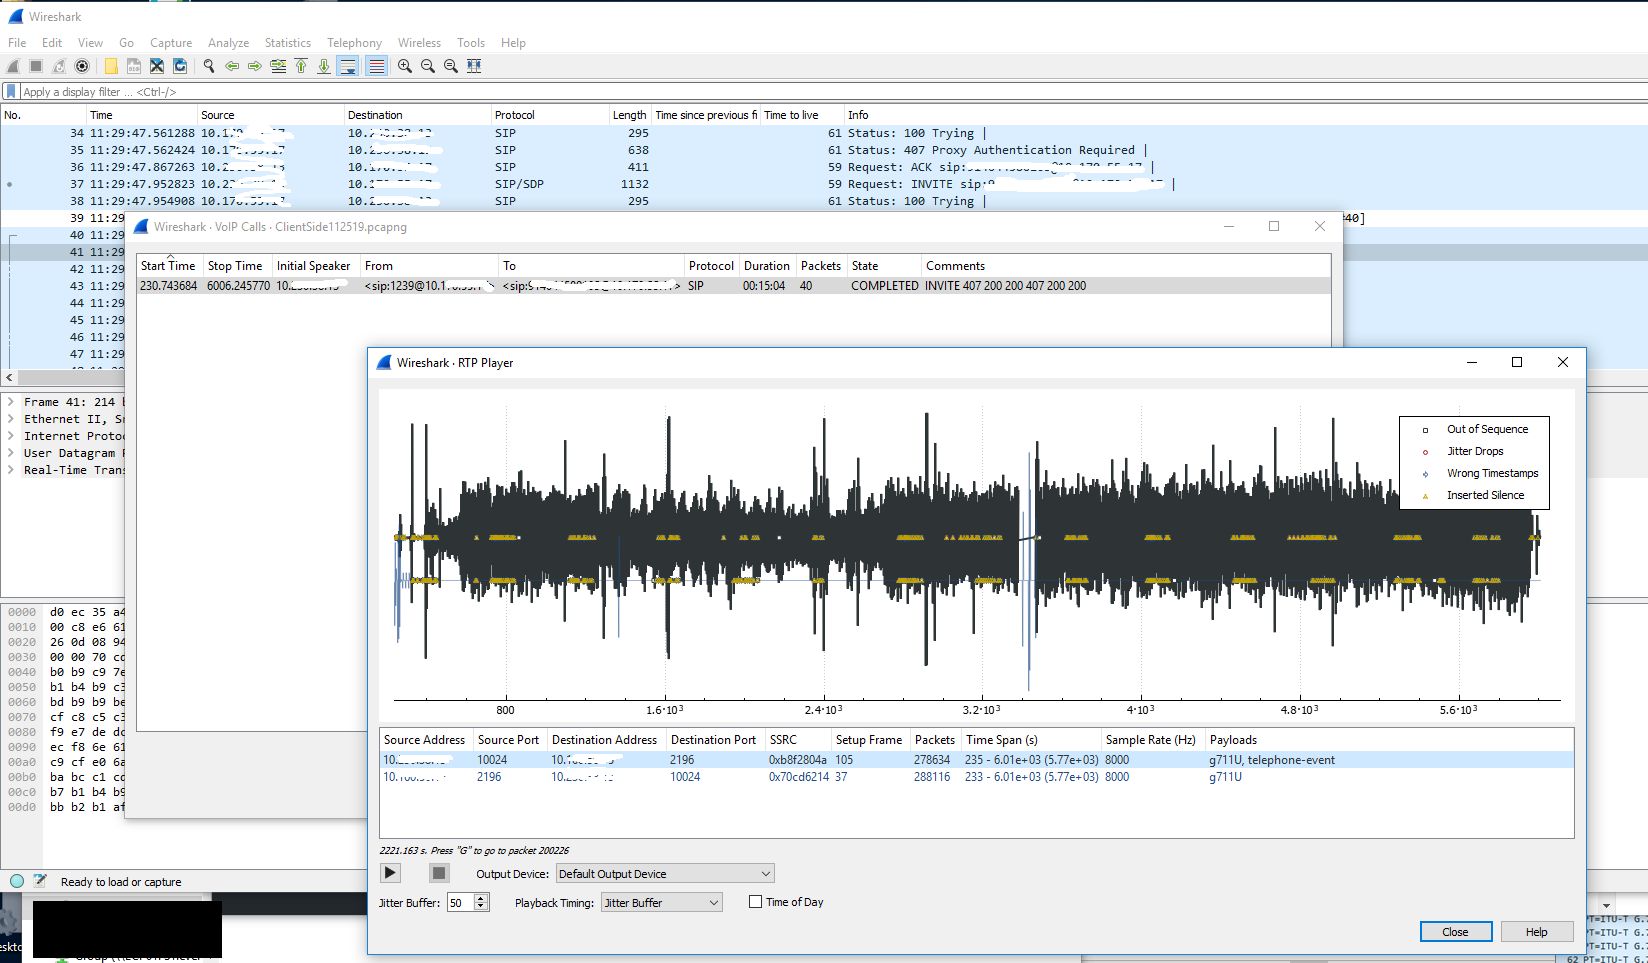
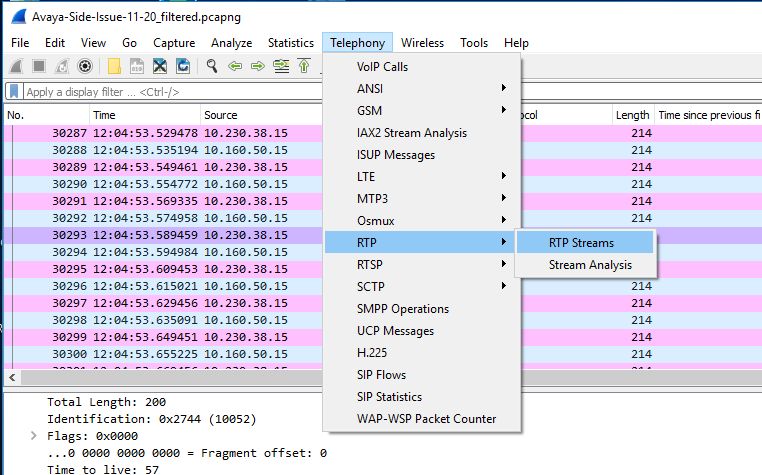
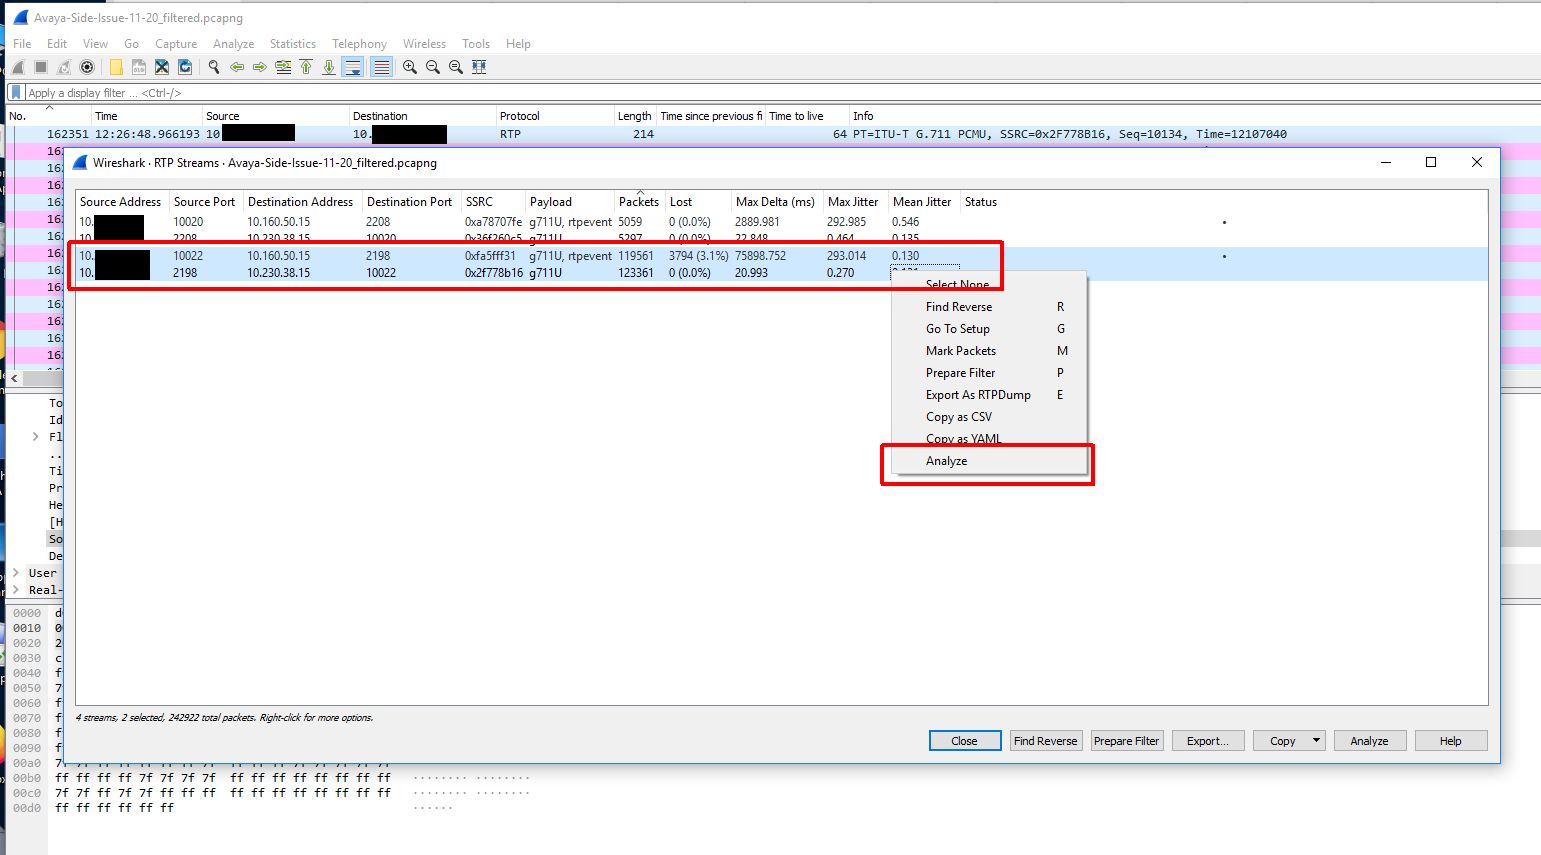
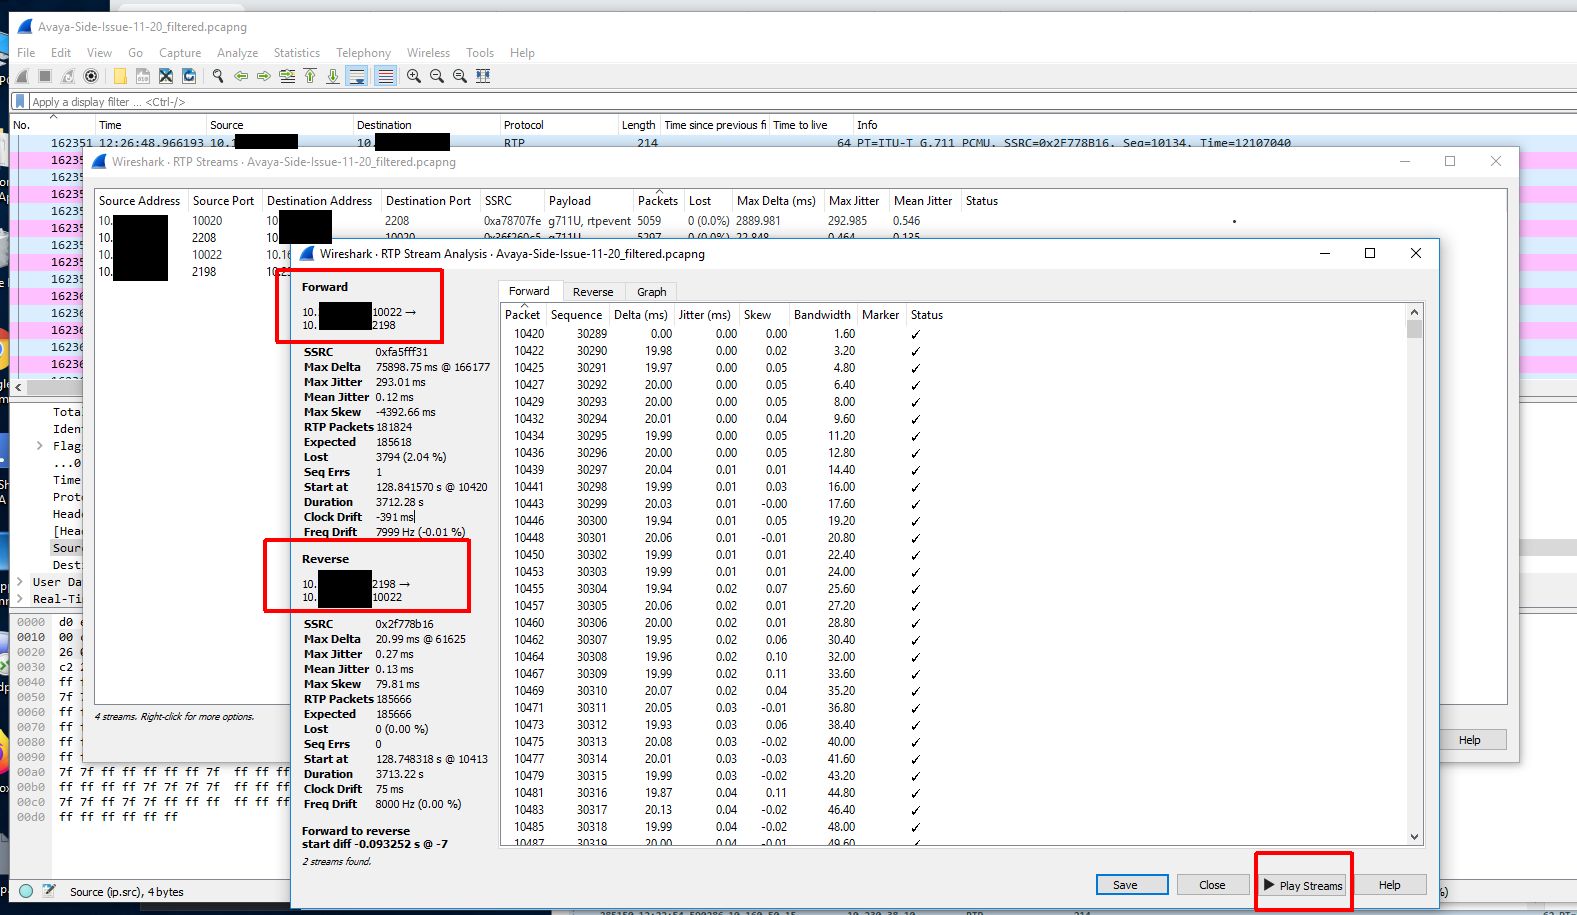
Because we didn’t capture the entire SIP handshake (the SIP gateway actually being dialed is another gateway in a different datacenter and that SIP gateway is actually handing off the call to a local gateway in the same building as the Biamp device) we need to reconstruct the RTP streams to be able to view them on a graph and play them back.
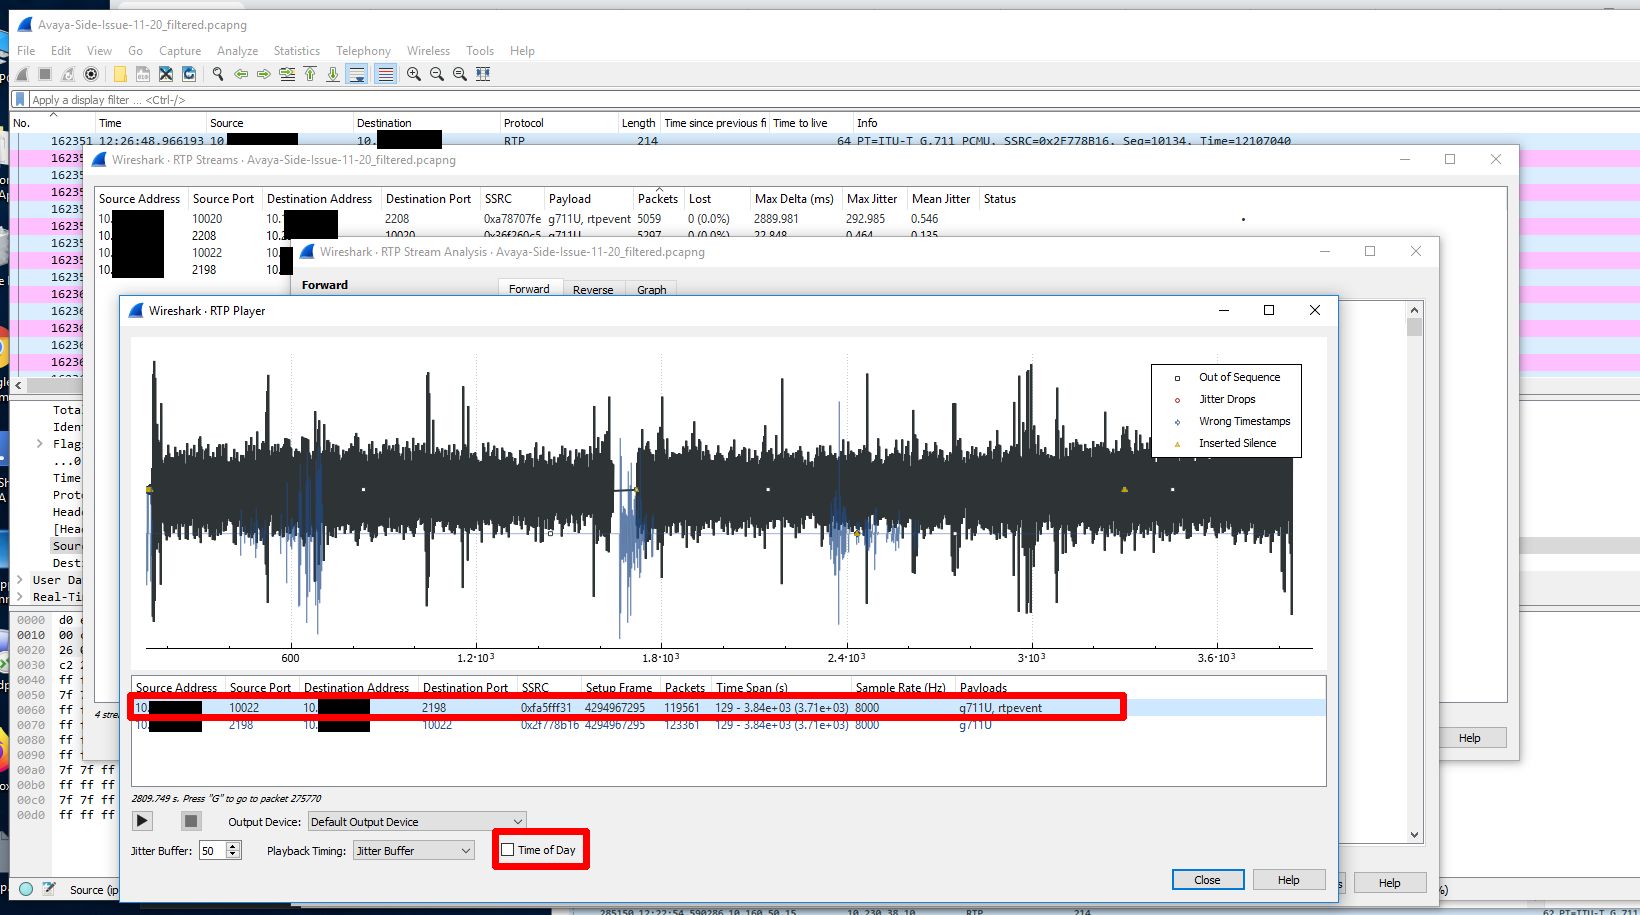
Now that we have a nice graph to look at and audio to look at we can hone in on the time of the audio loss which was about 12:26PM. When we do this we can clearly see a loss of sound and traffic at that time.
Now that we have this we can confirm that traffic isn’t actually getting to the gateway and it is not a problem with the gateway. This means somewhere between the first switch and the last switch in the path the traffic is being lost. The next step was to create a span of the trunk leaving the first switch (the switch that the Biamp device was sitting on). We actually saw the same loss of outbound traffic here as well. When the Biamp devices were installed they were actually hard set with a 100mb/full duplex configuration because they supposedly weren’t negotiating correctly and were negotiating to 10mb/half duplex. I decided we should work on that because hard setting like this can actually hide interface drops. After resolving this issue we realized the negotiation issue was actually a cosmetic issue in the configuration GUI. We upgraded firmware on the device to resolve this issue.
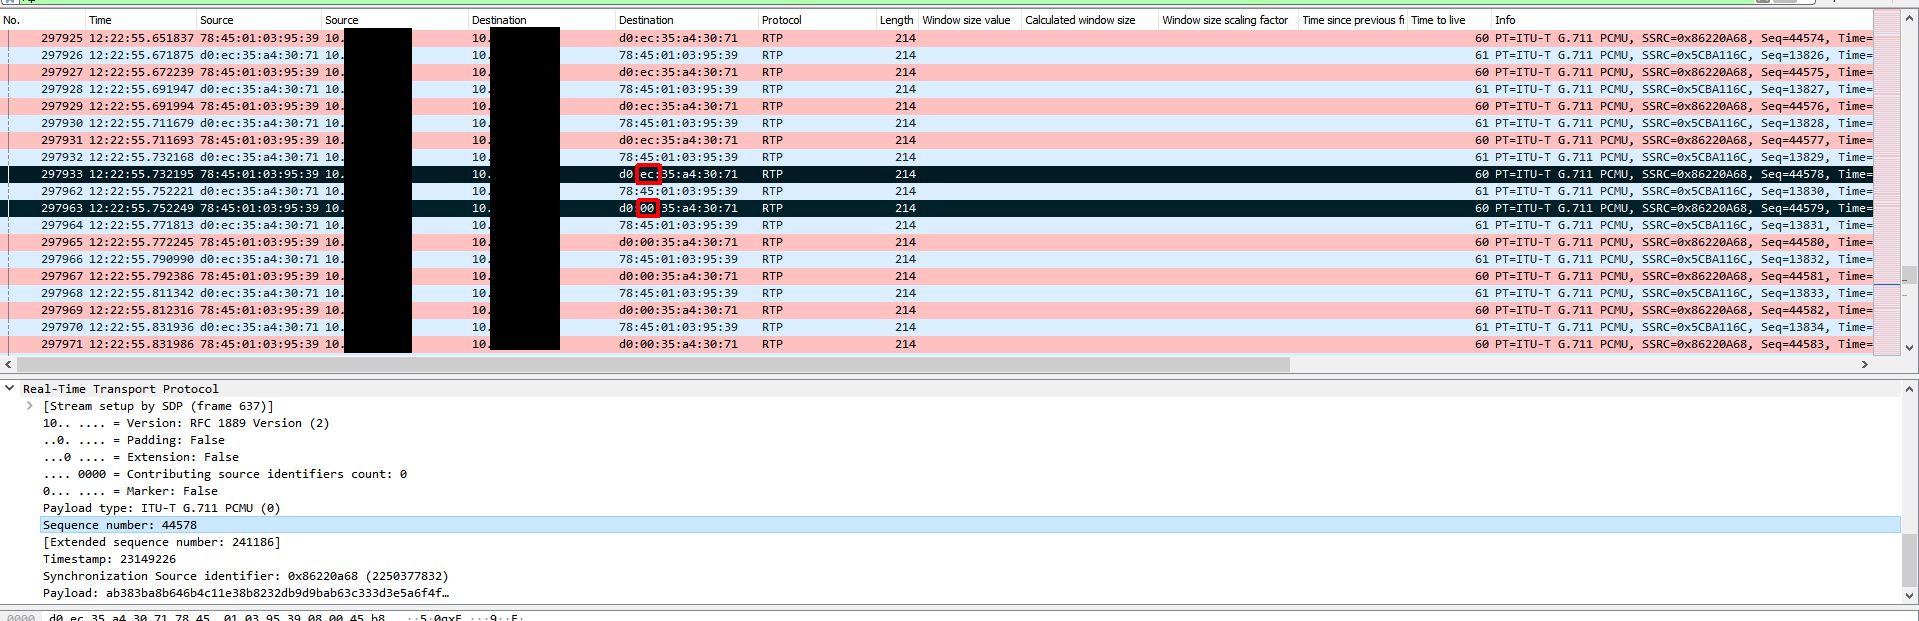
At this point I was a little baffled and had to retrace my steps since this wasn’t making any sense. To do this I took the last received RTP packet before an instance of audio loss on the gateway side capture and made note of the RTP sequence number. I used this sequence number to locate the outgoing packet on the Biamp device capture. I then marked this packet and marked the very next outgoing packet and started comparing them. This is when it got interesting. The destination MAC address changed between the two packets and remained that way for the duration of the audio loss. What made it even more interesting is the only thing that changed in the MAC address was the second byte which went from EC to 00. This MAC address was the address of the VLAN SVI (gateway). At this point I created new columns that included MAC addresses in my Wireshark view.
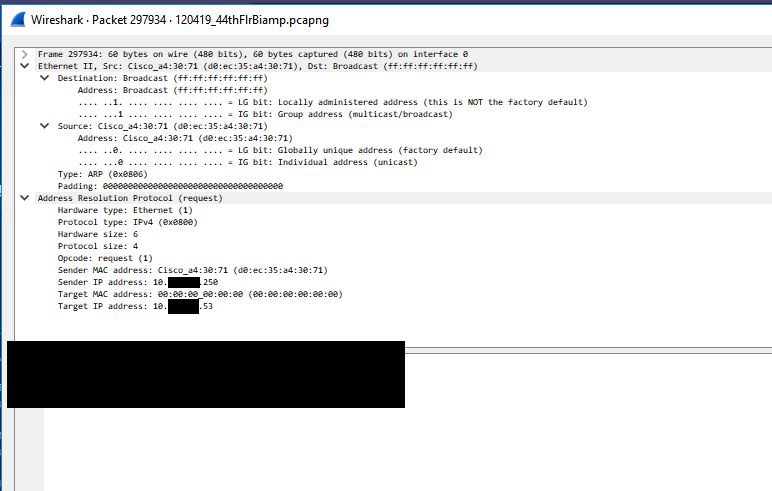
To figure out what could have caused this let’s keep this first marked packet highlighted and remove our filter (I was filtering down to SIP + RTP traffic in most of these screenshots) to see all traffic on the Biamp device span. The ONLY traffic that is visible to the Biamp device in between the last ‘good’ RTP packet and the first ‘bad’ RTP packet is a series of ARP request broadcasts from the switch. These ARP requests were normal requests looking for who had a series of IP addresses. It seems that when the Biamp device sees a number of these ARP request broadcasts it relearns the switch’s MAC address incorrectly or these APR request broadcasts somehow trigger a software bug that essentially poisons the Biamp device’s ARP cache by causing that second byte to go from EC to 00.
Even though it is normal and shouldn’t cause any issues we traced the reason for these ARP requests back to a network scan happening on this subnet at the time. None of these IP addresses are valid addresses and network scan is what triggered the switches to start searching for these addresses via ARP requests. Below is one of the ARP request packets. There is nothing in this packet that references the ‘bad’ switch MAC address with the second byte having 00 instead of EC.
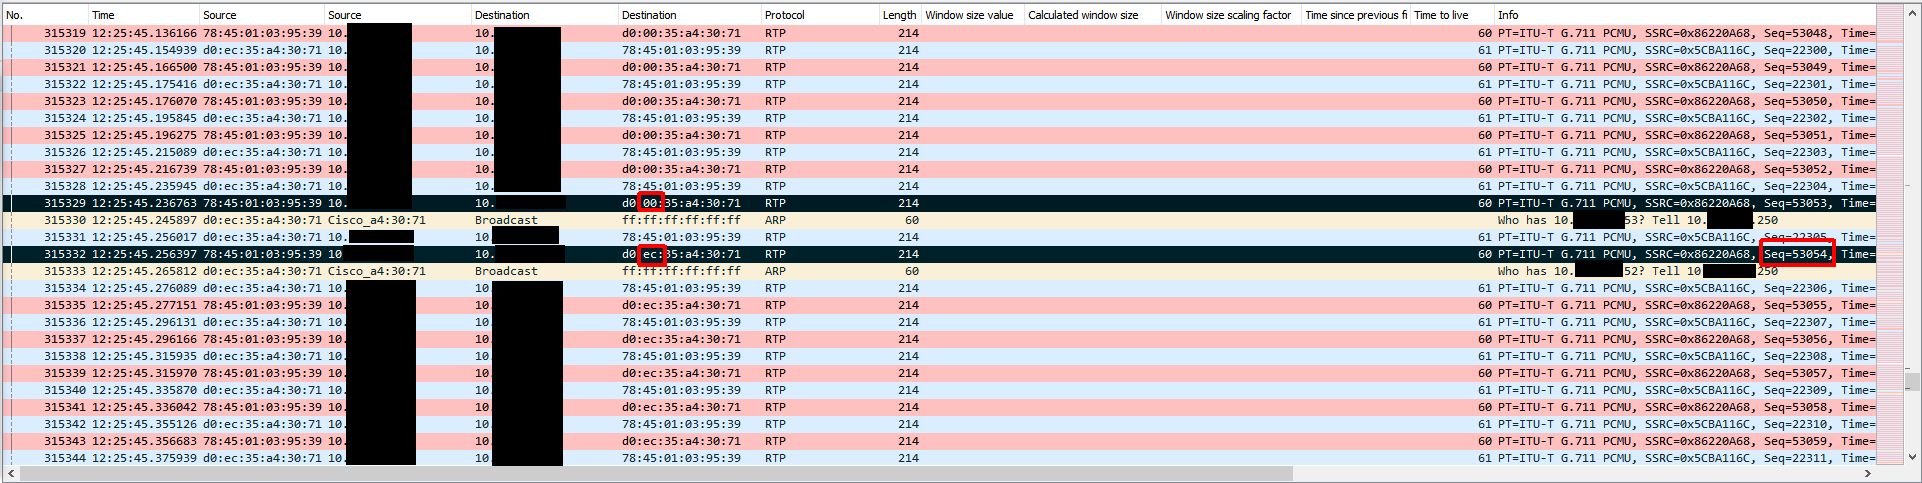
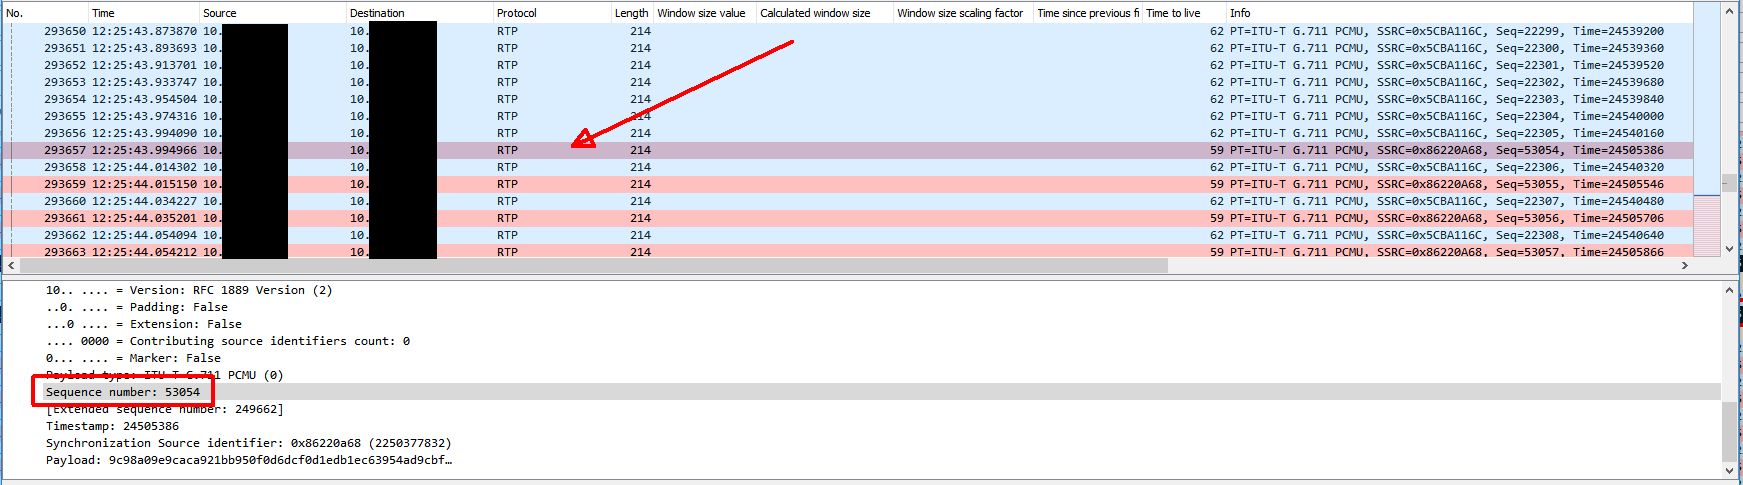
The next thing to look at is what actually causes the audio to be restored after a few minutes. Below is the same trace, but later on when the audio loss ends. The first marked (black) packet is the last ‘bad’ RTP packet and the last marked (black) packet is the first ‘good’ RTP packet when audio is restored. With no filter applied we can see that the ONLY thing happening between these two packets is ANOTHER ARP request broadcast. This ARP request seems to cause the Biamp device to re-learn the switch’s MAC address properly which restores RTP traffic delivery. The first ‘good’ RTP packet is the RTP packet with sequence number 53054. We can use the capture on the gateway side to find this packet.
With this new knowledge we were able to reproduce the issue on demand by scanning 20-30 non-existent IPs on the subnet which triggered the ARP requests. We could then restore audio by doing the same scan. Sometimes it would take a few extra scans to trigger the behavior.
We handed all of this information off to Biamp and they are still investigating the issue. When they come back with more information and/or a resolution I will update this thread. An important lesson here is to pay attention to the details. I technically had all the data I needed to figure out the issue in the original capture on the first day I was involved, but I wasn’t forced to look more closely until I looked at many other things.
UPDATE (2/7/20): Biamp eventually was able to reproduce the issue in their lab after we handed over the findings. They have since released a firmware update (3.14.1) that resolves this issue. The fix is listed as ‘Fixed issue where unsolicited ARPs impact the VoIP ARP table‘.