I have been working on implementing services like Azure AD and O365 in my work place. One of the services we are are adopting is Azure MFA. We currently use RSA SecurID company-wide for multiple remote access services and needed a way move users over in batches. One of the larger services to integrate Azure MFA with was Citrix NetScaler. Our original NSG (NetScaler Gateway) authentication configuration consisted of multiple LDAP policies and a set of RADIUS polices for RSA SecurID. Our goal was to create a configuration where we could control where users authenticate for their second factor via an Active Directory group. To do this kind of dynamic authentication in NSG we would have to move authentication from the basic model to an advanced nFactor-based configuration. The other requirement we had was to have a landing page before an Azure MFA authentication. We needed this because if your default sign-in method is set to ‘notification’ the RADIUS authentication could easily time out if the user doesn’t have their device running Microsoft Authenticator next to them. The page would let the user know to have their device ready before initiating authentication.
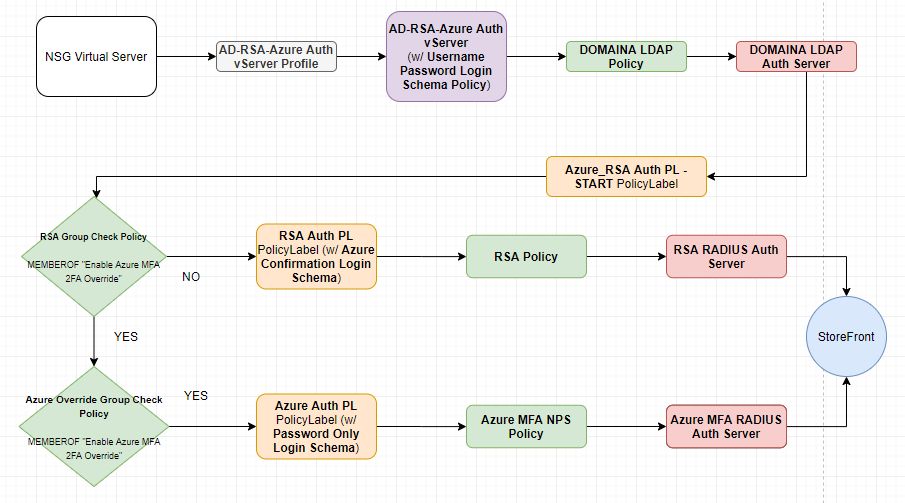
Below is a flowchart of the configuration end result. Objects of the same type share the same color (Gray – Authentication Virtual Server Profile, Purple – Authentication Virtual Server, Green – Advanced Authentication Policy, Orange – Advanced Authentication PolicyLabel, Red – Authentication Server (LDAP/RADIUS).
The first step in setting up Azure MFA is to stand up one or multiple NPS (Network Policy Server) instances and install the Azure MFA NPS Extension. I won’t go into the whole setup of this since it is documented, but I will comment on the policy config within NPS. It could be a little confusing because we are just going to pass the username to NPS, NPS will not be authenticating the user against AD. Azure MFA authentication in NPS happens AFTER NPS authenticates the user against AD. To make this work we will have to create a Connection Request Policy that just passes the user without authentication. The steps involved are as follows:
- Deploy the NPS server instance
- Install/setup the Azure MFA NPS Extension
- Disable all default Connection Request Policies
- Disable all default Network Policies
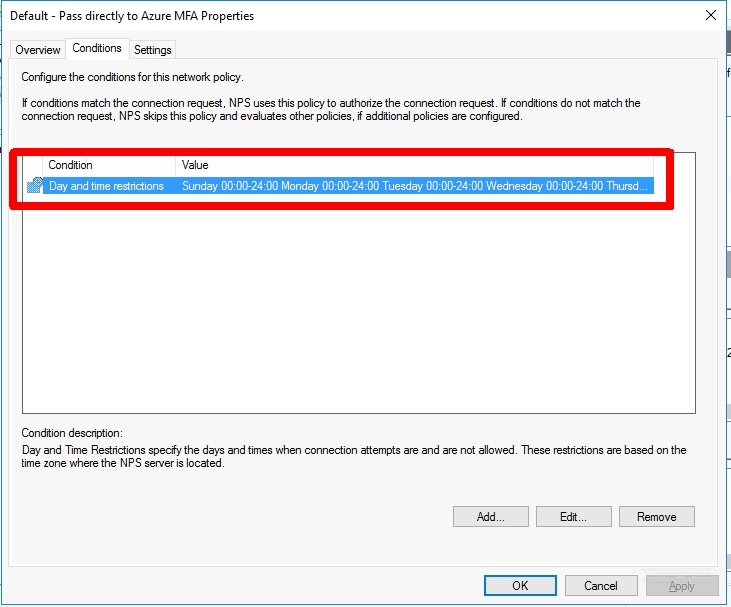
- Create a new Connection Request Policy called ‘Default – Pass directly to Azure MFA‘
- Add a Day and time restriction that covers 24 hours and 7 days
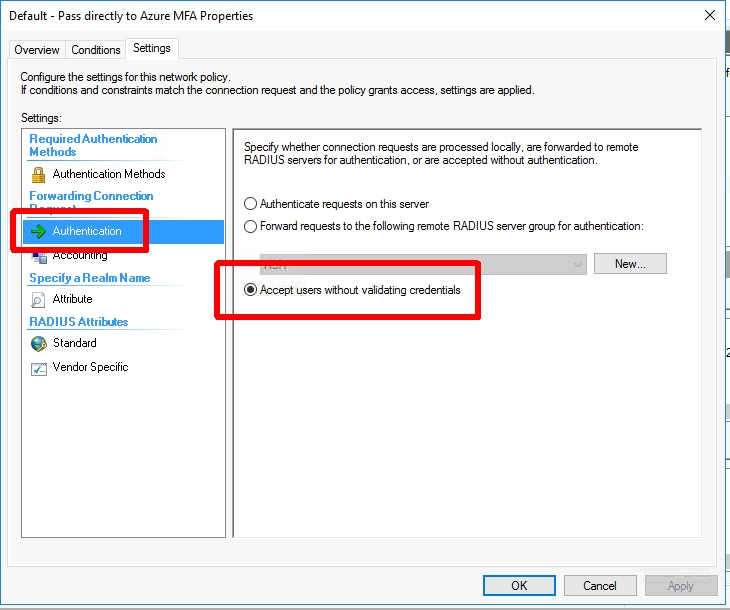
- Set the ‘Authentication’ settings‘ to ‘Accept users without validating credentials‘. (This will not perform an AD authentication and just pass the username along to the Azure MFA NPS Extension)


Now we can add this new Azure MFA RADIUS server to NetScaler.
- Go to ‘NetScaler -> System -> Authentication -> Basic Policies -> RADIUS‘
- Create a new Server using the settings from the NPS server above
Next we will create our Login Schemas. We will need an initial logon schema for the LDAP credentials, a login schema for the RSA SecurID token, and a prompt only login schema for the page we want to show before authentication is passed to the NPS RADIUS server we setup earlier for Azure MFA.
- Go to ‘NetScaler -> Security -> AAA – Application Traffic -> Login Schema‘
- Create a login schema profile called ‘Username Password Login Schema‘
- Set the authentication schema to ‘SingleAuth.xml‘
- Set ‘User Credential Index‘ to 11
- Set ‘Password Credential Index‘ to 12
- Create a login schema policy called ‘Username Password Login Schema Policy‘
- Set the profile to be the schema profile you just created above (‘Username Password Login Schema‘)
- Set the ‘Rule’ expression to ‘REQ.HTTP.HEADER User-Agent NOTCONTAINS CitrixReceiver‘ (Receiver does not support the nFactor flow, this will be for web clients only)
- Create a login schema profile called ‘Password Only Login Schema‘
- Create a new XML file called ‘RSAOnly.xml‘ using the XML below
- Upload this to ‘/flash/nsconfig/loginschema/LoginSchema‘
- Set the user expression to ‘HTTP.REQ.USER.ATTRIBUTE(11)‘. (This will carry the username from the first logon page to the RSA logon page)
<?xml version="1.0" encoding="UTF-8"?>
<AuthenticateResponse xmlns="http://citrix.com/authentication/response/1">
<Status>success</Status>
<Result>more-info</Result>
<StateContext></StateContext>
<AuthenticationRequirements>
<PostBack>/nf/auth/doAuthentication.do</PostBack>
<CancelPostBack>/nf/auth/doLogoff.do</CancelPostBack>
<CancelButtonText>Cancel</CancelButtonText>
<Requirements>
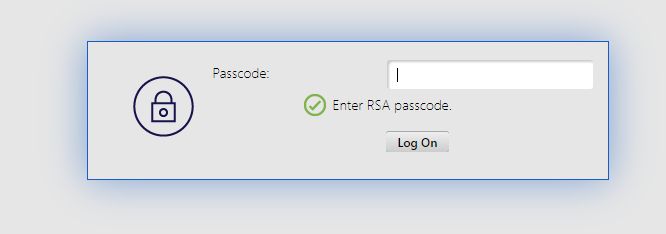
<Requirement><Credential><ID>passwd</ID><SaveID>ExplicitForms-Password</SaveID><Type>password</Type></Credential><Label><Text>Passcode:</Text><Type>plain</Type></Label><Input><Text><Secret>true</Secret><ReadOnly>false</ReadOnly><InitialValue></InitialValue><Constraint>.+</Constraint></Text></Input></Requirement>
<Requirement><Credential><Type>none</Type></Credential><Label><Text>Enter RSA passcode.</Text><Type>confirmation</Type></Label><Input /></Requirement>
<Requirement><Credential><ID>saveCredentials</ID><Type>savecredentials</Type></Credential><Label><Text>Remember my password</Text><Type>plain</Type></Label><Input><CheckBox><InitialValue>false</InitialValue></CheckBox></Input></Requirement>
<Requirement><Credential><ID>loginBtn</ID><Type>none</Type></Credential><Label><Type>none</Type></Label><Input><Button>Log On</Button></Input></Requirement>
</Requirements>
</AuthenticationRequirements>
</AuthenticateResponse>- Create a login schema profile called ‘No Prompt Login Schema‘
- Set authentication schema to ‘noschema‘
- Leave everything else blank
- Create a login schema profile called ‘Azure Confirmation Login Schema‘
- Create a new XML file called ‘Azure.xml‘ using the XML below
- Upload this to ‘/flash/nsconfig/loginschema/LoginSchema‘
- Set the user expression to ‘HTTP.REQ.USER.NAME‘. (This will pass the UPN to NPS after acknowledging the prompt)
<?xml version="1.0" encoding="UTF-8"?>
<AuthenticateResponse xmlns="http://citrix.com/authentication/response/1">
<Status>success</Status>
<Result>more-info</Result>
<StateContext></StateContext>
<AuthenticationRequirements>
<PostBack>/nf/auth/doAuthentication.do</PostBack>
<CancelPostBack>/nf/auth/doLogoff.do</CancelPostBack>
<CancelButtonText>Cancel</CancelButtonText>
<Requirements>
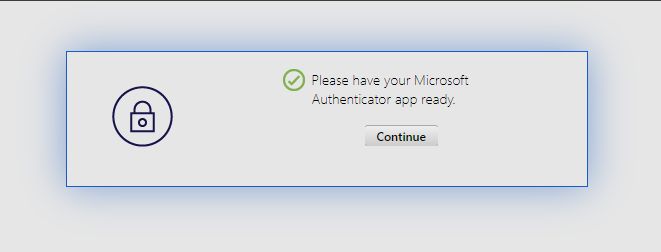
<Requirement><Credential><Type>none</Type></Credential><Label><Text>Please have your Microsoft Authentcator app ready.</Text><Type>confirmation</Type></Label><Input /></Requirement>
<Requirement><Credential><ID>loginBtn</ID><Type>none</Type></Credential><Label><Type>none</Type></Label><Input><Button>Continue</Button></Input></Requirement>
</Requirements>
</AuthenticationRequirements>
</AuthenticateResponse>Now we are going to create our Policy/PolicyLabel chain. The important thing here is to understand how they relate to each other. A Policy is exactly that… an authentication policy. You can define an expression and an authentication request server to use once the expression is matched. A PolicyLabel contains one or more Policy bindings with priorities, goto expressions (like NEXT/END), and a ‘Next Factor’ which gives you the ability to link to ANOTHER PoilcyLabel. First, we will start with our Policies.
- Go to ‘NetScaler -> Security -> AAA – Application Traffic -> Policies -> Authentication -> Advanced Policies -> Policy‘
- Create an LDAP authentication policy
- Set Name to be specific to the domain it is servicing (ex. ‘DOMAINA LDAP Policy‘)
- Set Action Type to ‘LDAP‘
- Set Action to your existing LDAP server
- Set Expression to ‘REQ.HTTP.HEADER User-Agent NOTCONTAINS CitrixReceiver‘
- Create a Azure MFA RADIUS authentication policy
- Set Name to ‘Azure MFA NPS Policy‘
- Set Action Type to ‘RADIUS‘
- Set Action to the NPS RADIUS server you created earlier
- Set Expression to ‘true‘
- Create a RSA RADIUS authentication policy
- Set Name to ‘RSA Policy‘
- Set Action Type to ‘RADIUS‘
- Set Action to your existing RSA RADIUS server
- Set Expression to ‘true‘
- Create an Active Directory group that will contain the users you are cutting over to Azure MFA. I used the name ‘Enable Azure MFA 2FA Override’. We will use this group in the next two policies
- Create the RSA check policy
- Set Name to ‘RSA Group Check Policy‘
- Set Action Type to ‘NO_AUTHN‘
- Set Expression to ‘HTTP.REQ.USER.IS_MEMBER_OF(“Enable Azure MFA 2FA Override”).NOT‘
- Create the Azure override check policy
- Set Name to ‘Azure Override Group Check Policy‘
- Set Action Type to ‘NO_AUTHN‘
- Set Expression to ‘HTTP.REQ.USER.IS_MEMBER_OF(“Enable Azure MFA 2FA Override”)‘
Next we can create our PolicyLabels. These objects will reference Login Schemas/Policies and will chain together.
- Go to ‘NetScaler -> Security -> AAA – Application Traffic -> Policies -> Authentication -> Advanced Policies -> PolicyLabel‘
- Create the Azure PolicyLabel
- Set Name to ‘Azure Auth PL‘
- Set Login Schema to ‘Azure Confirmation Login Schema‘ (we created this earlier)
- Set Feature Type to ‘AAATM_REQ‘
- Click Continue
- Add a policy binding for ‘Azure MFA NPS Policy‘ (we created this earlier)
- Set Priority to 100
- Set Goto Expression to NEXT
- Leave Next Factor empty
- Create the RSA Policy
- LabelSet Name to ‘RSA Auth PL‘
- Set Login Schema to ‘Password Only Login Schema ‘ (we created this earlier)
- Set Feature Type to ‘AAATM_REQ‘
- Click Continue
- Add a policy binding for ‘RSA Policy‘ (we created this earlier)
- Set Priority to 100
- Set Goto Expression to NEXT
- Leave Next Factor empty
- Create the primary PolicyLabel
- Set Name to ‘Azure_RSA Auth PL – START‘
- Set Login Schema to ‘No Prompt Login Schema‘ (we created this earlier)
- Set Feature Type to ‘AAATM_REQ‘
- Click Continue
- Add a policy binding for ‘RSA Group Check Policy‘ (we created this earlier)
- Set Priority to 100
- Set Goto Expression to NEXT
- Set Next Factor to ‘RSA Auth PL‘ (we created this earlier)
- Add a policy binding for ‘Azure Override Group Check Policy‘ (we created this earlier)
- Set Priority to 110
- Set Goto Expression to NEXT
- Set Next Factor to ‘Azure Auth PL‘ (we created this earlier)
Now we are going to create an authentication vServer and profile.
- Create the authentication vServer
- Go to ‘NetScaler -> Security -> AAA – Application Traffic -> Authentication Virtual Servers‘ and click ‘Add‘
- Set the name to ‘AD-RSA-Azure Auth vServer‘
- Set ‘IP Address Type‘ to ‘Non Addressable‘. (This authentication vServer will only be used internally, so we don’t need an IP address)
- Under Advanced Authentication Policies add a binding for the LDAP policy you created above (ex. DOMAINA LDAP Policy)
- Set the priority to 100
- Set the Goto Expression to NEXT
- Set the Next Factor to ‘Azure_RSA Auth PL – START‘ PolicyLabel we created this above
- Under Login Schemas add a binding for the ‘Username Password Login Schema Policy‘ policy we created this earlier
- Create an authentication profile
- Go to ‘NetScaler -> Security -> AAA – Application Traffic -> Authentication Profile‘ and click ‘Add‘
- Set the name to ‘AD-RSA-Azure Auth vServer Profile‘
- Set Authentication Host to ‘fake‘ (this won’t be used)
- Set Virtual Server Type to ‘Authentication Virtual Server‘
- Set the Authentication Virtual Server to the ‘AD-RSA-Azure Auth vServer‘ we created above
- Leave Authentication Domain blank
- Leave Authentication Level to set 0
Now that everything has been created all that is left is to configure the NetScaler Gateway Virtual Server. If you already have one setup you can simply remove all authentication profile bindings and add the Authentication Profile we just created above.

With everything created we can test the authentication flow…
This is the login flow when the user IS NOT a member of the ‘Enable Azure MFA 2FA Override‘ group.
This is the login flow when the user IS a member of the ‘Enable Azure MFA 2FA Override‘ group. Depending on what the Azure AD user’s ‘Default sign-in method’ is set to they may or may not receive a prompt after the 2nd prompt. If their default method is set to something like SMS or Authenticator App code they will receive a 3rd window asking for that code. This prompt is automatically generated, so we did not have to create it like we did for the RSA prompt. In the case below the user’s default method was set to ‘Microsoft Authenticator – notification’, so the login flow will wait until the prompt is acknowledged, denied, or times out on the user’s Microsoft Authenticator instance.
The last thing to mention is that a little extra configuration needs to be added to support Citrix Receiver clients (Windows/Mac/Android/iOS). In 11.1 52.x+ NetScaler AAA servers need to be configured with a separate set of polices for requests where the User-Agent header contains ‘CitrixReceiver’. It is fairly straightforward and Citrix has a write up on this, so I won’t write it all out. I will say the one thing to consider is that you will not be able to support multiple second factor methods using the AD group. For these clients you will have to choose one or the other. In our case we will be sticking with RSA until the majority of users are moved over meaning those users connecting Receiver directly to NSG will need to have that method available. Fortunately for us we do not have many users that access our environment this way. Citrix’s documentation on this can be found here: https://support.citrix.com/article/CTX223386.