Tag Archives: hybrid

Using Application Permissions (and client credentials grant flow) with Hybrid Exchange Graph API

We recently came across an application that uses Graph API and we wanted to start using it for some our on-prem mailboxes. Hybrid Graph API only supports delegated authentication flows and not application authentication flows. Just because something isn’t “supported” doesn’t mean you can’t make it work! There are two things that we’ll need to do to make this work.

First, any internet-facing Exchange server will need to have ‘V1S2SAppOnly‘ OAuth support added. You can do this by adding V1S2SAppOnly to the OAuthHttpModule.Profiles key in the REST web.config (ex. …\Program Files\Microsoft\Exchange Server\V15\FrontEnd\HttpProxy\rest). Once you add this value the key should look like this:

After this has been added either perform an iisreset or restart the ‘MSExchangeRestFrontEndAppPool‘ app pool in IIS for each server where you did this modification.

The next step is to add the appropriate ‘AppOnlyPermissions‘ to the Microsoft Graph partner application in Exchange/AD. First we’ll take a look at our Graph partner application:

Get-PartnerApplication | Where {$_.Name -like '*graph*'} | select *permissions* | fl

AppOnlyPermissions : 
ActAsPermissions   : {Mail.Read, Mail.Write, Mail.Send, Calendars.Read...}

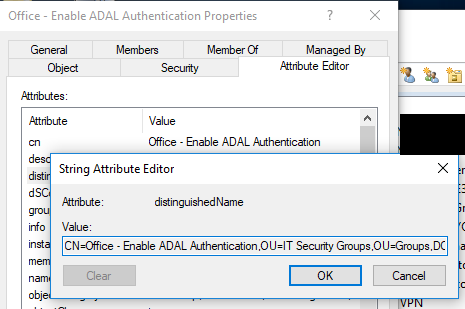
The ‘AppOnlyPermissions‘ value should be blank. We need this to match the ‘ActAsPermissions‘ value. You’d think (and some other articles say) that you could just run Set-PartnerApplication -AppOnlyPermissions… but this was not a supported parameter for me. To set this we’ll have to edit AD directly. You’ll need to fire up something like ADSIEdit, load the AD configuration partition, and drill down to your Exchange org and partner application object. The path should be something like:

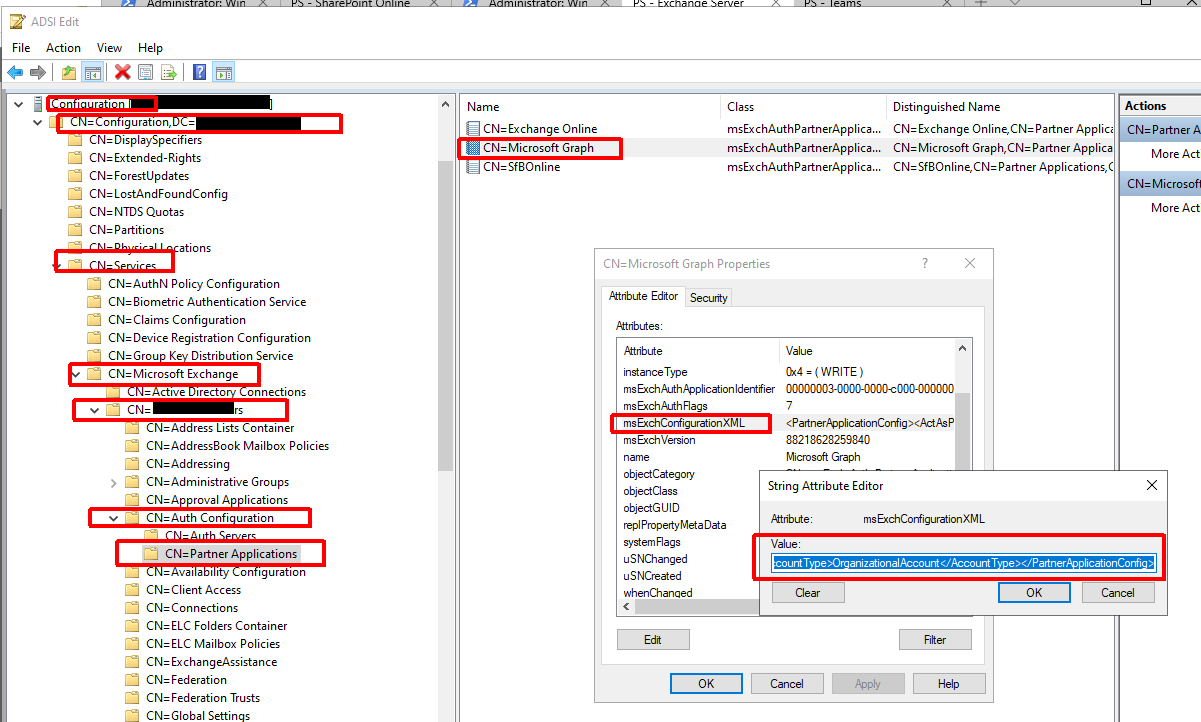
CN=Microsoft Graph,CN=Partner Applications,CN=Auth Configuration,CN=YOUR_EXCH_ORG,CN=Microsoft Exchange,CN=Services,CN=Configuration,DC=domain,DC=com

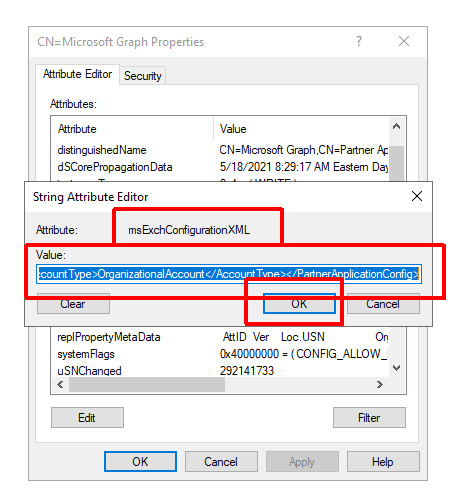
Once here you’ll need to open the ‘Microsoft Graph‘ object and copy the ‘msExchConfigurationXML‘ attribute value to the clipboard:

Next, we’ll use Notepad++ and the XML Tools plugin to manipulate this. MAKE SURE YOU BACKUP THIS VALUE. We want to convert this to a nicely formatted XML output so that it is easy to work with. To do this we use the ‘Pretty print’ option in XML Tools.

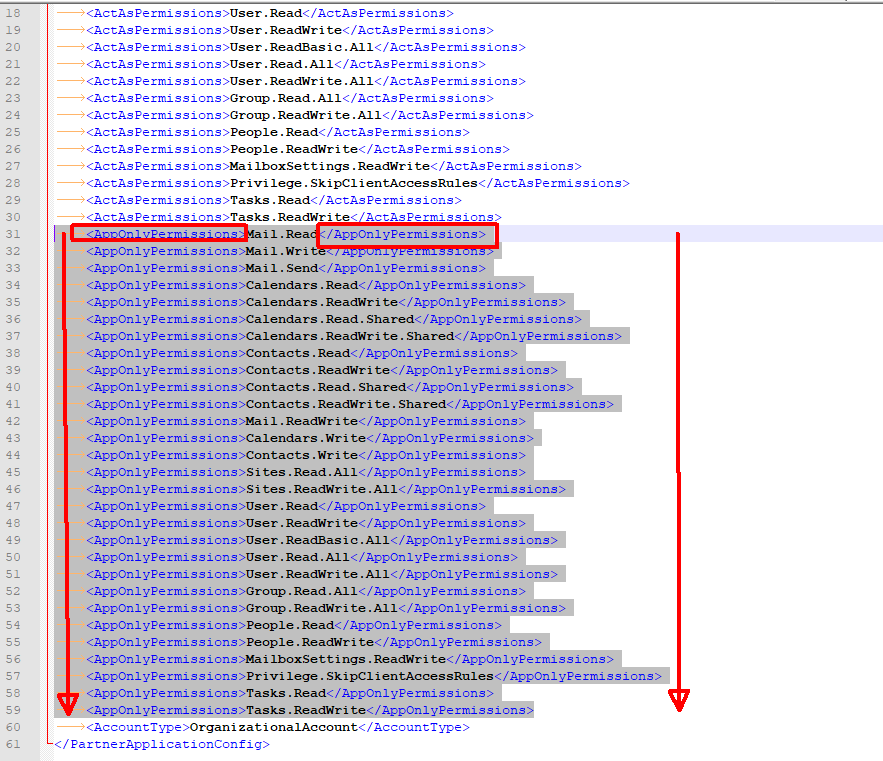
Once we have this we’ll need to duplicate all of the ‘ActAsPermissions’ lines and then use find and replace to convert those tags to be ‘AppOnlyPermissions’. Doing this will create a set of application permissions based on our delegated permissions (ActAsPermissions).

Once completed we need to linearize the output again so that we can copy it back into AD. We can use the ‘Linearize’ option in XML Tools for this:

Once we have the XML in the proper format we can put it back in the AD object:

Now that we’ve updated the AD object we can verify everything looks good by checking Exchange again (AppOnlyPermissions should have the same values as ActAsPermissions):

Get-PartnerApplication | Where {$_.Name -like '*graph*'} | select *permissions* | fl


AppOnlyPermissions : {Mail.Read, Mail.Write, Mail.Send, Calendars.Read...}
ActAsPermissions   : {Mail.Read, Mail.Write, Mail.Send, Calendars.Read...}

At this point you should be able to access on-prem Exchange resources using the supported Graph API functions with Application Permissions.

NOTE: One limitation of this is that application access policies (set in EXO) DO NOT apply and are ignored when accessing an on-prem mailbox.

Looks like you don’t have permission to schedule meetings for this account: A deep-dive into Teams delegate meeting scheduling in a hybrid environment

After implementing Teams last year we were faced with a number of issues to work through. One of the issues we were having was the inability of mailbox delegates to schedule meetings on behalf of mailbox owners. If you are a hybrid Exchange user, the very first step is making sure you have OAuth configured between your on-premises environment and Exchange online. The Hybrid Configuration Wizard should be taking care of this for you. I’ve also written an article on properly securing it externally. You will also need create and configure a service principal to allow Teams to interact with your on-premises Exchange environment. Steps 2-3 in this article must be preformed to set this up. If one of these items are not configured, you will receive the error ‘Sorry, but we can’t connect to the server right now. Please try again later.

Teams delegate invitations through Outlook - Microsoft Community

There is already a lot of decent information around troubleshooting the OAuth side of things here, so I’m going to focus on the other pieces that aren’t always covered…

Once these pre-requisites are configured, you may find users are still receiving errors when trying to schedule Teams meetings on behalf of other users. An error that many of our users were experiencing was ‘Looks like you don’t have permission to schedule meetings for this account. Talk to the owner to get permission and try again.

Scheduling Teams Meetings as Delegate for another mailbox. - Microsoft Tech  Community

During testing we found that Teams was looking for a specific set of permissions on the owner’s mailbox when generating the Teams meeting in Outlook. In order to create a meeting as a delegate, the delegate must be a true ‘delegate’ under the owner’s mailbox AND have either ‘Author‘ or ‘Editor‘ access to the calendar like the example below. If the user is not present in this list or if they are present but show a calendar permission such as ‘Custom‘ in this dialog, they will receive an error like the one above when creating the Teams portion of the meeting even if they technically have all the required permissions to create a meeting on behalf of the organizer. Many times permissions are granted either by giving full access (Add-MailboxPermission) to the mailbox or by granting folder level permissions (Add-MailboxFolderPermission) and by granting Send-On-Behalf/SendAs permissions.

NOTE: If you are getting the error like the one below: ‘The user ‘Smith, John’ cannot be added. Non-local users cannot be given rights on this server‘ when trying to add an EXO user as a delegate to an on-prem mailbox you need to make the mailbox ACLable per this KB: A remote mailbox created in on-premises AD DS is not ACLable in Exchange Online.

Enabling Cross-premises delegate access - Microsoft Tech Community
Error encountered when adding an EXO user as a delegate to an on-prem mailbox

To understand why Teams requires such a specific configuration, let’s look at what is happening in the background… When you are creating a new Teams meeting via Outlook, the Teams back-end actually does a OAuth-authenticated EWS (Exchange Web Services) ‘GetDelegate‘ call to your on-premises Exchange environment to verify that the user creating the meeting actually has access to the mailbox. The request look like this:

<?xml version="1.0" encoding="utf-8"?>"
<soap:Envelope xmlns:soap="http://schemas.xmlsoap.org/soap/envelope/"
               xmlns:t="http://schemas.microsoft.com/exchange/services/2006/types">
  <soap:Header>
    <t:RequestServerVersion Version="Exchange2016"/>
  </soap:Header>
  <soap:Body>
    <GetDelegate xmlns="http://schemas.microsoft.com/exchange/services/2006/messages"
                 xmlns:t="http://schemas.microsoft.com/exchange/services/2006/types"
                 IncludePermissions="true">
      <Mailbox>
        <t:EmailAddress>mailboxowner@domain.com</t:EmailAddress>
      </Mailbox>
    </GetDelegate>
  </soap:Body>
</soap:Envelope>

Exchange will respond with delegate list and associated permissions (similar to the view you see in Outlook).

<?xml version="1.0" encoding="utf-8"?>
<!-- Note: EwsEditor has replaced the "utf-16" text in the first line with"utf-8" in order for the XML to render in the response web control. -->
<s:Envelope xmlns:s="http://schemas.xmlsoap.org/soap/envelope/">
    <s:Header>
        <h:ServerVersionInfo MajorVersion="15" MinorVersion="1" MajorBuildNumber="1979" MinorBuildNumber="3" Version="V2017_07_11" xmlns:h="http://schemas.microsoft.com/exchange/services/2006/types" xmlns="http://schemas.microsoft.com/exchange/services/2006/types" xmlns:xsd="http://www.w3.org/2001/XMLSchema" xmlns:xsi="http://www.w3.org/2001/XMLSchema-instance" />
    </s:Header>
    <s:Body xmlns:xsi="http://www.w3.org/2001/XMLSchema-instance" xmlns:xsd="http://www.w3.org/2001/XMLSchema">
        <GetDelegateResponse ResponseClass="Success" xmlns="http://schemas.microsoft.com/exchange/services/2006/messages">
            <ResponseCode>NoError</ResponseCode>
            <ResponseMessages>
                <DelegateUserResponseMessageType ResponseClass="Success">
                    <ResponseCode>NoError</ResponseCode>
                    <DelegateUser>
                        <UserId xmlns="http://schemas.microsoft.com/exchange/services/2006/types">
                            <SID>S-1-5-21-2061111111-1111111111-222222222-33333</SID>
                            <PrimarySmtpAddress>delegateuser@domain.com</PrimarySmtpAddress>
                            <DisplayName>User, Delegate</DisplayName>
                        </UserId>
                        <DelegatePermissions xmlns="http://schemas.microsoft.com/exchange/services/2006/types">
                            <CalendarFolderPermissionLevel>Editor</CalendarFolderPermissionLevel>
                            <TasksFolderPermissionLevel>None</TasksFolderPermissionLevel>
                            <InboxFolderPermissionLevel>None</InboxFolderPermissionLevel>
                            <ContactsFolderPermissionLevel>None</ContactsFolderPermissionLevel>
                            <NotesFolderPermissionLevel>None</NotesFolderPermissionLevel>
                        </DelegatePermissions>
                        <ReceiveCopiesOfMeetingMessages xmlns="http://schemas.microsoft.com/exchange/services/2006/types">false</ReceiveCopiesOfMeetingMessages>
                        <ViewPrivateItems xmlns="http://schemas.microsoft.com/exchange/services/2006/types">false</ViewPrivateItems>
                    </DelegateUser>
                </DelegateUserResponseMessageType>
            </ResponseMessages>
            <DeliverMeetingRequests>NoForward</DeliverMeetingRequests>
        </GetDelegateResponse>
    </s:Body>
</s:Envelope>

The important things here are that the user is present and has either ‘Author‘ or ‘Editor‘ permissions to the calendar. Remember, even having ‘Custom‘ permissions to the calendar will result in an error during meeting creation.

Another issue you can run into is one where you have already added the user as a delegate with the appropriate calendar permissions, but still receive the error ‘Looks like you don’t have permission to schedule meetings for this account. Talk to the owner to get permission and try again.‘ To troubleshoot this, let’s look at the mailbox from the perspective of Teams and perform the EWS ‘GetDelegate‘ call ourselves. We can use EwsEditor to do this.

In this example we receive an empty response from EWS even though we have properly configured the delegate permissions. This is indicative of mailbox corruption and to resolve this we have to understand how delegates are actually stored in the mailbox. Delegates actually translate to a number of things, but at the center of all of this is the ‘LocalFreebusy‘ object in the mailbox which can only be viewed with a tool like MFCMapi. The reason EWS is returning a blank list is because the object in the mailbox is corrupt and missing the delegate information. In order to resolve this we will use MFCMapi to delete the object. You can perform this on behalf of the user if you have full mailbox permissions and write access to their AD account, but in this example we will run as the mailbox owner using their default MAPI profile. To reset/repair the delegates list we will perform the following steps:

  • Before anything, record all of the users delegates from Outlook along with all the permissions for each one
  • Go to QuickStart -> Open Folder -> Local Freebusy
  • Choose the item with the subject ‘LocalFreebusy
  • Choose ‘Delete message‘ and when prompted with options choose ‘Permanent delete passing DELETE_HARD_DELETE…’
  • Go back into Outlook and re-create the user’s delegate(s)

After recreating the user’s delegates we can issue the EWS call again and see if they now show properly. The response should contain every delegate user along with their ‘Author‘ or ‘Editor‘ calendar permissions. Once you have verified EWS is returning the correct information you can try creating a new Teams meeting request.

Properly securing your on-prem Exchange 2016 environment when using Hybrid Modern Authentication

In the past many organizations completely blocked or limited external access to on-premises Exchange servers because of the lack of multi-factor authentication. Protocols like OutlookAnywhere (also known as RPC-over-HTTP, now MAPI-over-HTTP) and EWS had no native methods to accomplish multi-factor authentication. Failure to protect these protocols from external exposure has led to many breaches like FIN4 and London Blue.

HMA to the rescue… In 2017 Microsoft finally answered this deficiency with Hybrid Modern Authentication. I briefly touched on modern authentication in two previous articles (here and here). With Hybrid Modern Authentication Microsoft gave you the ability to use new technologies like modern authentication and conditional access for on-premises Exchange. Clients will connect using modern authentication by default once Exchange is on a supported version, supported clients are implemented, and the configuration is implemented. The issue here is that legacy Windows authentication is still available. You can simply disable modern authentication in the client or use a different client and you are now connected to on-premises Exchange with a simple username and password completely bypassing conditional access. Conditional access is only invoked when you are authenticating with modern authentication. Exchange 2019 implemented Authentication Policies which allow you turn off legacy authentication methods. If you are using Exchange 2019, you can use these to lock down your environment.

We were in the situation where we wanted to allow secure external access to Exchange (mainly for OutlookAnywhere, but also Outlook Mobile), but we couldn’t have any legacy authentication exposure. The solution we came up with was creating a set of externally facing Exchange 2016 mailbox servers (think Client Access Servers from the pre-Ex2016 days) that have all legacy authentication methods disabled (only OAuth available). These servers are the only ones exposed to the internet. The protocols we want to expose but lock down are ActiveSync (needed for Outlook Mobile), EWS (Exchange Web Services), MAPI, and OAB (Offline Address Book). To lock these down we ran the following against the externally facing servers:

$Servers = @(Get-MailboxServer excas01)
$Servers = $Servers + (Get-MailboxServer excas02)
$Servers | Get-ActiveSyncVirtualDirectory | Set-ActiveSyncVirtualDirectory -BasicAuthEnabled $false
$Servers | Get-WebServicesVirtualDirectory | Set-WebServicesVirtualDirectory -WindowsAuthentication $false
$Servers | Get-MapiVirtualDirectory | Set-MapiVirtualDirectory -IISAuthenticationMethods @('OAuth')
$Servers | Get-OabVirtualDirectory | Set-OabVirtualDirectory -WindowsAuthentication $false

After this is completed, Windows and basic authentication should now fail for these virtual directories.

IMPORTANT: It is VERY important to regularly check that these settings are still in place. You should always re-run these commands after any kind of Exchange update. If you do not do this, you could inadvertently expose your Exchange environment. A simple script could be run on a schedule to check and report on any changes to the authentication configuration of these virtual directories.

The second step is disabling or blocking the other virtual directories that do not need to be accessed externally. For us, these were ECP, OWA, PowerShell, and RPC. We have an on-premises load balancer with SSL bridging configured for our Exchange environment, so we used that to block access to these virtual directories. Another option is to use IP restrictions in IIS on these virtual directories. A third option is to disable the virtual directories via PowerShell. For those of you who want to allow secure access to OWA (Outlook Web Access) you can use Azure App Proxy to accomplish this or an ADC like NetScaler or F5 Big-IP.

The final step in this configuration is allowing the O365 servers to reach an unaltered version of EWS for the IntraOrganizationConnector used for Exchange Online to pull free/busy data (and other data like photos) from your on-premises environment. I found that for some reason the IntraOrganizationConnector fails to authenticate from EXO->on-premises when it uses the modified virtual directory even though all OAuth tests pass. I also use this configuration for my MRS endpoint when doing mailbox migrations since MRS wants to do traditional Windows authentication to EWS. If you are using the Microsoft Hybrid Agent, you shouldn’t have to do this since Azure App Proxy is taking care of the MRS and free/busy communication. I have still have an ongoing ticket open with Microsoft to understand the root cause of this. The workaround is fairly simple:

  • Create a namespace that can be used for EXO->on-premises communications. (Ex. exocomm.domain.com)
  • Configure this namespace to point to your regular INTERNAL and unaltered mailbox servers
  • Lock down this namespace in your firewall, so that ONLY Microsoft O365 servers can reach it. NOTE: This is very important and failure to do so will undermine all of the work done above and leave you exposed. We use a combination of PaloAlto firewalls and MineMeld to accomplish this, but this can be accomplished with a static/maintained ACL as well.
  • Configure the IntraOrganizationConnector in EXO to not use Autodiscover and to use this new namespace as its endpoint with the following commands:
Get-IntraOrganizationConnector | Set-IntraOrganizationConnector -TargetSharingEpr "https://exocomm.domain.com/ews/Exchange.asmx"
Get-IntraOrganizationConnector | Set-IntraOrganizationConnector -DiscoveryEndpoint $null

Outlook with ADAL + Hybrid Modern Authentication causing a white box and AADSTS500011 / 500011 errors in Azure AD

We are in the process of selectively turning on ADAL for Outlook clients. We have already gone through enabling Hybrid Modern Authentication for Exchange (https://docs.microsoft.com/en-us/exchange/configure-oauth-authentication-between-exchange-and-exchange-online-organizations-exchange-2013-help) a while back. We recently ran into an issue where specific users were getting a white box about a minute after launching Outlook. I have seen this issue where all of Outlook freezes, but this was not the same. They receive this error while Outlook continues to run in the background. The error is also accompanied by an Azure AD sign-in failure for the user. The error received is 500011. When looking this up in the documentation (https://login.microsoftonline.com/error?code=500011) you can see it is referring to the error ‘The resource principal named {name} was not found in the tenant named {tenant}‘.

I decided to do a Fiddler trace to get to the bottom of this and this is where the issue started becoming clearer. In the trace you see Outlook reaching out to autodiscover.domainname.com (which is on-prem), getting a 401 response, reaching out to login.windows.net/login.microsoftonline.com, and looping in this manner. This part of the capture aligned exactly with the mysterious white box.

In my case this specific set of users had a different primary SMTP address (and UPN) than the other users we had already enabled ADAL for and their autodiscover.domain.com URL was never added to our Azure AD service principals for the ‘Office 365 Exchange Online‘ application ID. Microsoft documentation talks about this in Step 5 of the link I added at the beginning of this post. Using the ‘MSOnline‘ PowerShell module I was able to add the URL to the service principal list.

$x = Get-MsolServicePrincipal -AppPrincipalId 00000002-0000-0ff1-ce00-000000000000
$x.ServicePrincipalnames.Add("https://autodiscover.domain.com/")
Set-MSOLServicePrincipal -AppPrincipalId 00000002-0000-0ff1-ce00-000000000000 -ServicePrincipalNames $x.ServicePrincipalNames

After adding the principal there were no more instances of the white box.

Creating group-based GPO without requiring a logoff/logon to take effect

As part of piloting O365 I was tasked with implementing hybrid modern authentication in our Exchange org in order to leverage functionality like the Outlook mobile application and MFA within the Windows version of Outlook for on-prem mailboxes. One caveat of enabling hybrid modern authentication in Exchange is that once this is flipped on any compatible client (ex. Outlook 2016) will begin using modern authentication (ADAL) exclusively by default. This switch can potentially be disruptive and we did not want to run into issues with the general user base. To do this we needed to disable modern authentication in Outlook on the client-side while being able to selectively enable it for certain users. This is easily handled with a ‘EnableADAL’ registry setting via GPO/Group Policy Preferences (GPP)/AD group. The issue is when you use an AD group with a group policy any member addition/removal needs to be coupled with a logoff/logon (or a reboot if it involves in a computer object in an AD group) to generate a new Kerberos token. I wanted to be able to quickly enable/disable ADAL for a user without requiring them to logoff/logon.

In order to get around this requirement I used GPP targeting with an LDAP query that looked for the group membership rather than standard group membership check. This LDAP query is completely dynamic and isn’t tied to the group list in user’s Kerberos token.

To do this you can do the following:

  • Create your GPP setting
  • Enable ‘Item-level targeting‘ on the setting
  • Create a new ‘LDAP Query‘ item
  • Create your filter using the distinguished name of your AD group and the ‘%LogonUser% variable
(&(objectCategory=user)(memberOf=GROUP DISTINGUISHED NAME)(sAMAccountName=%LogonUser%))
Create LDAP Query
Create LDAP Query condition
Retrieve group distinguishedName

This method could also be used for traditional GPO settings as well, but you’d have to use GPP to directly target GPO registry value(s) (ex. HKCU\Software\Policies\Microsoft\Windows\Control Panel\Desktop – ScreenSaveActive=0/1). This method could also be used for computer-based settings, but the LDAP query would have to be adjusted to target a ‘computerobjectCategory and the name of the computer (%ComputerName%). I wouldn’t use this method for everything, but can be very helpful for those one-off situations where you want a setting to take effect immediately without requiring a logoff/logon or reboot.

Journaling stops working after entering Exchange Online hybrid mode

We recently made changes to our on-prem Exchange org. Not long after we realized that any email flowing through Exchange Online to on-prem was not getting processed by our journaling configuration (per-database journaling). After digging and opening a case with Microsoft we found that Exchange Online was injecting this header:

X-MS-Exchange-Organization-Processed-By-Journaling: Journal Agent

This header tells Exchange that journaling was already processed. On-prem Exchange will then not process any journaling for that message. O365 apparently started injecting this header in the summer of 2018. The reason we did not run into the issue earlier is because until we were in hybrid mode (and ran the hybrid wizard) the Exchange header firewall was stripping this header as it arrived on-prem. They did release an article on this exact issue back in July 2016, but we didn’t come across it until Microsoft found the issue. The current fix is to duplicate all journal rules/settings in Exchange Online. According to Microsoft they are planning to add a warning in the hybrid wizard for this condition.