Category Archives: Linux

Hacking a Verizon RC8021V IP camera – Part 3

Examining the landscape

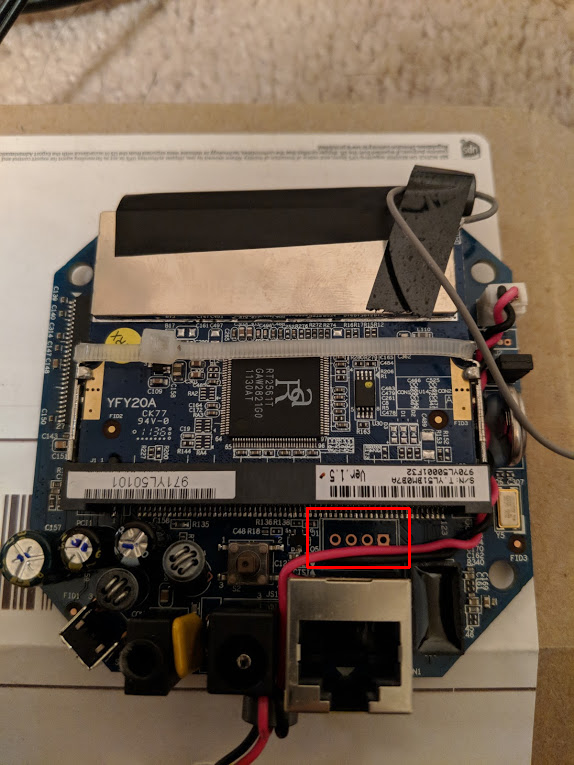
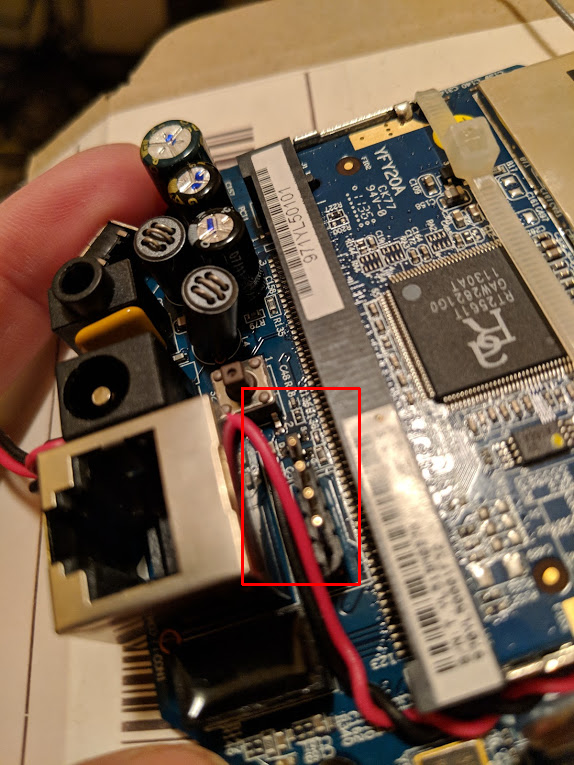
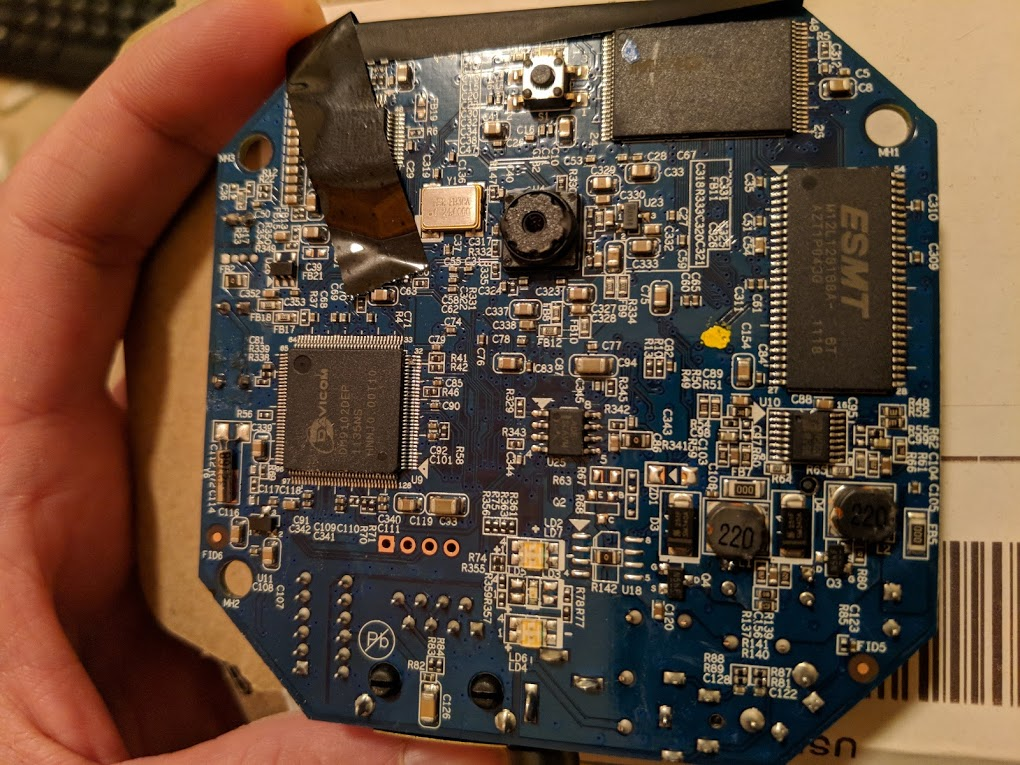
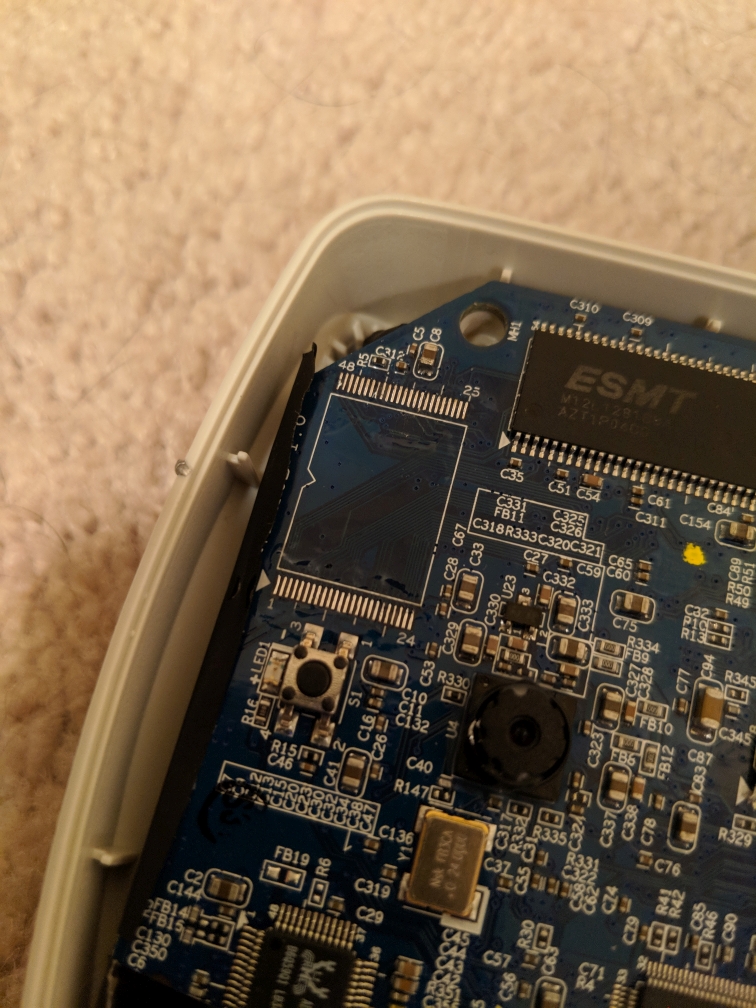
In part two I covered how I was able to make use of the cameras by first attempting to crack a known root password hash (which wound up not working for this firmware) and then later re-flashing the camera with alternative firmware. Even though I accomplished my primary goal of making the Verizon-branded camera usable I still felt I could take this further by actually cracking the default admin credentials and avoiding the need to re-flash these cameras. I started by taking a closer look at the camera and its components. I had already identified and utilized the UART points, but hadn’t yet looked very closely at other items. One of the easiest things you can do is take FCC ID and look it up in the FCC database. I did this and although it didn’t provide me with anything especially helpful it was an interesting read. After this I decided to single out each component and research them. The picture below shows the front side of the main board. I’m particularly interested in the two chips in the top right corner of the board, but we’ll get there.

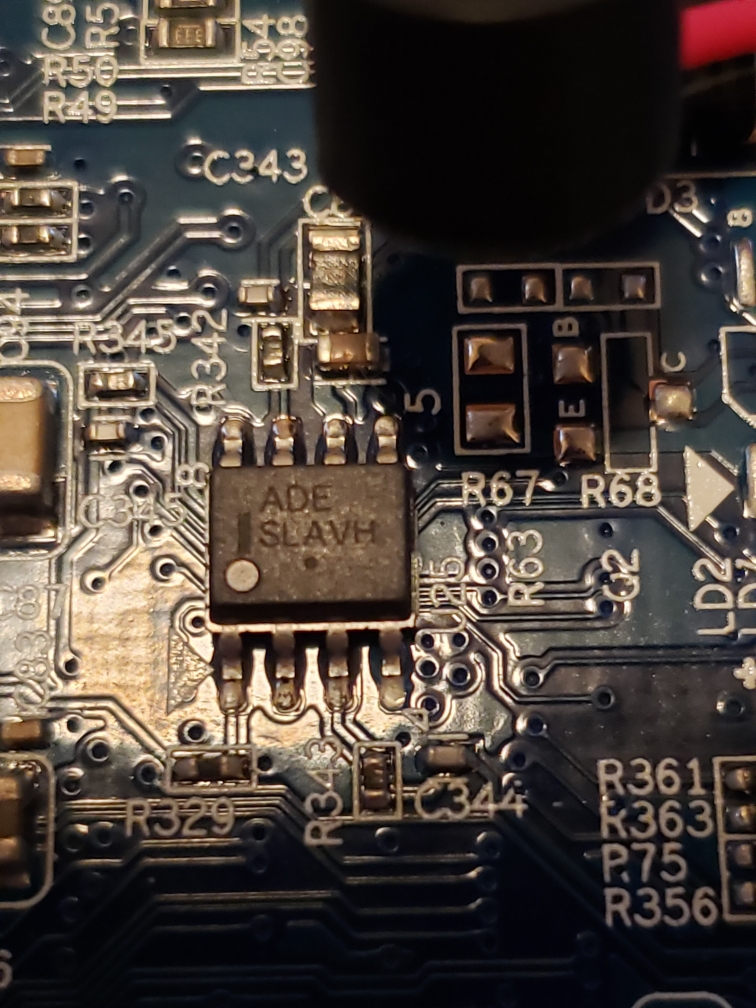
I started with the small 8-pin chip in the middle of the board. I had originally hoped this was a standard EEPROM chip as they are fairly easy to read, but taking a closer look it didn’t seem to be the case. The text read “ADE SLAVH“. I was unable to find anything on this, so it was clearly not an EEPROM.

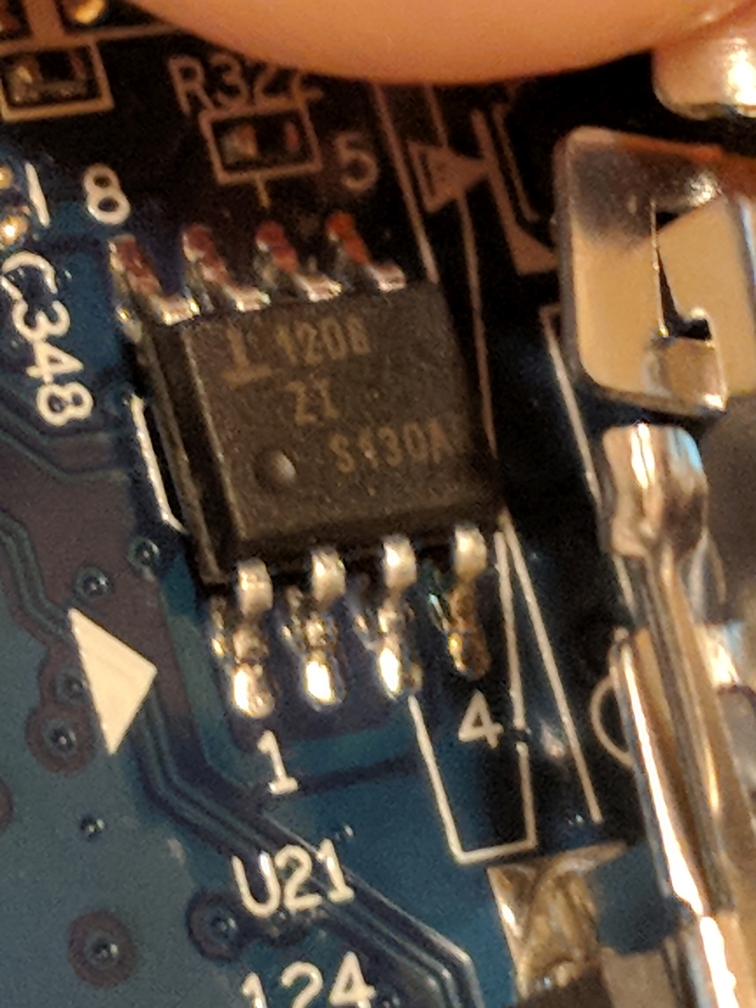
I then moved to another 8-pin chip on the back of the board (next to the wireless interface module). After doing a little research on this chip it seemed to be a Renesas ISL 1208 RTC (real-time clock).

The next chip was one to the right on the front side of the board. It was a 16-pin chip, but I had trouble finding anything about this one. It was clear this wasn’t one that would be useful at this point, so I moved on.

The next chip I focused on was one of the two larger ones in the upper right of the front side of the board. This chip was labeled ESMT M12L128168A. It also had a matching partner on the direct opposite side of the board. When looking this up it wound up being a 16MB RAM chip. These two 16MB chips align with the 32MB of RAM in the boot output I observed via UART back in part one.

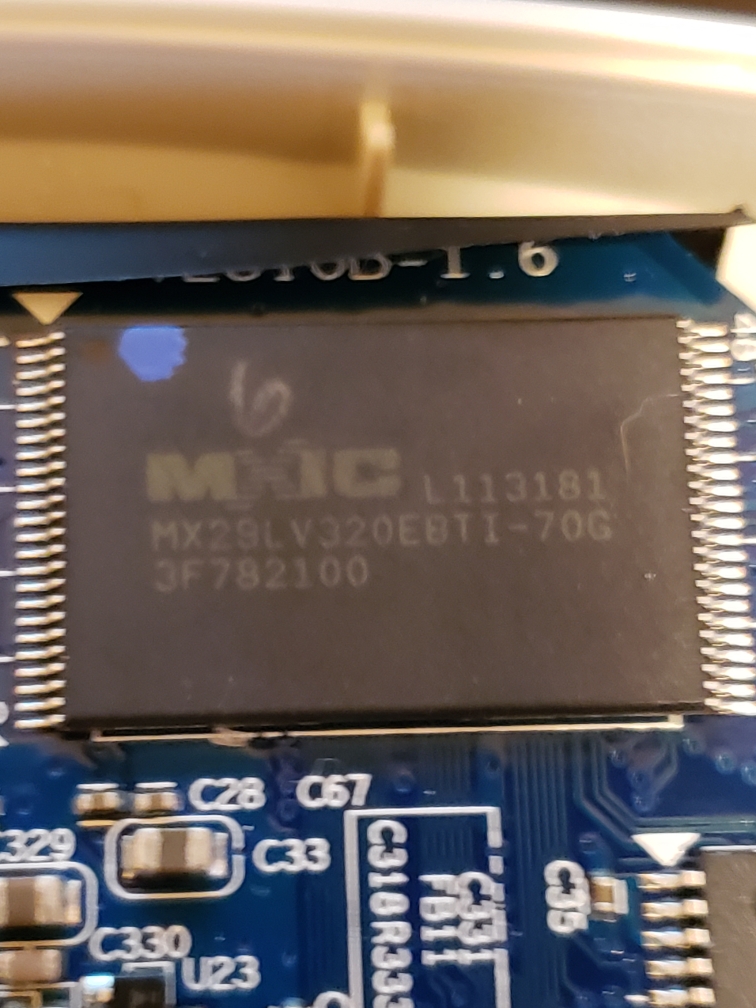
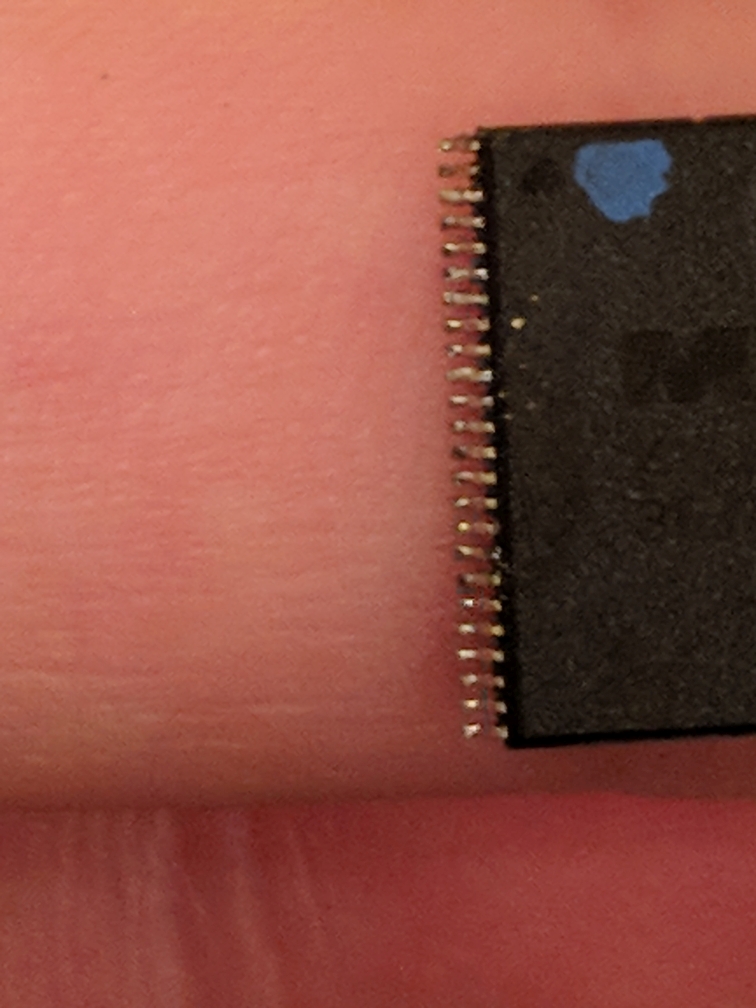
The last chip I moved to was one reading MX29LV320EBTI-70G. This one was sitting right next to the RAM chip above. A quick search revealed that this is actually a Macronix 4MB 48-PIN NOR parallel flash chip. This also aligned with the boot output from part one. During bootup the bootloader referenced a 4MB flash. This was the component to focus on.

Extracting a surface-mount device component

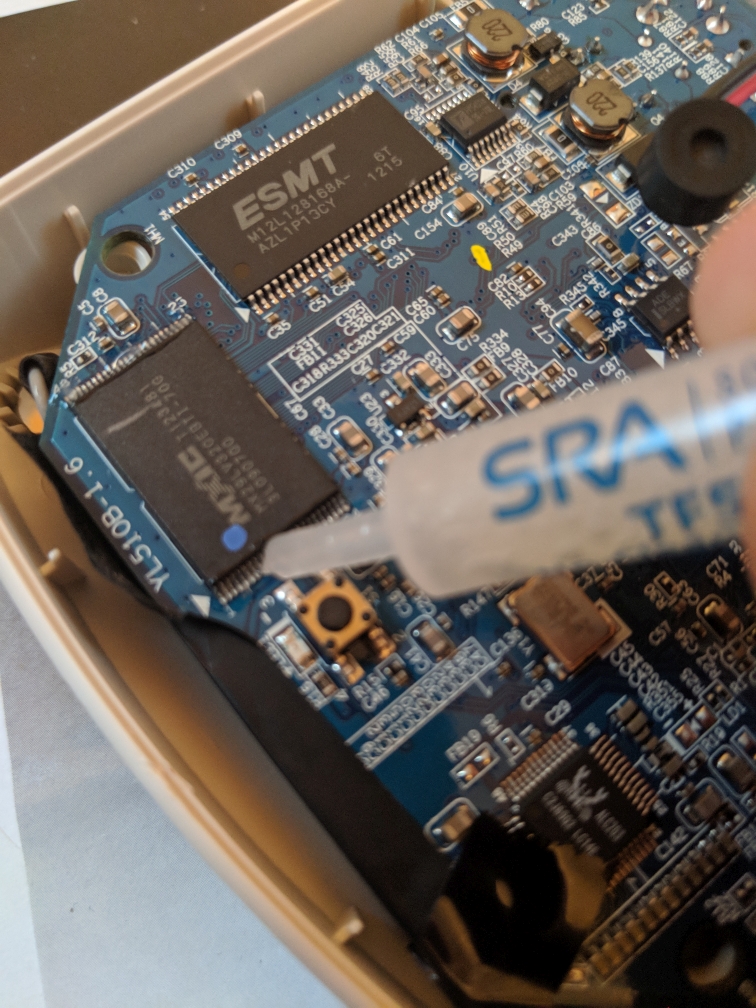
Now that I knew which chip was the flash chip it was time to attempt extracting it. I had never attempted the extraction of such a small component before, so I did some research into methods. I found that there are special low melting point alloys that are meant for just this type of task. I chose to go with SRA Fast Chip KIt SMD Removal Alloy. It was relatively cheap and available on eBay. Another popular choice for this task is Chip Quik which looks to be identical, but slightly more expensive.

To use these products you take the included flux (or a regular rosin flux) and cover all pins on the chip. You then melt a small amount of the alloy and cover all pins with it. Once everything is covered you try to keep the alloy melted by running the iron over the alloy with it while carefully extracting the chip with tweezers.

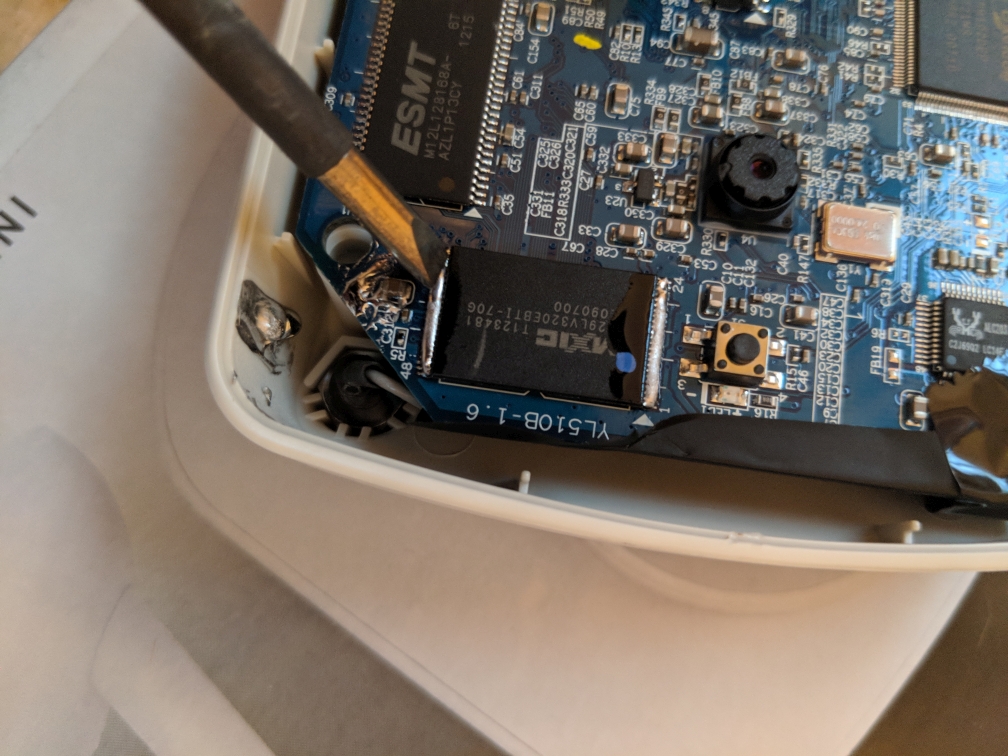
Once the chip has been pulled you can clean up the board with the iron (if you are planning to re-solder a chip there). The chip was a little more tedious to clean up. I carefully ran the iron’s flat tip over the pins while slowly dragging the chip across cardboard. The alloy came off in small streaks with each pass. The chip needs to be free of any bridging in order to be read properly.

Reading a NOR parallel flash chip

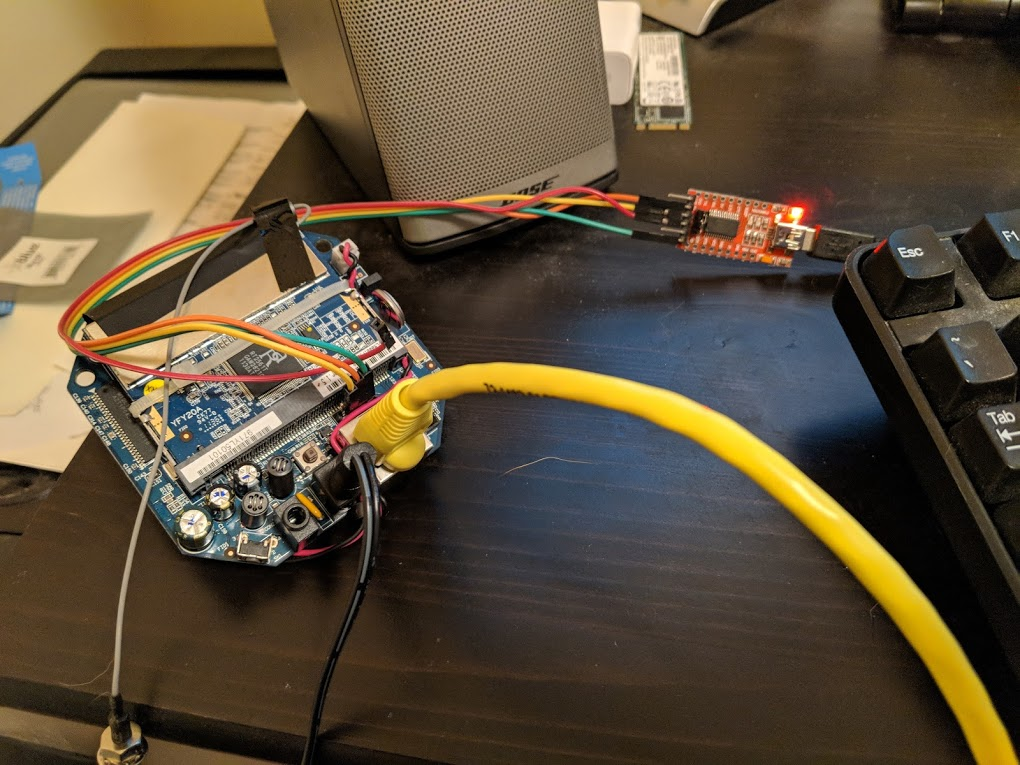
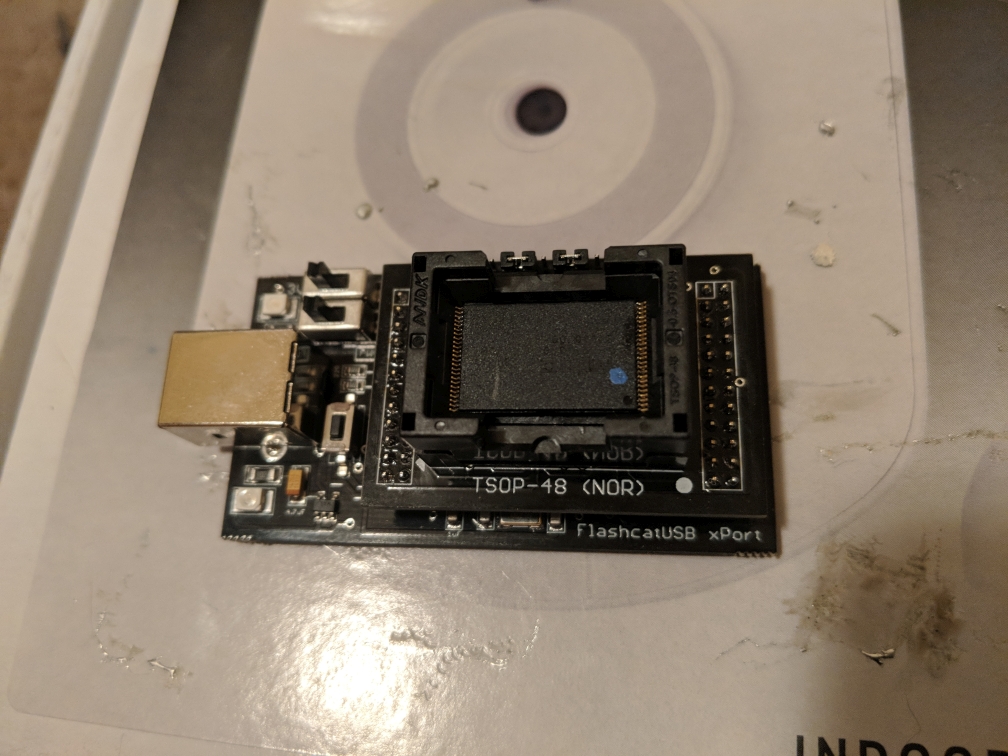
Reading a parallel flash chip can be a bit difficult. There are a lot of pins to communicate with and it all has be done in a specific order. Communicating with something like a standard 8-pin EEPROM is much easier. I was able to find someone using an Arduino to read a TSOP-48 NOR flash chip like this one, but I decided to take an easier route as I had already put a good amount of time into this project. I looked into different flash readers/writers and came across the FlashcatUSB xPort with the TSOP-48 adapter. It was relatively cheap and supported this chip along with many many others. I’m sure I’ll be able to make use of it in the future. Setup was easy and I was able to successfully pull an image from the chip.

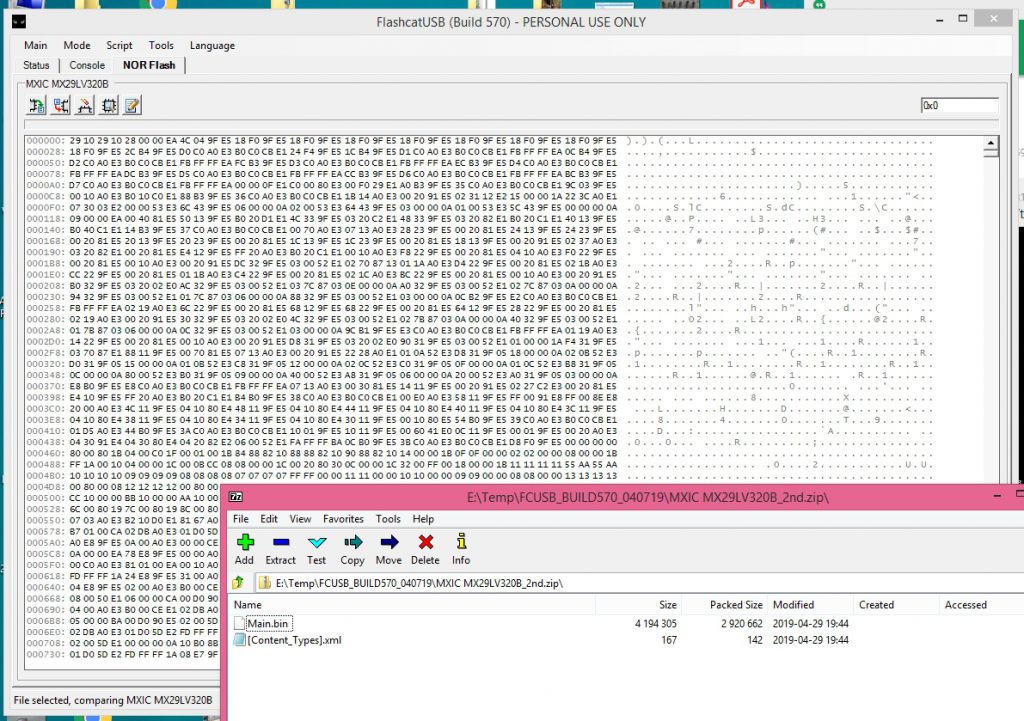
Now that I had a binary image of the chip I could start digging for what I was after… the default username/password for the admin console. In part one we learned the partition layout from the bootup output:

 Creating 9 MTD partitions on "plnormtd":
 0x00000000-0x00008000 : "bootloader"
 0x0000c000-0x0000e000 : "MAC"
 0x000e0000-0x00400000 : "SQUASHFS"
 0x0000e000-0x00010000 : "LOGO Image"
 0x00020000-0x00400000 : "Kernel+FS"
 0x00000000-0x00400000 : "ALL"
 0x0000a000-0x0000c000 : "HTTPS CA"
 0x00010000-0x00020000 : "CONFIG"
 0x00008000-0x0000a000 : "Reserve" 

The “CONFIG” partition is usually what holds the persistent device configuration in plain-text on these types of devices. I loaded the image into hexedit and started working my way down from 0x00010000… and there it was! Some developer at Verizon has a sense of humor. I finally had what I really wanted from the beginning… the default admin console username/password. I tested it immediately and it worked. I also verified that once in the console I could change the username/password along with any other settings and they persisted a reboot. The admin console was almost identical to the default Sercomm web console. All the same configuration options were present.

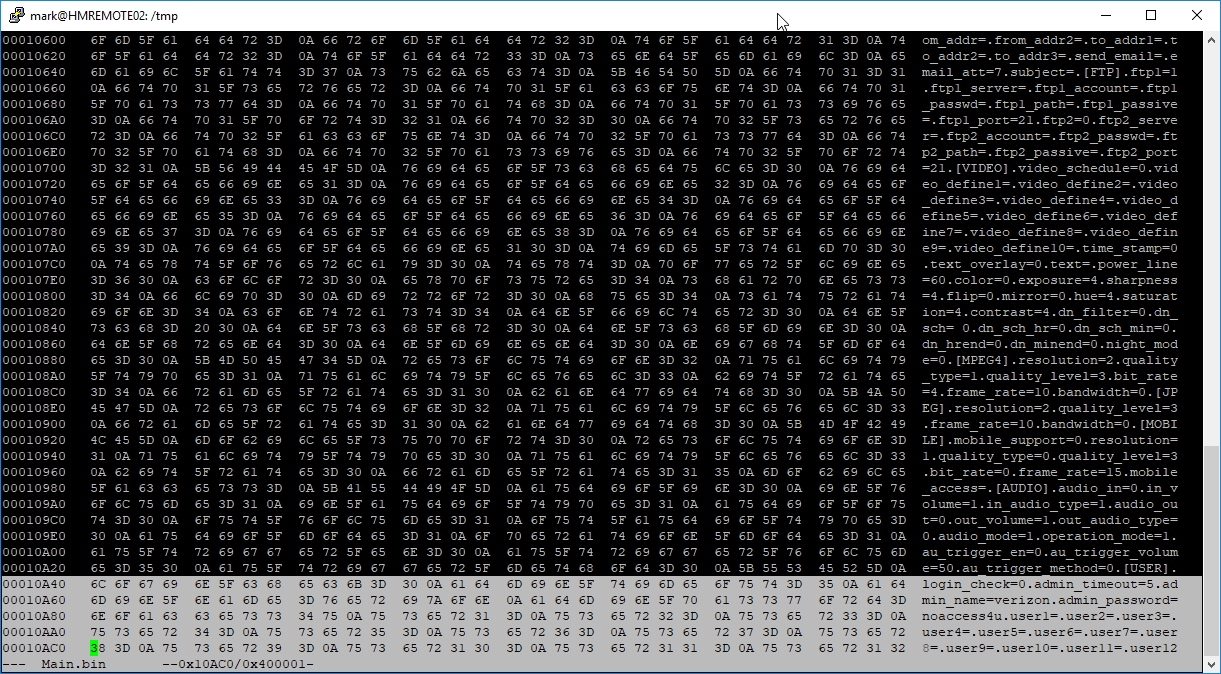
admin_name=verizon
admin_password=noaccess4u

I also extracted the Squashfs filesystem for examination. I verified that the root password was definitely not the manufacturer default that I had cracked in part two. It is actually generated during the boot process. I may possibly go into breaking this down in a part four post, but for now I accomplished exactly what I set out to do. I obtained the default admin credentials for a camera that Verizon was trying to keep you locked out of. The cameras are now fully functional as-is no flash required.

Hacking a Verizon RC8021V IP camera – Part 2

Obtaining Root

In the last post I went over obtaining terminal access to the camera via the UART connection points on the main board. One I had terminal access I was still presented with a login that I needed to get past. With no other way at the time to get this I started doing more research on this and the other related camera models I mentioned previously. I was hoping to find firmware that could lead me to a static root password. I was unable to find any export of the Verizon firmware, but I did find others. With some Google searches I stumbled across unpublished links for source-code builds on the Sitecom web site for both the WL-404 and LN-406 cameras. The two archives I used were under: https://www.sitecom.com/documents/. Let’s take a look at
GPL _ LN-406_WL-404 _ fw1_0_11.zip. If we dig into ZIP we can a lot of source code, but more importantly we see an /etc/passwd file. The contents of this file were:

root:9szj4G6pgOGeA:0:0:root:/root:/bin/sh

The string we are concerned with is ‘9szj4G6pgOGeA‘. Taking a closer look at the string we see It is an old descrypt crypt(3) Unix password hash. The password itself has a maximum length of eight characters combined with a two character salt (‘9s‘). If you Google this hash you find that it actually is common among many of the camera models I mentioned in part 1, but I was unable to find any instance of this hash actually being cracked. Looking at the firmware it seemed that this was based on a core source code distribution that originally came from Sercomm (the actual manufacturer of the camera). I figured that there was a high probability of this being actual root password on the camera I was trying to crack. At this point I decided that cracking the root password may be the easiest way to get the web console admin password and get access to the camera.

Cracking a crypt(3) Unix Password

I had never attempted to crack this algorithm before and knowing the password wasn’t overly simple (as others have attempted to crack it) I knew I’d need external resources to accomplish this. I started off by calculating the approximate number of password combinations I’d have to go through. I know nothing about the password, so I’d at least have to assume it could have all printable characters with a length between one and eight characters. The math for this would be: 93^1 + 93^2 + 93^3 + 93^4 + 93^5 + 93^6 + 93^7 + 93^8 = 5656642206396600 combinations. I ran a quick Jonn the Ripper benchmark on a decent Azure VM (no GPU) and the descrypt performance on that box was only around 16385000 c/s. At that rate it would take ~11 years to crack. I found the most powerful video card I had lying around which was an NVIDIA GTX 750Ti (forgive me, I am not a gamer). The Hashcat benchmark for this card cracking descrypt was around 28989000 c/s. This was significantly faster, but still would take ~6 years. I started researching video cards and found that one of the more popular cards, the NVIDIA 1080 GTX Ti, had a descrypt crack rate of around 1227000000 c/s. At this rate it would take around ~53 days. I had a colleague who actually had this card at home and I figured I’d make a deal with him to run this crack for me during idle time if I couldn’t find anything else. I started researching heavy GPU cloud systems and the most powerful (GPU-wise) I found was the Amazon p3.16xlarge configuration which used EIGHT NVIDIA® V100 Tensor Core GPUs. These GPUs are commonly used in the machine learning space and are a bit more powerful than the top gaming GPUs. An instance with this configuration has a descrypt crack rate of around 15571600000 c/s and could crack the password in around ~4 days, but would cost $2000 for the privilege. As a last resort when looking at computing rentals I turned to Vast.ai. Playing with different GPU/server rental combinations I found the password could be cracked somewhere around $250, but I couldn’t get it any lower than this. Doing further research I came across and interesting site called Crack.sh which was founded by David Hulton (also a founder of ToorCon). He created a purpose-built system that uses a series of FPGAs and specializes in cracking DES. They rent it out for much less than any other cracking service comes close to and even offer some services for free. Because this system was specifically created for cracking DES it actually can crack a descrypt password in ~3 days which is even faster than the Amazon configuration I spec’d out. I decided to eat the cost in the name of the project and figured the cracked password would be useful to others as well. Once my crack job actually started after sitting in the queue for a while I had the password in around three days. The email read:

Crack.sh has found a password that works against your hash. The password match is included below both in ASCII and HEX:
HASH: 9szj4G6pgOGeA
Password (ASCII): "h@11oCAM"
Password (HEX): 684031316f43414d
This run took 313726 seconds. Thank you for using crack.sh, this concludes your job.

The password was a bit comical. I took the first instance of idle time I had, remotely connected to my lab environment, and attempted getting into the camera’s shell using the password. To my dismay I found that the password DID NOT WORK on this camera. I felt somewhat defeated at this point, but I had known when going this route that there was some percentage chance that the password was in the Verizon firmware was not the same as the other cameras using the same platform. Cracking what was LIKELY the root password was sort of an easy way out.

Flashing New Firmware

Since I had multiple versions of usable firmware (with a default web console password I actually knew) I decided to look into somehow flashing alternate firmware. I forgot to mention this in part 1, but during discovery I found that holding the reset button and powering the camera on put the camera into a download mode. I was able to see this through the UART connection. When in this mode the output showed this:

The bootloader version 4.09
Flash Size = 4M(8K x 8,64K x 63)
MAC address 00:0e:8f:7a:34:83
  MAC address is 00:0e:8f:7a:34:83
DAVICOM driver ready
geting PID
got PID in flash
got it
Download mode.

The reason I didn’t further explore this was because at time I didn’t see how there was a way to upload this firmware. When in download mode the camera did not have an IP address and the UART connection didn’t seem to accept any input in this mode. What I didn’t realize at the time was that it was able to accept a firmware download over network in this mode, but not via TCP/IP. Further research led me to an old Sercomm tool that was used to flash a number of Sercomm-based products. I had seen references to this tool earlier on, but knowing it was a network-based utility I didn’t see how it could be used for this device. The filename/download for this tool is: Upgrade_207_XP.zip. The tool required a 32-bit OS and I didn’t have any instances running, so I decided to quickly spin up a Windows 98 VM. To my surprise the application immediately discovered the camera on the network.

I was curious what protocol this was using since it was not using IP, so I used the span port I setup earlier when I was performing the initial reconnaissance on the camera to sniff this traffic.

I found that the upgrade utility sent a layer 2 broadcast and the camera responded. The Ethernet protocol type shown in the packet capture was 0x8888. A Google search of this revealed a little information about the protocol and its commands. I attempted to flash the NQ-9006 version firmware (NQ-9006.1009.bin) to this camera and it took without any issue.

After the firmware update I was FINALLY able to get into the camera’s admin console making the camera completely usable. Though I technically accomplished my original goal I was not happy about spending time on the password crack that turned out to be a dead end and I still did not have or know the default admin console password (or root password) that the Verizon firmware was using. Also, my buddies would need to open and manually flash every camera before attempting to sell them. True to form I could not let it be and I will cover this in part 3!

Hacking a Verizon RC8021V IP camera – Part 1

A few months ago a tenant next to my friends’ warehouse threw way something like 100 IP cameras that were still sealed in the box. One of my other friends took the bulk of them with hopes of making a profit and the friend who initially found them saved me a few because he thought I’d like playing with them (little did he know what this would turn into). When I tried setting one up I found that it was a Verizon-branded version of the Sercomm RC8021 camera. The web console had a username/password combination that did not match up with anything I found online. Because of this the camera was essentially useless as you could not configure any settings or join it to a wireless network. I thought cracking this camera would make for an interesting exercise/challenge and It turned out be exactly that…

Initial Reconnaissance

I started out by researching the camera model and any default passwords associated with it. I came across references to the default credentials for an RC8021 being ‘administrator’ with a blank password. That didn’t work along with anything else I could think of admin/blank, admin/admin, administrator/admin, etc. Resetting the camera didn’t help with this either. Verizon’s own document for this camera was still available online, but had nothing useful. Some Googling also revealed some documented APIs for the camera, but any of the APIs I hoped to get access to required authentication. A port scan did not yield anything useful. I did find that the camera had a port open for UPnP, but I wasn’t able to use any of the known UPnP exploits to gain access to the camera or its file system.

Obtaining Physical Access

After all my initial attempts to get into this camera were unsuccessful, I decided to crack the camera open and start poking around. Below are both sides of the camera board. The four connection points within red square below are indicative of a UART connection. The other clue to this was the square connection to the far right. That would likely be the ground. I used my multi-meter to test these points and verified this.


Now that I was confident I had located a UART connection I broke out the soldering iron and soldered a four pin header here…

After soldering the header I just needed to figure out which pin was RX and which was TX. I already knew what ground was, so figuring out RX/TX was simple. VCC was not necessary since the camera had its own power supply. I hooked up three of the pins to a USB->UART converter, connected Putty to the COM port assigned to the converter on my computer, and set the Putty serial session with a common config:

Speed (baud): 115200
Data bits: 8
Stop bits: 1
Parity: Even
Flow control: None

Once I hooked the camera up to power I was able to watch the entire boot process and eventually received logon prompt. My initial hope was that the shell was not password protected or at least had a blank root password, but I was not that lucky. This was the the boot up output:

 The bootloader version 4.09
Flash Size = 4M(8K x 8,64K x 63)
MAC address 00:0e:8f:7a:34:83
unprotected area checksum = 00000000
Uncompressing Linux………………………………………… done, booting the kernel.
Linux version 2.4.19-pl1029 (peggy@ISBU-Compiler-B1) (gcc version 3.3.4) #294 Thu Sep 29 14:27:29 CST 2011
CPU: Faraday FA526id(wb) revision 1
ICache:16KB enabled, DCache:16KB enabled, BTB support, IDLE support
Machine: Prolific ARM9v4 - PL1029
Prolific arm arch version 1.0.11
On node 0 totalpages: 8192
zone(0): 8192 pages.
zone(1): 0 pages.
zone(2): 0 pages.
Kernel saved command line [arch]: root=/dev/mtdblock3 rootfstype=squashfs
Kernel command line [options]: root=/dev/mtdblock3 rootfstype=squashfs
plser console driver v2.0.0
Calibrating delay loop… 147.56 BogoMIPS
Memory: 32MB = 32MB total
Memory: 30764KB available (1263K code, 284K data, 64K init)
Dentry cache hash table entries: 4096 (order: 3, 32768 bytes)
Inode cache hash table entries: 2048 (order: 2, 16384 bytes)
Mount-cache hash table entries: 512 (order: 0, 4096 bytes)
Buffer-cache hash table entries: 1024 (order: 0, 4096 bytes)
Page-cache hash table entries: 8192 (order: 3, 32768 bytes)
POSIX conformance testing by UNIFIX
PCI: Probing PCI hardware on host bus 0.
Linux NET4.0 for Linux 2.4
Based upon Swansea University Computer Society NET3.039
Initializing RT netlink socket
tts/{a2a43ffa4022ea385038b9b7ab8e5db884a5cf9868153c481440e673f79e035a}d0 at MEM 0x1b000400 (irq = 2) is a PLSER
Prolific addr driver v0.0.4
Starting kswapd
devfs: v1.12a (20020514) Richard Gooch (rgooch@atnf.csiro.au)
devfs: boot_options: 0x1
squashfs: version 3.0 (2006/03/15) Phillip Lougher
i2c-core.o: i2c core module version 2.8.1 (20031005)
i2c-dev.o: i2c /dev entries driver module version 2.8.1 (20031005)
Prolific i2c algorithm module v1.2
Initialize Prolific I2C adapter module v1.2.1
found i2c adapter at 0xd9440000 irq 17. Data tranfer clock is 100000Hz
i2c-proc.o version 2.8.1 (20031005)
pty: 256 Unix98 ptys configured
Software Watchdog Timer: 0.05, timer margin: 60 sec
RAMDISK driver initialized: 16 RAM disks of 4096K size 1024 blocksize
PPP generic driver version 2.4.2
PPP Deflate Compression module registered
PPP BSD Compression module registered
Linux video capture interface: v1.00
Prolific Audio AC97 driver version 2.2.2 for 63 and 29 Audio Module 2006/03/21
ac97_codec: AC97 Audio codec, id: 0x414c:0x4770 (Realtek ALC203/203LF)
PL-1029 NOR flash driver for MTD, version 0.8.0 sc 1
NOR flash type: ppi-amd 8x8 64x63
NOR flash id = 0xa8
nor interrupt 30 registered
Creating 9 MTD partitions on "plnormtd":
0x00000000-0x00008000 : "bootloader"
0x0000c000-0x0000e000 : "MAC"
0x000e0000-0x00400000 : "SQUASHFS"
0x0000e000-0x00010000 : "LOGO Image"
0x00020000-0x00400000 : "Kernel+FS"
0x00000000-0x00400000 : "ALL"
0x0000a000-0x0000c000 : "HTTPS CA"
0x00010000-0x00020000 : "CONFIG"
0x00008000-0x0000a000 : "Reserve"
usb.c: registered new driver hub
usb-ohci-pci.c: usb-00:05.0, PCI device 180d:2300
usb-ohci.c: USB OHCI at membase 0xd8400000, IRQ 9
usb.c: new USB bus registered, assigned bus number 1
usb.c: ### @@@ usb_set_address
usb.c: >>> usb_get_device_descriptor
usb.c: >>> usb_get_configuration
hub.c: USB hub found
hub.c: 4 ports detected
Prolific Real-Time Clock Driver version 1.0.0 (2003-04-02)
PL UART driver version 1.0.1-1 (2006-04-21)
Initializing Cryptographic API
NET4: Linux TCP/IP 1.0 for NET4.0
IP Protocols: ICMP, UDP, TCP, IGMP
IP: routing cache hash table of 512 buckets, 4Kbytes
TCP: Hash tables configured (established 2048 bind 4096)
ip_tables: (C) 2000-2002 Netfilter core team
NET4: Unix domain sockets 1.0/SMP for Linux NET4.0.
802.1Q VLAN Support v1.8 Ben Greear greearb@candelatech.com
All bugs added by David S. Miller davem@redhat.com
Fast Floating Point Emulator V0.9 (c) Peter Teichmann.
RAMDISK: squashfs filesystem found at block 0
RAMDISK: Loading 2221 blocks [1 disk] into ram disk… done.
VFS: Mounted root (squashfs filesystem) readonly.
Mounted devfs on /dev
Freeing init memory: 64K
pl serial only support even parity
init started: BusyBox v1.01 (2011.09.29-06:29+0000) multi-call binary
Starting pid 11, console /dev/tts/0: '/etc/init.d/rcS'
Starting the boot scripts…
Watchdog is at home.
Using /lib/modules/2.4.19-pl1029/watchdog.o
Using /lib/modules/2.4.19-pl1029/gpio_drv.o
insmod: io_expander.o: no module by that name found
insmod: leds.o: no module by that name found
insmod: lcd.o: no module by that name found
insmod: switchs.o: no module by that name found
Using /lib/modules/2.4.19-pl1029/reset.o
insmod: rtc_drv.o: no module by that name found
insmod: iris_drv.o: no module by that name found
insmod: analog_out.o: no module by that name found
insmod: echo_cancel.o: no module by that name found
/etc/init.d/rcS: 69: /usr/local/bin/pt_chk: not found
/sbin/ifconfig lo
RT61: Vendor = 0x1814, Product = 0x0301
System Info:
fw_ver: V1.0.03
fw_create_date: [2011-09-29 14:31:19 +0800 ]
mac_addr: 00:0e:8f:7a:34:83
def_name: VZ7A3483
release_date: Sep 29,2011
model_name: RC8021V
Assigned Info:
domain=0x10
language=0x00000000
serial=
pin=
rc4=
pid=
vid=
en_name=
desp=
time=
boot_mode=0x0
power line freq=60
lens_type=1
aes interrupt 12 registered
Using /lib/modules/crypt.o
cp: /usr/local/bin/stunnel.pem: No such file or directory
cp: /usr/local/bin/CAcerts.pem: No such file or directory
OV7725 detected!
Using /lib/modules/2.4.19-pl1029/ov_7725.o
plmedia version 1.2.11.1
Hello Grabber!
Hello Encoder!
Hello PLMD!
Using /lib/modules/plmedia.o
Using /lib/modules/2.4.19-pl1029/dmac.o
DMAC Driver (Ver: 1.0.0.1, Release-Date: 25-Sep-2009)
/etc/init.d/rcS: 102: /usr/local/bin/io_init: not found
/etc/init.d/rcS: 116: /usr/local/bin/dnswitch_action: not found
Davicom DM91xx net driver loaded, version 1.37 (JUN 16, 2004): VLAN support 4…
RT61: Vendor = 0x1814, Product = 0x0301
Ethernet link is ready now
Jan 1 00:00:09 dhcpcd[136]: DHCP successfully worked with the server (192.168.0.43)
/etc/init.d/rcS: 139: /usr/local/bin/jabberlog: not found
pl serial only support even parity
RC8021V7A3483 login: pc : [<0000a8a4>] lr : [<0000a868>] Not tainted
sp : bffffb28 ip : ffffffff fp : 00036e90
r10: 00024eb8 r9 : 00033ce0 r8 : 00033ca8
r7 : 00000000 r6 : 00021db8 r5 : 00000000 r4 : 0000000a
r3 : 00000000 r2 : 0000000a r1 : 000171ca r0 : 00000000
Flags: nZCv IRQs on FIQs on Mode USER_32 Segment user
Control: 397D Table: 01E8C000 DAC: 00000015
RC8021V7A3483 login:

With this output we’re able to see a few interesting things. We get a lot of information about what the underlying bootloader/OS/filesystem look like, we get more hardware information, and all of this gives us more information we can Google against. I tried logging into the camera with root and various passwords, but was unsuccessful. Once I started Googling against this information I found that this camera platform was actually fairly common and that a number of other cameras were pretty much identical to this one. Some models were Sercomm RC8021, ADT Pulse RC8021W, Linksys WVC54GCA, Sitecom WL-404, Sitecom LN-406, NorthQ NQ-9006, and some others. The actual manufacturer of this platform was Sercomm with their RC8021 camera, but unfortunately their web site had absolutely nothing to offer.

Stay tuned for Part 2…