The woes of implementing M365 Information Barriers – One BIG gotcha and how to undo unexpected Teams team/group chat/meeting membership removals using Graph API

For the better part of three years we had been working to implement Information Barriers for Microsoft Teams. All throughout that time we ran into countless issues, bugs, and back-end changes forcing us to open a number of tickets with Microsoft and do multiple rounds of extensive testing before we were comfortable implementing. The day finally came when we were ready to implement. Finally one evening we had everything staged and we were ready to flip the switch later that week. To our surprise a number of unexpected changes occurred a day before flipping the switch. A large set of users were removed from teams, group chats, and meetings. There were also reports of users not being able to communicate with each other via chat/calls/meetings. Some of the users affected were not even part of either of the two IB segments that we were implementing policies for. After a little digging it became clear that IB started to go haywire sometime after we activated the IB policies (we did this as part of staging), but before running Start-InformationBarrierPoliciesApplication (this was our final step in activation). We immediately disabled both of the IB policies and ran Start-InformationBarrierPoliciesApplication to force an immediate processing of the policies. After this was done processing, all users were able to communicate again, but we were still left with all of the team/group chat/meeting removals.

I decided to start with addressing the team removals. I decided the quickest way to get a list of these was to do an Azure AD audit search since all team member removals translate to member removals of the associated M365 group. I already had experience with how IB removals show from an Azure AD perspective, so I started by running an audit search for AAD group removals and then filtered this using the three principals that could perform these IB-related removals:

Information Barrier Processor
5214069a-b412-4856-b885-c1db77635b0a

Microsoft Teams Services
47ec8689-d241-46e8-adfa-c7d2144c9848

Microsoft Substrate Management
8f3d0e67-f567-4e23-8e81-2cd5ee520c4c

I then exported this to a CSV, spot checked it for any removals that seemed to not be IB-related, and ran a little PS loop to add the members back to the M365 groups:

$RemovalList = Import-Csv -Path "C:\Temp\TeamsUserReadds.csv"

ForEach ($Removal in $RemovalList) {
	Add-AzureADGroupMember -ObjectId $Removal.GroupId -RefObjectId $Removal.UserId
}

Now for the group chat/meetings removals; these unfortunately were not going to be easy. I started digging into how I would even detect these removals. I first tried M365 audit logs, but the IB-initiated removals did not show in any audit logs. The only place I knew of where you could see a removal was in the chat itself. Whenever a user is added or removed from a group chat/meeting there is an event message generated in the chat. I started digging into the Teams Graph APIs for ways to query these events. Eventually I wrote a pair of scripts to deal with these removals. The first script is GetGroupChatRemovals.ps1. This script crawls through all group chats (and optionally meetings) for a specified set of users over a specified date/time range for removals and creates a CSV of each unique removal. We were able to produce a set of users to scan against because every removal could be traced back to group chat/meeting where there was at least one member who was in one of the IB segments. Sometimes the user who was removed was not in either IB segment, but that didn’t matter because the script would be scanning the whole group chat/meeting for all removals. Since we knew the approximate start and end times of the removals, we had a fairly tight window of ~15 hours to scan. There were multiple challenges with the API, one of them being how it sorts chats when you request them and the inability to properly filter on the last event. I had to make the script walk backwards through chats until it was outside of the specified date/time range. After that list was created it would go through each individual message searching for the deleted system-generated member removed messages. Meetings were even worse. Not only are there many meetings, but for some reason meetings were not being returned in an order based on last event. Because of this you would have to just go through all meetings. For this reason I made scanning meetings optional. This is how the script is executed (I recommend using dot sourcing so you are able to retrieve the output variables after execution in case of a failure or issue):

."C:\Temp\GetGroupChatRemovals.ps1" -CsvPath 'C:\Temp\IBUsers.csv' -TenantId 'aa10484c-ea8b-4d62-a130-54b306384fcc' -AppId '9f3d6a8e-4e1f-436b-9972-a6918e07dbcb' -AppSecret '*PqbUTk,#d;&gK:c@[]4tRHE^TCQ<ZDQ8-NW6Q&9' -StartDateTimeString '2022-12-01T00:00:00.000Z' -EndDateTimeString '2022-12-01T15:00:00.000Z' -OutputCsvPath 'C:\Temp\ChatRemovalsOutput.csv' -ErrorTxtPath 'C:\Temp\ErrorUserUPNs.txt'

The parameters are as follows:

  • CsvPath – A path for a CSV containing all UPNs you are scanning (this will scan for any removals in group chats/meetings that the user was part of)
  • TenantId – Your tenant ID
  • AppId – Your app ID. (You will need to create an app registration with the following permissions: Chat.Read.All, ChatMember.ReadWrite.All. You will also need to request access to the Teams Protected APIs to read chats as an application)
  • AppSecret – The secret created for your application registration
  • StartDateTimeString – The start date/time in UTC ISO 8601 format
  • EndDateTimeString – The end date/time in UTC ISO 8601 format
  • OutputCsvPath – The path to write the output CSV
  • ErrorTxtPath – The path to write the output TXT of UPNs of users the script was unable to retrieve chats for
  • IncludeMeetings – Include this as a switch if you want to scan meetings in addition to group chats. This is optional

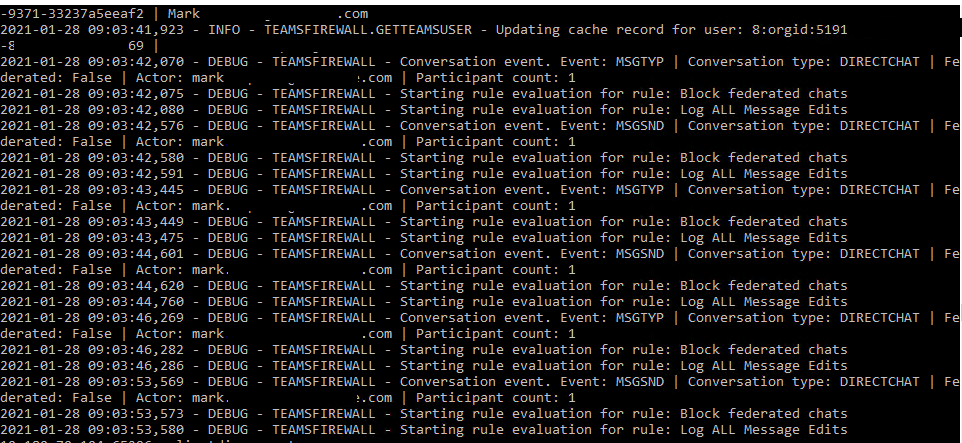
Once the script is completed you are left with output like this:

The results this script produced were surprising. IB removed many people (IB segmented and non-segmented) from many group chats. Now that we had this list we used the second script (UndoChatRemovals.ps1) to restore the memberships. This script is fairly simple and you can feed it the exact same CSV that was created from the first script. We actually decided to filter this down to a much smaller list based on the last chat activity column (by excluding stale chats). The four parameters in this script are the same as the first script. This is how the script is executed:

."C:\Temp\UndoChatRemovals.ps1" -CsvPath 'C:\Temp\ChatRemovalsOutput.csv' -TenantId 'aa10484c-ea8b-4d62-a130-54b306384fcc' -AppId '9f3d6a8e-4e1f-436b-9972-a6918e07dbcb' -AppSecret '*PqbUTk,#d;&gK:c@[]4tRHE^TCQ<ZDQ8-NW6Q&9'

Once this script is completed all removed members should have been re-added. There are a few things to note. One is that there will be system messages generated in each chat for each member add event. Another is that there is no way to know if the removed member had limited visibility (added with the ability to only see beyond a certain date) or had access to the entire chat, so we have to add the user back with full visibility.

In conclusion, I will say this all could have been avoided by coupling the two IB activation steps together. Do not activate an IB policy until you are ready to run Start-InformationBarrierPoliciesApplication. The documentation does not mention that any actions happen until you complete the last step and in testing we never saw anything happen until completing the last step. For some reason IB starts to malfunction (seems to take hours for this to happen) if a policy is left active without completing the last step. When running them together it behaves as expected, lesson learned.

Microsoft Purview Information Protection Sensitivity Labels Not Showing – Sensitivity Button Greyed Out In Desktop Client

I recently was doing a PoC for Microsoft Purview Information Protection and when I started I realized I was no longer able to see sensitivity labels in the desktop version of Office. I had access to them months back without any issue. Of course I had already followed instructions on creating and publishing the labels to my user account. When I checked Office for Web, the button was available and functional. This issue was specific to desktop C2R Office clients. While troubleshooting I decided to turn off TLS decryption (handled by our Palo Alto firewalls) just to rule it out and to my surprise the button became available. When I looked at the firewall logs while decryption was on, I noticed some traffic failure hits for a sub-domain under protection.outlook.com. I looked through the documentation and eventually found this in the Azure Information Protection documentation:

Unified labeling client. To download labels and label policies, allow the following URL over HTTPS: *.protection.outlook.com

Sadly, the documentation says nothing about this needing to be excluded from any firewall/proxy inspection. The only mention of excluding hostnames from inspection was this (which we were already doing):

TLS client-to-service connections. Do not terminate any TLS client-to-service connections, for example to perform packet-level inspection, to the aadrm.com URL.

We actually did have a specific sub-domain under protection.outlook.com excluded from decryption, but that was not the one being used. I removed the specific sub-domain, added *.protection.outlook.com, and everything was working after that. I tried to log a case to force Microsoft to update their documentation, but I got the usual runaround and they have yet to update.

Windows Defender Causing iSCSI and Citrix VDA Issues

Over the last few months we have gone through a Defender pilot and rollout. I’ll admit I was surprised how relatively painless the rollout has been. Major problems were scarce and we have been able to enable most features for the general landscape. One feature that is not turned on by default that we decided to turn on was Network Protection. This features provides filtering and detection around web traffic. When we first enabled this in our pilot a number of us were on persistent Citrix VDIs and would randomly experience disconnects and reconnects to our machines. Sometimes this would go away for days or weeks and then randomly come back. Another issue we had was when we were trying to roll out Defender to some of our backup servers. These servers were physical servers with a number of iSCSI volumes mounted on them (using the Microsoft iSCSI Initiator). When the server would boot up they would hang at logon and the system event log would report a ton of iScsiPrt/Event ID: 9 errors around timeouts while trying to mount the storage. Both of these issues were immediately resolved simply by enabling asynchronous inspection. I have found almost nothing on the internet about this, but it resolved two major issues for us. This setting doesn’t seem to be exposed in GPO or other the other management methods and needs to be done manually on the machine. This setting can be enabled in PowerShell using this command:

Set-MpPreference -AllowSwitchToAsyncInspection $true

Note: In addition turning on asynchronous inspection you can obviously also disable network protection altogether while troubleshooting an issue.

The Microsoft documentation now briefly mentions this functionality, but states that it is on by default. We just had the issue within the last two weeks and needed to enable this on our backup servers. If I find anymore information on this I will post it here.

Running Sync-ModernMailPublicFolders.ps1 with Modern Authentication

UPDATE: After years of Microsoft leaving users lost and confused, they finally decided to refactor and release a new version their script (only a few days after I published this article). Their new script is now based on the EXO PS v2 module which uses Graph API and no longer uses EXO PS Remoting.

As part of an Exchange Online migration I was re-running a Public Folder sync that I initially ran two years ago when we still had basic authentication enabled from internal networks for Exchange Online. When I went to re-run I realized it was not going to work because we completely disabled basic authentication. I had recently created an unattended script that connects to Exchange Online using MSAL and integrated Windows authentication (IWA) and was able to use this methodology in this script without making any modifications to the script.

To make this work we first need to install the MSAL.PS module:

Install-Module -Name 'MSAL.PS'

Next, we need to get an OAuth token for Exchange Online PowerShell, create a bearer token secure string, and create a basic credential from it along with our UPN. We will need to specify the client ID for Exchange Online PowerShell (612e1698-a44c-49a4-b66b-4188cc69cbaa) along with our tenant ID (I’m entering a fake one here). When prompted you will login with an account that has EXO administrative access:

$EXOToken = Get-MsalToken -ClientId 'a0c73c16-a7e3-4564-9a95-2bdf47383716' -TenantId '612e1698-a44c-49a4-b66b-4188cc69cbaa' -Scopes 'https://outlook.office365.com/.default'

$TokenSecureString = ConvertTo-SecureString "Bearer $($EXOToken.AccessToken)" -AsPlainText -Force

$Credential = New-Object System.Management.Automation.PSCredential($EXOToken.Account.Username, $TokenSecureString)

Now we can execute the script, but we will need to use an alternate ConnectionUri so that we can make EXO do the basic -> OAuth conversion:

.\Sync-ModernMailPublicFolders.ps1 -Credential $Credential -ConnectionUri 'https://outlook.office365.com/powershell-liveid?BasicAuthToOAuthConversion=true' -CsvSummaryFile:sync_summary.csv

The script should have executed without an issue. No need to re-enable basic authentication!

Exchange FIP-FS Scan Engine Update Issues: How to roll-back the update

UPDATE #3: There is the potential that after running Rollback-FIPFSEngine.ps1 that you may see the following error in the Application Event Logs:

Log Name:      Application
Source:        Microsoft-Filtering-FIPFS
Date:          01/04/2022 00:00:00
Event ID:      6027
Task Category: None
Level:         Error
Keywords:      
User:          NETWORK SERVICE
Computer:      exchange-server.domain.com
Description:
MS Filtering Engine Update process was unsuccessful to download the engine update for Microsoft from Custom Update Path.
Update Path:http://amupdatedl.microsoft.com/server/amupdate
UpdateVersion:0
Reason:"There was a catastrophic error while attempting to update the engine. Error: DownloadEngine failed and there are no further update paths available.Engine Id: 1 Engine Name: Microsoft"

If you are seeing the error above this could be an indication that there is an improper ACL on the ‘FIP-FS\Data\Engines’ directory. The Rollback-FIPFSEngine.ps1 script has been updated to set the proper ACL, but if you’ve previously run the script and need to resolve this issue you can run the following on your affected Exchange server(s) from an elevated PowerShell session:

$InstallFIPFSPath = "$($env:ExchangeInstallPath)FIP-FS"
$Sddl = 'O:SYG:SYD:PAI(A;OICI;FA;;;SY)(A;OICI;FA;;;LS)(A;OICI;FA;;;NS)(A;OICI;FA;;;BA)'
$NewSddl = Get-Acl -Path "$InstallFIPFSPath\Data\Engines"
$NewSddl.SetSecurityDescriptorSddlForm($Sddl)
Set-Acl -Path "$InstallFIPFSPath\Data\Engines" -AclObject $NewSddl

UPDATE #2: I have still been recommending this procedure since it doesn’t rely on deleting definitions and then waiting for the definition download from MS. With this workaround you are immediately in a fully working state.

If you have already used the Microsoft reset method on one or some server(s), you can use Rollback-FIPFSEngine.ps1 to copy definitions directly from the good server. This will speed up resolution time as the other servers will not have to wait for a definition download. Simply change the $BackupPathFIPFSPath variable to something like below and run on the other servers:

$BackupPathFIPFSPath = '\\GOODEXSERVER.domain.com\C$\Program Files\Microsoft\Exchange Server\V15\FIP-FS'

Note: Just make sure to re-enable auto-updates by running: Set-EngineUpdateCommonSettings -EnableUpdates $true

UPDATE: Microsoft has released a new engine update with a version number that resolves the issue. If you have already performed the fix above there is *no need* to perform the procedures in their article as you are already in a functional state. All you need to do is run Set-EngineUpdateCommonSettings -EnableUpdates $true to re-enable updates and your server(s) will download the latest update at the next check interval. Their script/procedure is for customers who are broken.


How to roll-back…

As almost anyone with an on-prem Exchange implementation probably knows there was an update released on 12/31/21 that caused email delivery issues globally. The core issue is the new version number is too large to fit in a long variable. Microsoft has acknowledged the issue, but the only current workaround is to disable the FIP-FS engine. The issue here is that certain transport rules also use this service, so if you have transport rules like these you may still have email delays even after disabling the engine. A better option would be to roll-back to the engine version that did not invoke the bug while Microsoft works this out.

I created a script (Rollback-FIPFSEngine.ps1) that makes the roll-back quick and easy. The one pre-requisite is that you need to restore your FIP-FS directory (ex. C:\Program Files\Microsoft\Exchange Server\V15\FIP-FS) from a restore. The restore should be from some point before the bad engine update. You can use the same restore for all Exchange servers assuming they are all running the same version of Exchange and have the same architecture (ex. amd64).

To preform the roll-back you must do the following:

  • Obtain a restore of the FIP-FS directory
  • Copy the Rollback-FIPFSEngine.ps1 script to the Exchange server(s) that need the rollback
  • Edit the $BackupPathFIPFSPath variable of the script to reflect the restored FIP-FS directory path
  • Open a new elevated (as Administrator) Exchange Management Shell PowerShell session on the server. Do not run this from a regular PowerShell session, it must be a Exchange session
  • Execute the script

The script should take a few minutes to execute and will do the following:

  • Re-enable FIP-FS. It doesn’t matter if you previously disabled FIP-FS using the Disable-Antimalwarescanning.ps1 script or Set-MalwareFilteringServer cmdlet. It will re-enable both
  • Globally disable FIP-FS engine updates (so that the problem updates do not return)
  • Stop necessary services (BITS, MSExchangeTransport, and MSExchangeAntispamUpdate)
  • Rename current engine files/directories
  • Copy engine files/directories from restore path
  • Start stopped services

After the script is run everything should be functioning normally. We’ve already run this in our environment and mail flow is now back to normal.

NOTE: After MS releases a fix you will need to re-enable updates by running: Set-EngineUpdateCommonSettings -EnableUpdates $true

FilteringServiceFailureException Error: Microsoft.Exchange.MessagingPolicies.Rules.FilteringServiceFailureException: FIPS text extraction failed with error: ‘WSM_Error: Scanning Process caught exception: (0x00000005) Access is denied

For some time we had been seeing these events in the event logs of our Exchange mailbox servers and the ‘UnifiedContent‘ directory (related to the Hub Transport role) has been growing:

Log Name:      Application
Source:        MSExchange Messaging Policies
Date:          10/26/2021 8:08:10 AM
Event ID:      4010
Task Category: Rules
Level:         Error
Keywords:      Classic
User:          N/A
Computer:      mbx1.domain.com
Description:
Transport engine failed to evaluate condition due to Filtering Service error. The rule is configured to ignore errors. Details: 'Organization: '' Message ID '<1ea41f5d-64ec-424a-b863-19d7fc2cf7d0@journal.report.generator>' Rule ID 'bcdf1c32-0249-4149-a91b-85ecabaeb695' Predicate '' Action ''. FilteringServiceFailureException Error: Microsoft.Exchange.MessagingPolicies.Rules.FilteringServiceFailureException: FIPS text extraction failed with error: 'WSM_Error: Scanning Process caught exception: 
Stream ID: <1ea41f5d-64ec-424a-b863-19d7fc2cf7d0@journal.report.generator>
ScanID: {E44453FB-B127-44F8-BEF0-357252C6DAA3}
(0x00000005) Access is denied.  Failed to open file: T:\TransportRoles\data\Temp\UnifiedContent\8bedad9e-130a-490e-be7a-af8a58758231'. See inner exception for details ---> Microsoft.Filtering.FilteringException: WSM_Error: Scanning Process caught exception: 
Stream ID: <1ea41f5d-64ec-424a-b863-19d7fc2cf7d0@journal.report.generator>
ScanID: {E44453FB-B127-44F8-BEF0-357252C6DAA3}
(0x00000005) Access is denied.  Failed to open file: T:\TransportRoles\data\Temp\UnifiedContent\8bedad9e-130a-490e-be7a-af8a58758231
   at Microsoft.Filtering.InteropUtils.ThrowPostScanErrorAsFilteringException(WSM_ReturnCode code, String message)
   at Microsoft.Filtering.FilteringService.EndScan(IAsyncResult ar)
   at Microsoft.Filtering.FipsDataStreamFilteringService.EndScan(IAsyncResult ar)
   at Microsoft.Exchange.MessagingPolicies.Rules.UnifiedContentServiceInvoker.TextExtractionComplete(IFipsDataStreamFilteringService textExtractionService, TextExtractionCompleteCallback textExtractionCompleteCallback, IAsyncResult asyncResult)
   --- End of inner exception stack trace ---
   at Microsoft.Exchange.MessagingPolicies.Rules.UnifiedContentServiceInvoker.GetUnifiedContentResults(FilteringServiceInvokerRequest filteringServiceInvokerRequest)
   at Microsoft.Exchange.MessagingPolicies.Rules.MailMessage.GetUnifiedContentResults()
   at Microsoft.Exchange.MessagingPolicies.Rules.MailMessage.GetAttachmentStreamIdentities()
   at Microsoft.Exchange.MessagingPolicies.Rules.MailMessage.GetAttachmentInfos()
   at Microsoft.Exchange.MessagingPolicies.Rules.MailMessage.get_AttachmentNames()
   at Microsoft.Exchange.MessagingPolicies.Rules.MessageProperty.OnGetValue(RulesEvaluationContext baseContext)
   at Microsoft.Exchange.MessagingPolicies.Rules.Property.GetValue(RulesEvaluationContext context)
   at Microsoft.Exchange.MessagingPolicies.Rules.TextMatchingPredicate.OnEvaluate(RulesEvaluationContext context)
   at Microsoft.Exchange.MessagingPolicies.Rules.PredicateCondition.Evaluate(RulesEvaluationContext context)
   at Microsoft.Exchange.MessagingPolicies.Rules.AndCondition.Evaluate(RulesEvaluationContext context)
   at Microsoft.Exchange.MessagingPolicies.Rules.RulesEvaluator.EvaluateCondition(Condition condition, RulesEvaluationContext evaluationContext)
   at Microsoft.Exchange.MessagingPolicies.Rules.TransportRulesEvaluator.EvaluateCondition(Condition condition, RulesEvaluationContext evaluationContext). Message-Id:<1ea41f5d-64ec-424a-b863-19d7fc2cf7d0@journal.report.generator>'

You may notice the ‘T:\TransportRoles\data‘ path above and this is due to the fact that we have our transport queue database path set to an alternate location. It is clear in the error that there is an access issue as it is is stating ‘(0x00000005) Access is denied. Failed to open file: T:\TransportRoles\data\Temp\UnifiedContent\8bedad9e-130a-490e-be7a-af8a58758231‘ as the core issue. Looking at the ‘Temp‘ directory ACL we saw the current permissions were:

  • LocalSystem – Full Control
  • Administrators – Full Control
  • NetworkService – Full Control

These permissions seem correct at face value, but when we look at the ACL of one of the files we actually found:

  • LocalSystem – Full Control
  • Administrators – Full Control
  • NetworkService – Full Control
  • LocalService – Full Control

If you look at a default Exchange installation you will also see the ACL above is how it is set. It seems that when using a non-default queue database location you are required to set the ACL yourself as it won’t be set automatically. After fixing the ACL we simply shut down the transport service, cleared the directory, and restarted the transport service:

Stop-Service MSExchangeTransport
Remove-Item -Path "T:\TransportRoles\data\Temp\UnifiedContent\*"
Start-Service MSExchangeTransport

After this change the ‘UnifiedContent‘ directories are no longer growing and the error we started with is no longer appearing in the event log.

Using Application Permissions (and client credentials grant flow) with Hybrid Exchange Graph API

We recently came across an application that uses Graph API and we wanted to start using it for some our on-prem mailboxes. Hybrid Graph API only supports delegated authentication flows and not application authentication flows. Just because something isn’t “supported” doesn’t mean you can’t make it work! There are two things that we’ll need to do to make this work.

First, any internet-facing Exchange server will need to have ‘V1S2SAppOnly‘ OAuth support added. You can do this by adding V1S2SAppOnly to the OAuthHttpModule.Profiles key in the REST web.config (ex. …\Program Files\Microsoft\Exchange Server\V15\FrontEnd\HttpProxy\rest). Once you add this value the key should look like this:

After this has been added either perform an iisreset or restart the ‘MSExchangeRestFrontEndAppPool‘ app pool in IIS for each server where you did this modification.

The next step is to add the appropriate ‘AppOnlyPermissions‘ to the Microsoft Graph partner application in Exchange/AD. First we’ll take a look at our Graph partner application:

Get-PartnerApplication | Where {$_.Name -like '*graph*'} | select *permissions* | fl

AppOnlyPermissions : 
ActAsPermissions   : {Mail.Read, Mail.Write, Mail.Send, Calendars.Read...}

The ‘AppOnlyPermissions‘ value should be blank. We need this to match the ‘ActAsPermissions‘ value. You’d think (and some other articles say) that you could just run Set-PartnerApplication -AppOnlyPermissions… but this was not a supported parameter for me. To set this we’ll have to edit AD directly. You’ll need to fire up something like ADSIEdit, load the AD configuration partition, and drill down to your Exchange org and partner application object. The path should be something like:

CN=Microsoft Graph,CN=Partner Applications,CN=Auth Configuration,CN=YOUR_EXCH_ORG,CN=Microsoft Exchange,CN=Services,CN=Configuration,DC=domain,DC=com

Once here you’ll need to open the ‘Microsoft Graph‘ object and copy the ‘msExchConfigurationXML‘ attribute value to the clipboard:

Next, we’ll use Notepad++ and the XML Tools plugin to manipulate this. MAKE SURE YOU BACKUP THIS VALUE. We want to convert this to a nicely formatted XML output so that it is easy to work with. To do this we use the ‘Pretty print’ option in XML Tools.

Once we have this we’ll need to duplicate all of the ‘ActAsPermissions’ lines and then use find and replace to convert those tags to be ‘AppOnlyPermissions’. Doing this will create a set of application permissions based on our delegated permissions (ActAsPermissions).

Once completed we need to linearize the output again so that we can copy it back into AD. We can use the ‘Linearize’ option in XML Tools for this:

Once we have the XML in the proper format we can put it back in the AD object:

Now that we’ve updated the AD object we can verify everything looks good by checking Exchange again (AppOnlyPermissions should have the same values as ActAsPermissions):

Get-PartnerApplication | Where {$_.Name -like '*graph*'} | select *permissions* | fl


AppOnlyPermissions : {Mail.Read, Mail.Write, Mail.Send, Calendars.Read...}
ActAsPermissions   : {Mail.Read, Mail.Write, Mail.Send, Calendars.Read...}

At this point you should be able to access on-prem Exchange resources using the supported Graph API functions with Application Permissions.

NOTE: One limitation of this is that application access policies (set in EXO) DO NOT apply and are ignored when accessing an on-prem mailbox.

Windows Autopilot with User-Driven Hybrid Azure AD Domain Join using Palo Alto GlobalProtect VPN: Part 2, using GlobalProtect PLAP with Basic Credentials

I recently had a call with another company attempting to setup Autopilot following my previous post (Windows Autopilot with User-Driven Hybrid Azure AD Domain Join using Palo Alto GlobalProtect VPN). While speaking to them I learned that are currently using basic credentials (LDAP+RADIUS) with GlobalProtect and are only attempting to setup certificate authentication to get Autopilot working. They were still planning on having the user perform two-factor basic authentication after the Autopilot-based deployment. This configuration was the perfect use-case for GlobalProtect’s new “Use Connect Before Logon” functionality. This functionality was introduced version 5.2 and works by registering a Pre-Login Access Provider (PLAP). With PLAP you now have interactive access to the GlobalProtect client at the logon screen. A huge plus with this method is that it requires NO back-end changes to your existing GlobalProtect configuration. The functionality is completely client-side and only really requires an additional step during installation. This PLAP functionality works with basic credentials, certificates, and even SAML! I will be using basic two factor credentials below.

The first step will be to create a new GlobalProtect package in Intune. I am using the newest version below, 5.2.7. You can use the same steps for creating the package that I laid out in my first post, but we will be using an alternate wrapper script, InstallGlobalProtect_PLAP.ps1. InstallGlobalProtect_PLAP.ps1, will install GlobalProtect, set our default GlobalProtect portal, and register the Pre-Login Access Provider (PLAP). Everything else non-certificate related in my original post will still apply (ex. IntuneHybridJoinHelperInstaller.ps1).

Once the machine has been deployed you will notice an extra button in the lower right. This is the PLAP.

When clicked, GlobalProtect will attempt to connect to the portal configured in the wrapper script and you will be presented with a screen like the one below. The prompts here will vary based on your authentication method. Here I am being prompted for my LDAP credentials to authenticate to the portal.

Once I passed the correct credentials here (and the correct second set of credentials at a second screen for two-factor) I was connected.

At this point you can click the ‘Back’ button and continue to log in to the device. That’s all there is to it! This is a great option for those of you who are lacking the desire to use certificates in your existing GlobalProtect configuration, but want to start using Autopilot.

Intune Android Enterprise Work Profile devices no longer launching dialer for telephone tel: links after installing Zoom

We recently came across an issue where after a recent Zoom app update anytime a user clicked a tel: link from within the work profile the Zoom app was launched instead of the native dialer. We first looked into what changed within the app in the release notes. It was obvious that a change in 5.6.3 caused this:

Support for tel: protocol links - Android
Users can tap a telephone number in an email or web page to call that number with Zoom Phone.

What is happening here is Zoom is now registered to handle tel: links and because it exists inside of the work profile it is taking precedence (the dialer is not really part of the work profile). This would have happened if we introduced ANY application that was registered to handle tel: links, but Zoom was the only one for us. What we need to do is bring the dialer into the work profile to give it precedence and to do that we use the ‘Android Enterprise system app‘ option to create instances of the native dialers in the environment. In our case we created one for the native (Google) Android dialer and one for the Samsung dialer. You may have other vendors in your environment so there may be others you need to add.

First, we need a target group of devices. We could simply deploy the applications to all devices and it will take effect where applicable, but it is better to be more targeted and specific when possible. We already have two Azure AD dynamic device groups that target our Android Enterprise devices. You can also get more specific using properties like deviceManufacturer to target specific vendor devices.

The first group is for our personally-owned work profile devices:

Name: dyn All BYOD-Enrolled Android Devices
Dynamic Membership rule: (device.deviceOSType -eq “AndroidForWork”)

The second group is for our corporate-owned devices (this technically will also target non-work profile Android Enterprise devices, but there is no harm in that):

Name: dyn All CORP-Enrolled Android Devices
Dynamic Membership rule: (device.deviceOSType -contains “AndroidEnterprise”)

Next, we need to create our dialer apps in Intune and assign them to our dynamic device groups. We are going to create one for the native Android dialer (com.google.android.dialer) and one for the Samsung dialer (com.samsung.android.dialer). The first time I attempted this I had an issue with the Samsung app installing because I had a capital ‘S’ in Samsung. Make sure the app id is all lowercase.

Once the new apps have have applied to the devices you will notice that the ‘Phone’ app shows inside the work profile app launcher. Once the ‘Phone’ app shows there you will be able to open tel: links in the dialer from within the work profile again.

TeamsFirewall – The open-source ethical firewall for Microsoft Teams

Some months back I was faced with an interesting challenge in Microsoft Teams. How do we prevent chats for users that have access to an external tenant? The background here is that certain industries like mine require you to capture and archive electronic communications. Depending on how you interpret the requirement this could include chats taking place in a tenant other than your own. An administrator naturally has zero access to the data in a tenant other than their own. You can use tenant restrictions to prevent a user (who you have some network or proxy control over) from accessing a tenant other than your own, but there are cases where a user needs this access for external collaboration. The challenge here was finding a way to prevent certain actions while working in another tenant… and so came TeamsFirewall.

I started analyzing Teams traffic in my free time and got a feel for how it works. I quickly realized that I could approach the issue with a scriptable proxy server that supported HTTPS. I chose mitmproxy for this task. In the first iteration of the product I broke traffic down to actions (like sending a message or deleting a message) and location (internal tenant or external tenant). After I had that working I wanted to expand the functionality to control actions based on not only location, but on other things like conversation type and participants. After more development I came up with a process that learns the environment by looking at action -> conversation -> participants. The system caches API tokens from the users it supervises to make requests on their behalf in order to learn what it does not know about the environment. The product does not need any credentials or direct access to a tenant to function. This data is then saved in the cache database (teamsfirewall_cache.db). The cache is used for lookups so that faster decisions can be made on the fly. Cache lifetime of both the user table and the conversation table can be configured via the config file.

An example of console output with core level logging set to debug

The rule engine of the product allows for extremely granular rulesets. You can get as granular as saying user A cannot edit messages sent to user B or as broad as user A/B/C cannot communicate with anyone @companyA.com. I would like to note that M365 Information Barriers perform some basic ethical wall functions, but it does not have much granularity and does not address examples like the the one above with external tenants.

Some next steps are improving the scalability of the product and developing an easily deployable package. I am currently looking at adding an option to use a central database for the cache database and using Docker containers with a load balancer to add more workers. You can see some of this upcoming work in the TODO file within the project repository (below).

All development and documentation will be maintained at the TeamsFirewall GitHub here: https://github.com/markdepalma/TeamsFirewall. Please feel free to post issues/questions and contribute!