Category Archives: Telephony

The mysterious case of intermittent one way audio loss between a Biamp TesiraFORTE device and an Avaya gateway

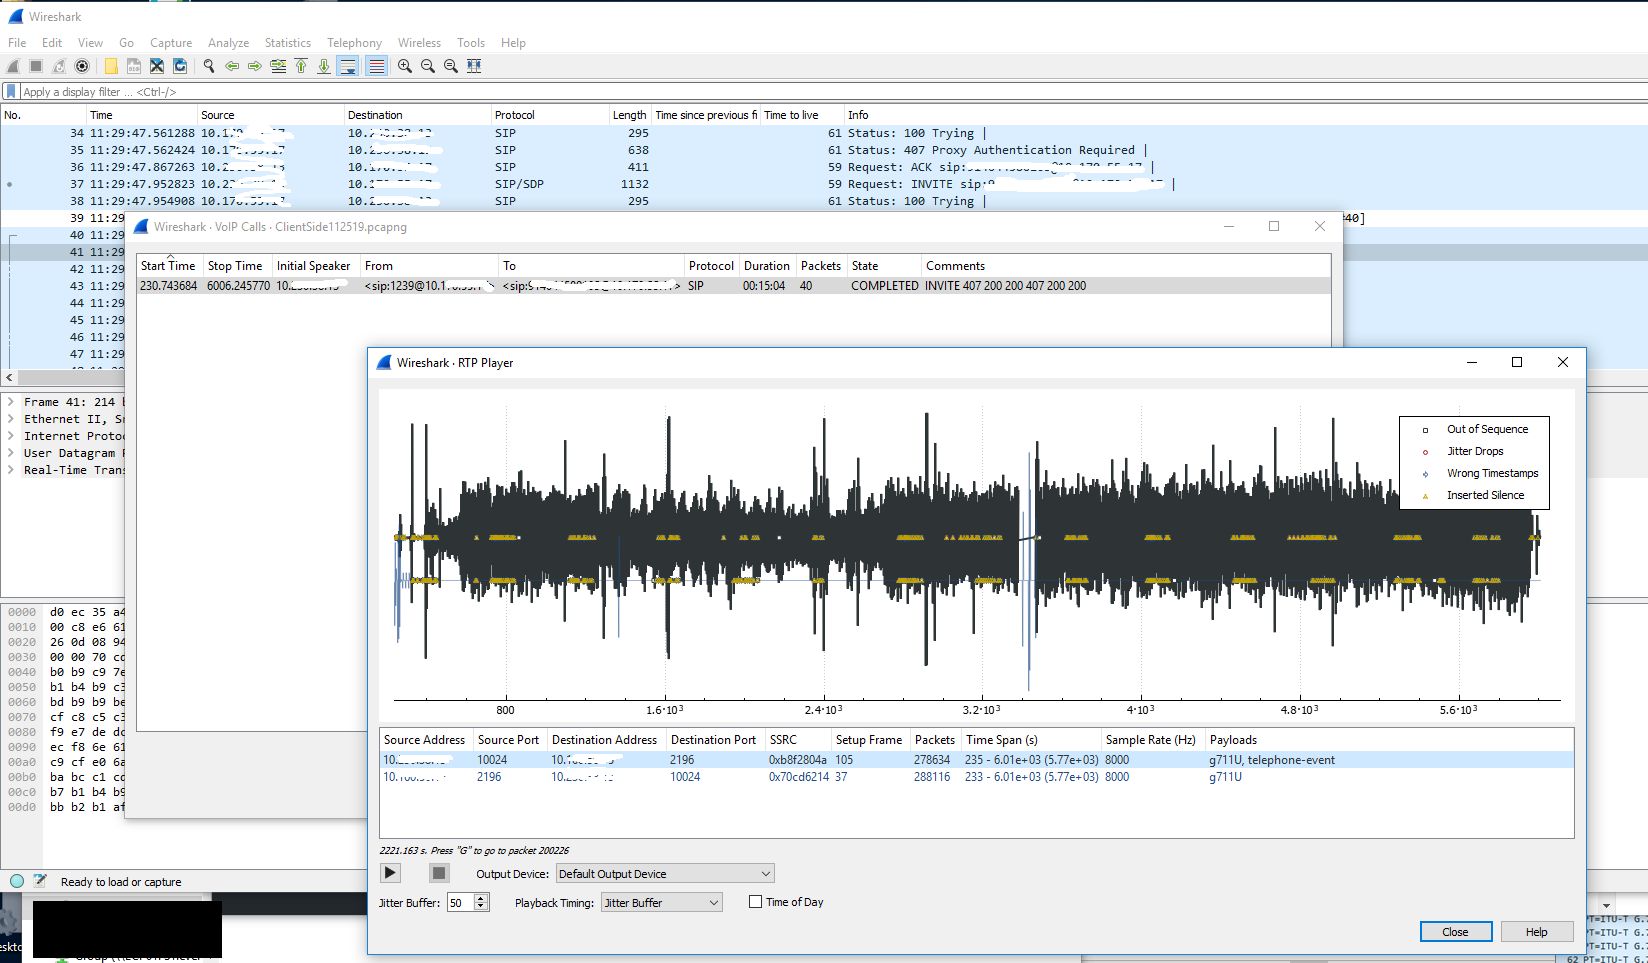
My company recently started using new Biamp TesiraFORTE devices for their newer conference rooms. I have little experience with VoIP (besides my fun with Google Voice and GVSIP) or these types of devices, but I was asked to assist in diagnosing a strange issue where audio going from the Biamp device to the Avaya gateway would randomly cut out for 1-3 minutes. Audio going from the gateway to the device would continue to work during this drop. I started by looking at a Wireshark capture of a span port of the Biamp device. This trace initially looked fine to me. I was able to view the RTP traffic and use the RTP player (Telephony -> VoIP Calls). During the time of drop there was no loss of audio.

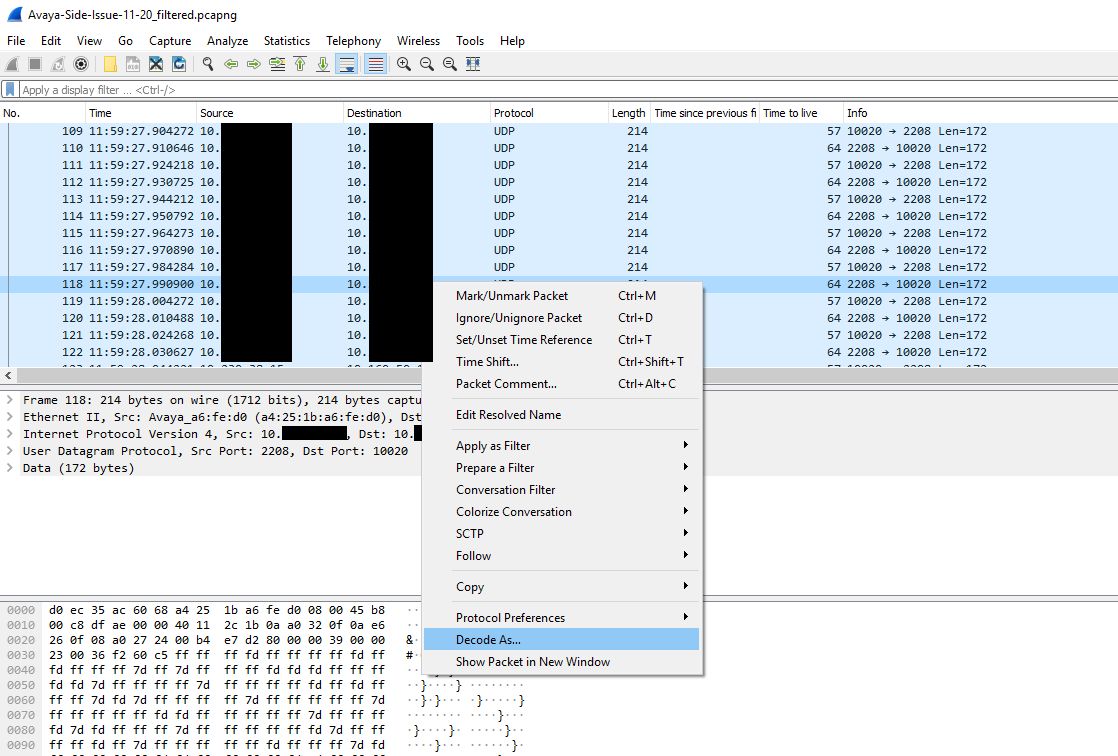
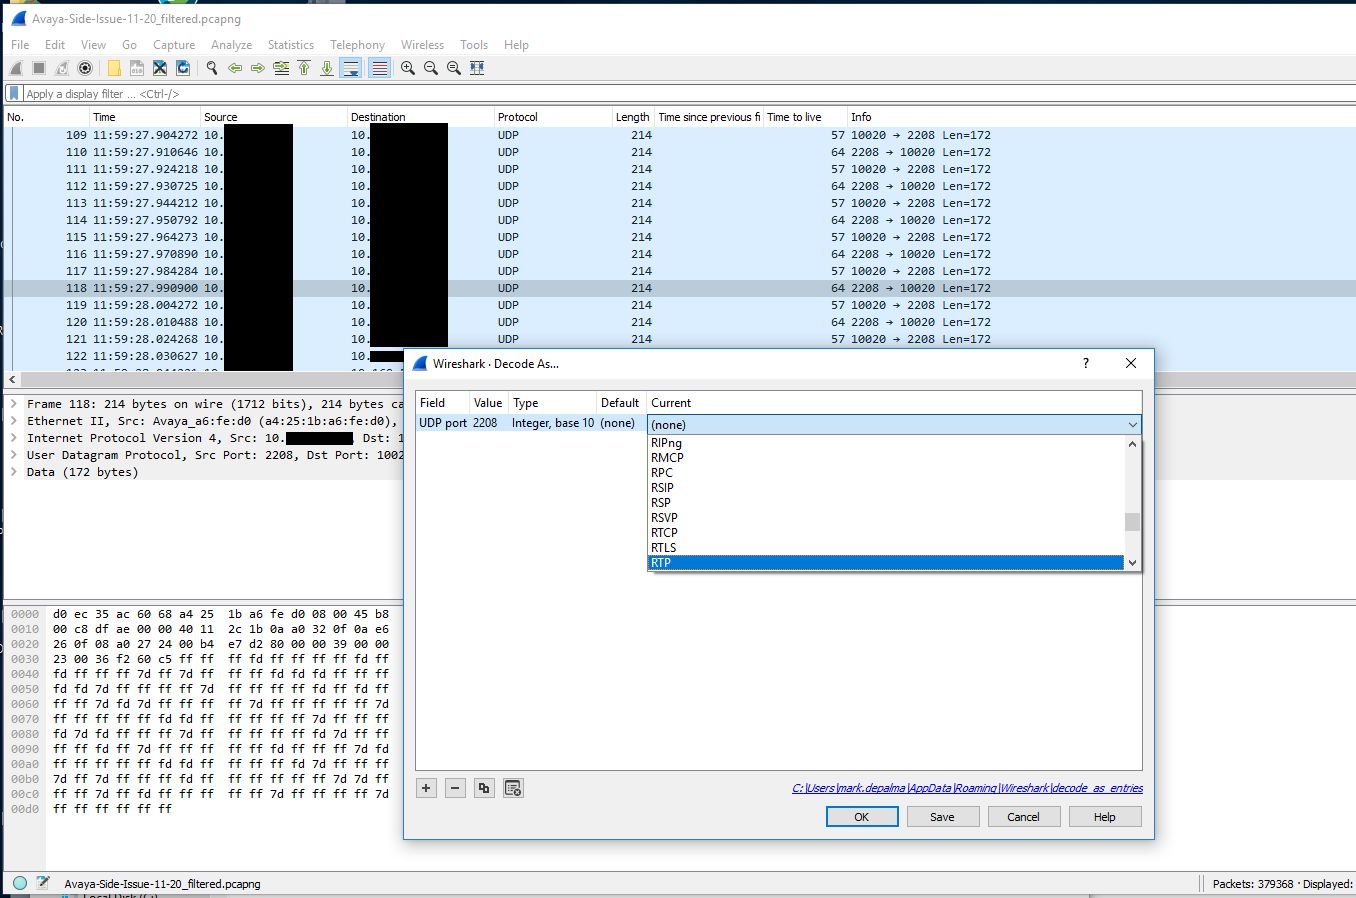
The next step was to get a trace of the other side involved. To do this we created a span of the interface on the switch that the gateway was sitting on. We then ran a packet capture of that, but using a capture filter to reduce the size of the capture since many other devices (mainly phones) were communicating with this gateway. We just used the filter ‘host <IP address of Biamp device>’ as the capture filter. I colorized traffic Biamp -> gateway traffic in this capture to make it easier to read. I also had to decode the traffic into RTP since the gateway traffic didn’t contain the initial SIP handshake.

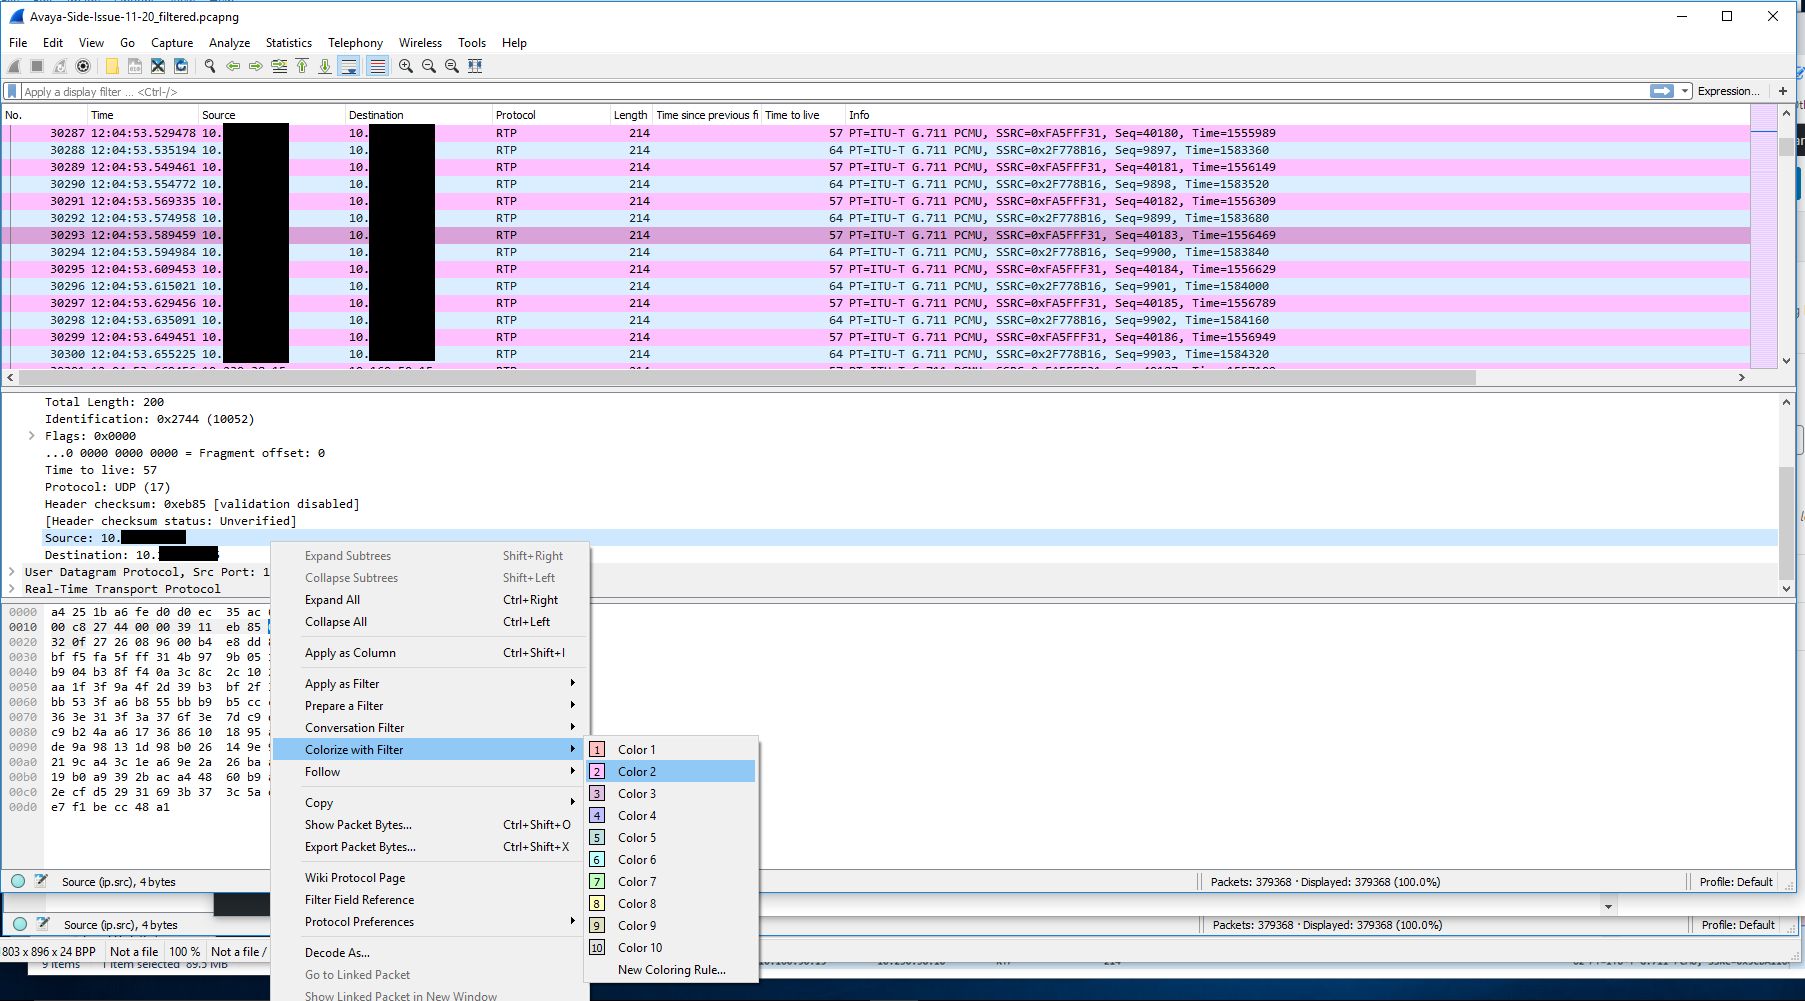
After decoding the raw UDP traffic into RTP traffic and colorizing the Biamp -> gateway traffic we are left with a nice back and forth to look at.

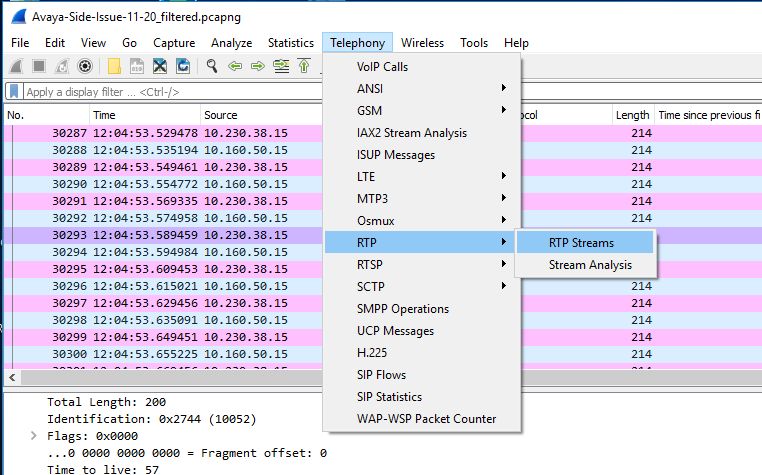
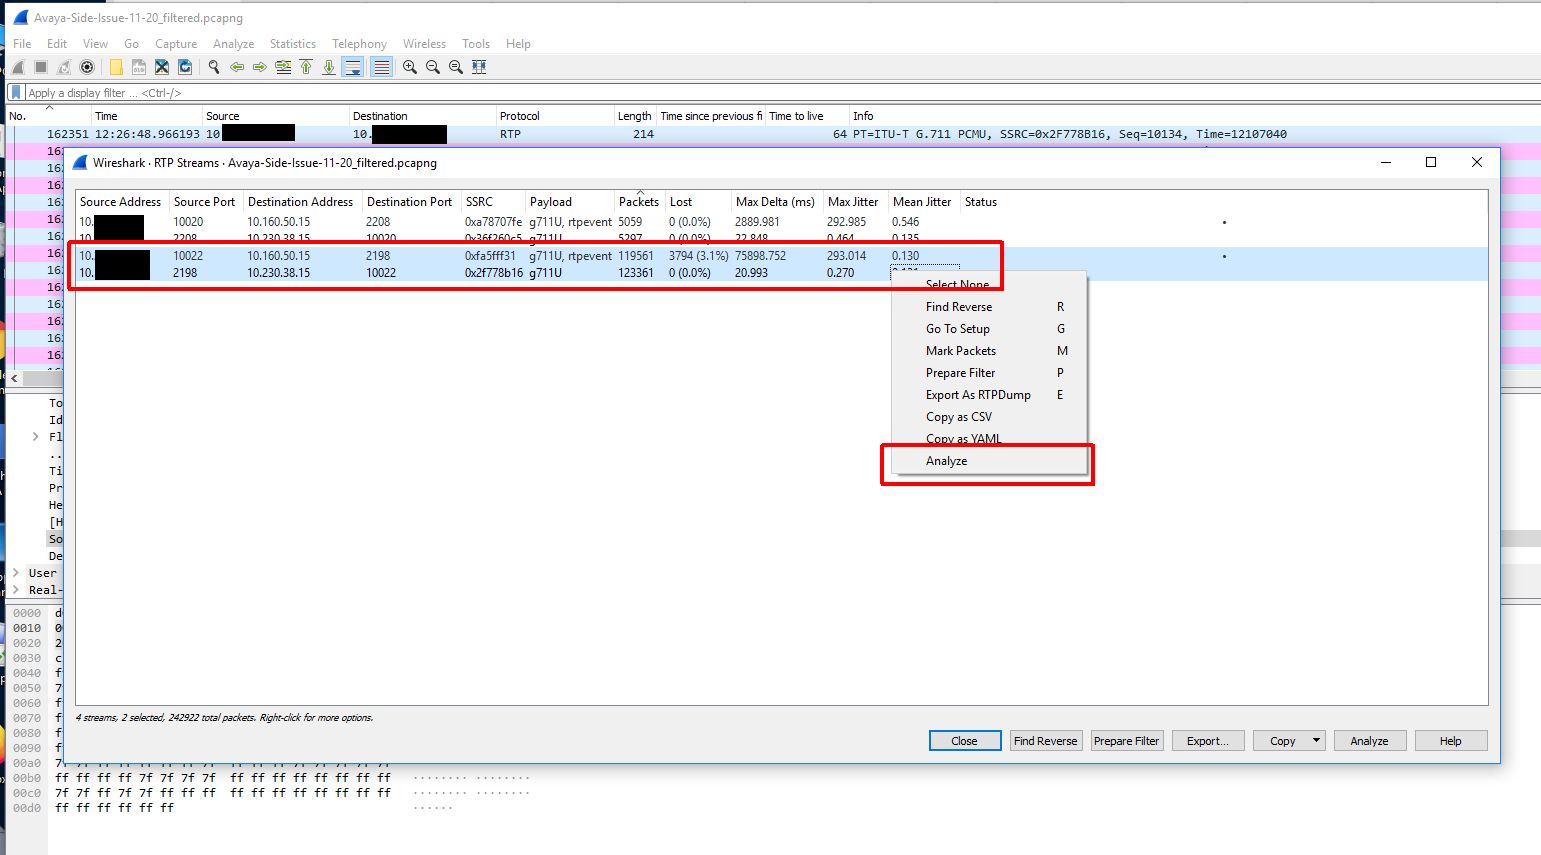
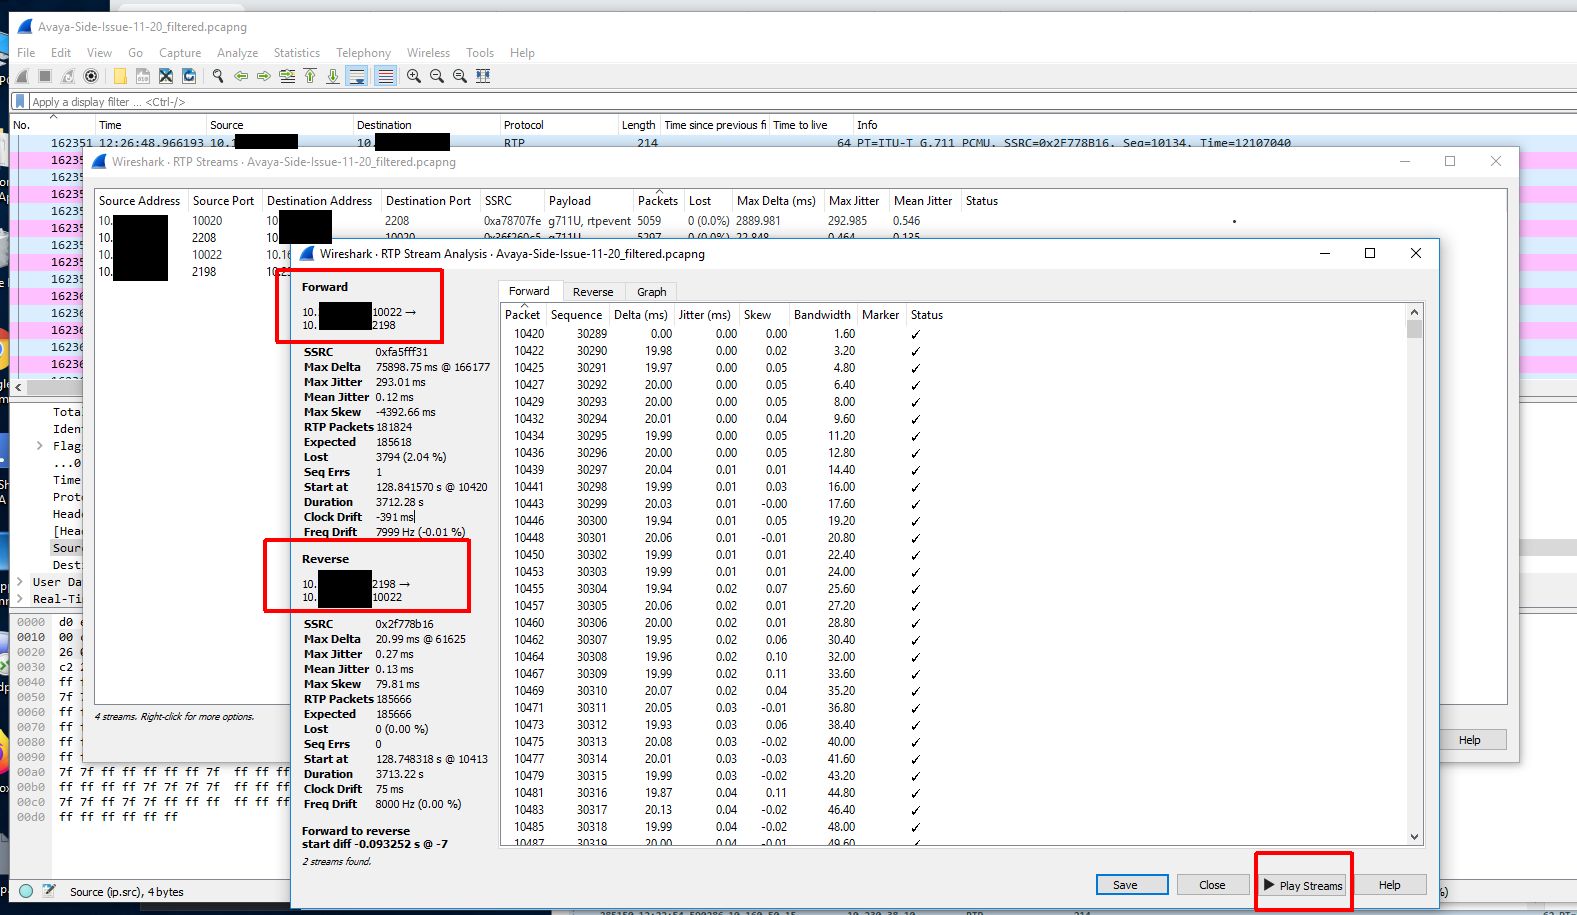
Because we didn’t capture the entire SIP handshake (the SIP gateway actually being dialed is another gateway in a different datacenter and that SIP gateway is actually handing off the call to a local gateway in the same building as the Biamp device) we need to reconstruct the RTP streams to be able to view them on a graph and play them back.

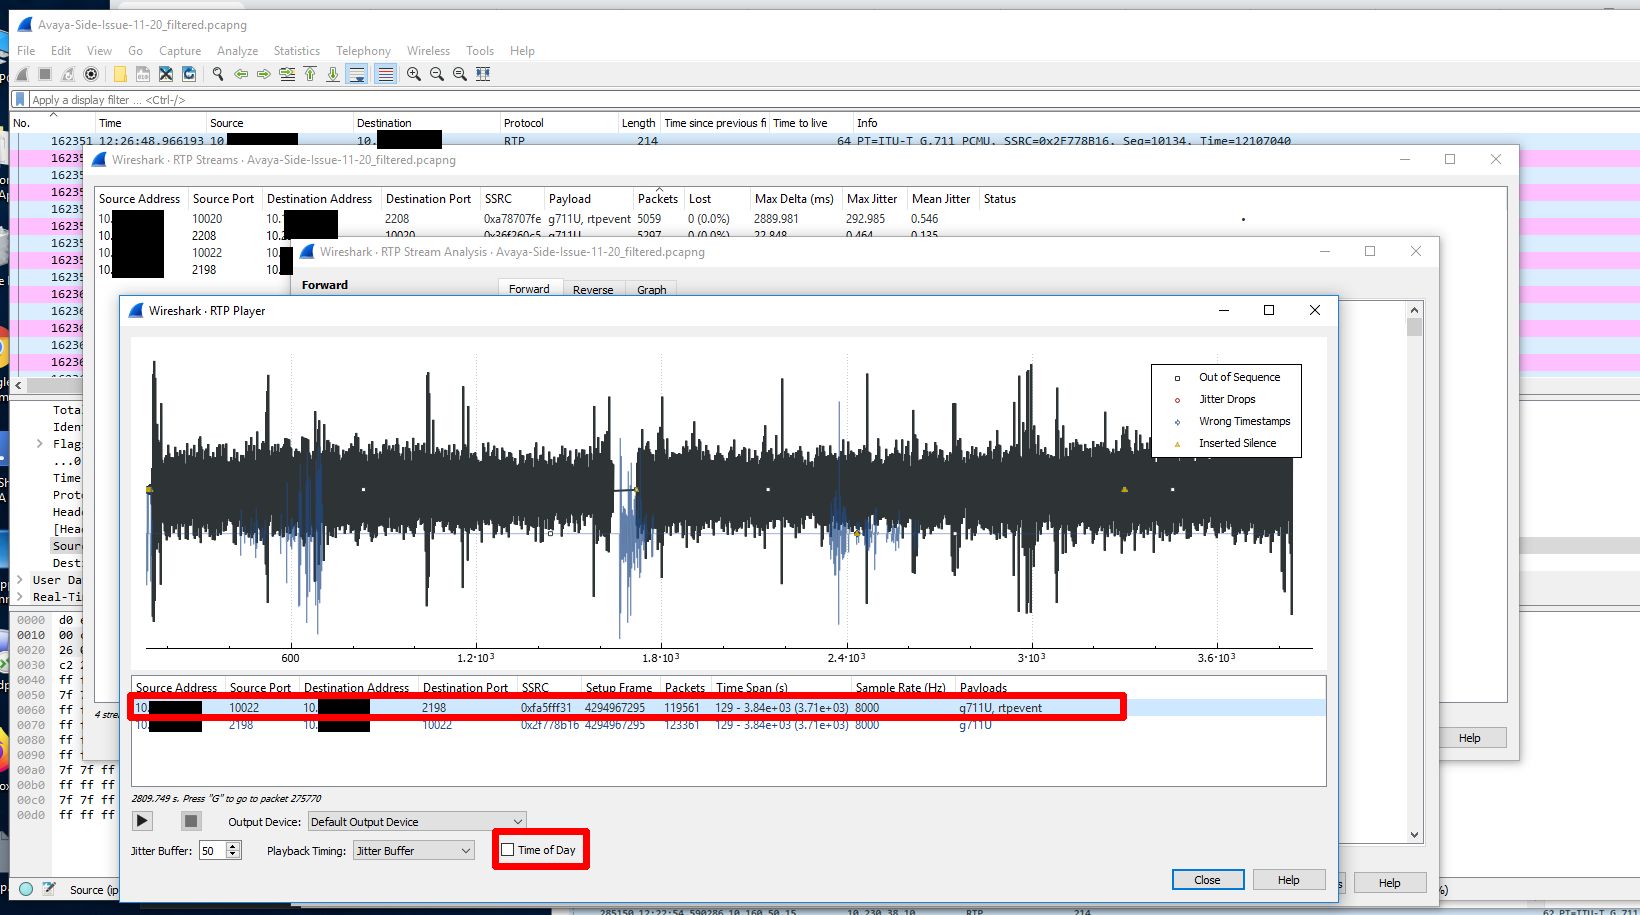
Now that we have a nice graph to look at and audio to look at we can hone in on the time of the audio loss which was about 12:26PM. When we do this we can clearly see a loss of sound and traffic at that time.

Now that we have this we can confirm that traffic isn’t actually getting to the gateway and it is not a problem with the gateway. This means somewhere between the first switch and the last switch in the path the traffic is being lost. The next step was to create a span of the trunk leaving the first switch (the switch that the Biamp device was sitting on). We actually saw the same loss of outbound traffic here as well. When the Biamp devices were installed they were actually hard set with a 100mb/full duplex configuration because they supposedly weren’t negotiating correctly and were negotiating to 10mb/half duplex. I decided we should work on that because hard setting like this can actually hide interface drops. After resolving this issue we realized the negotiation issue was actually a cosmetic issue in the configuration GUI. We upgraded firmware on the device to resolve this issue.

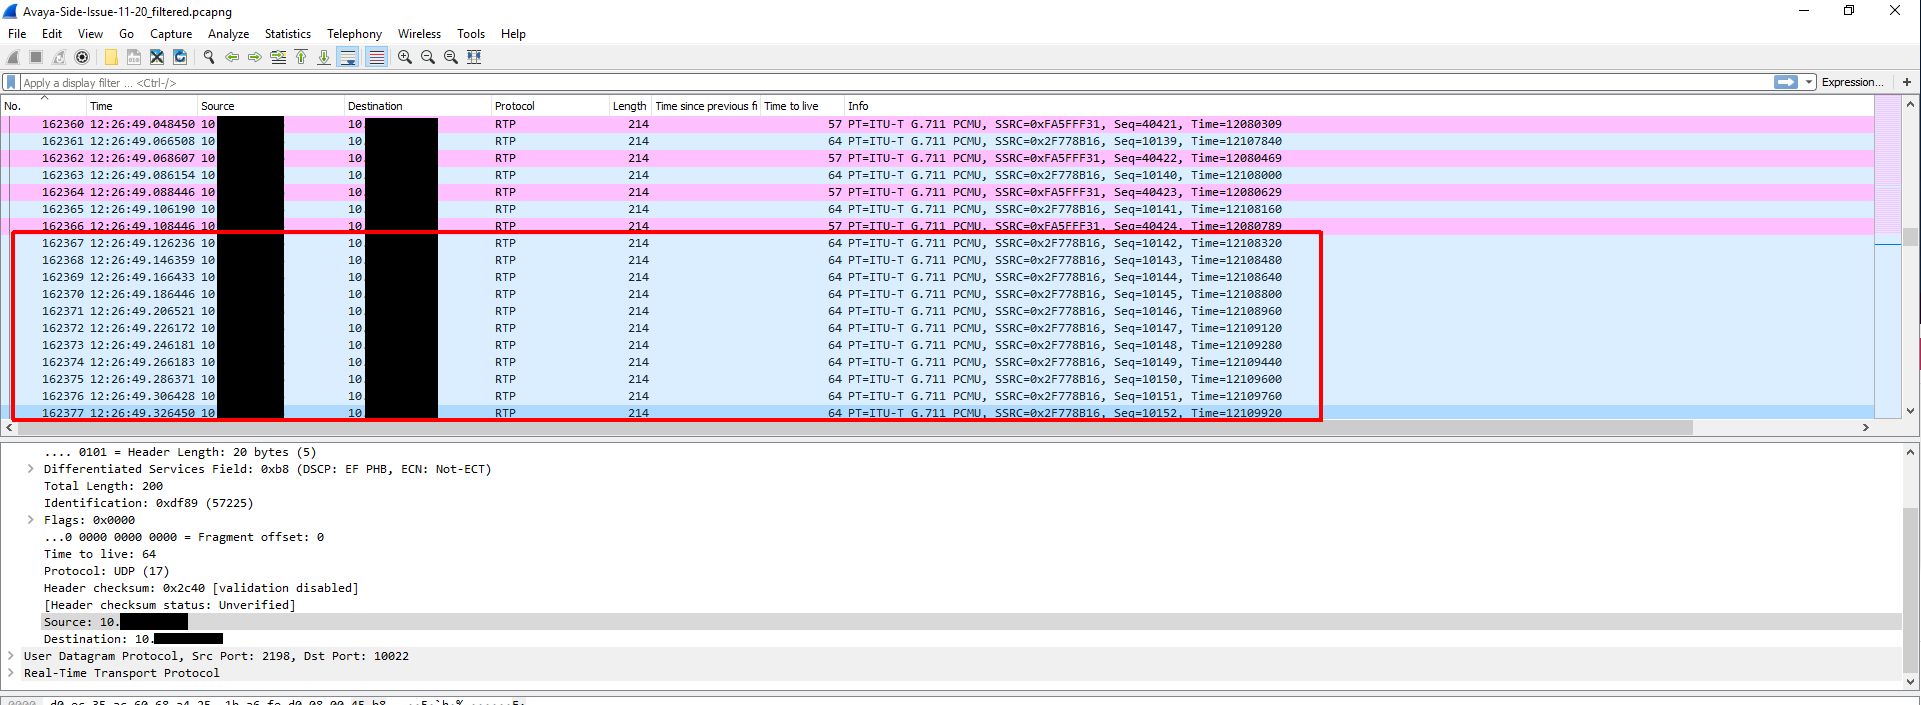
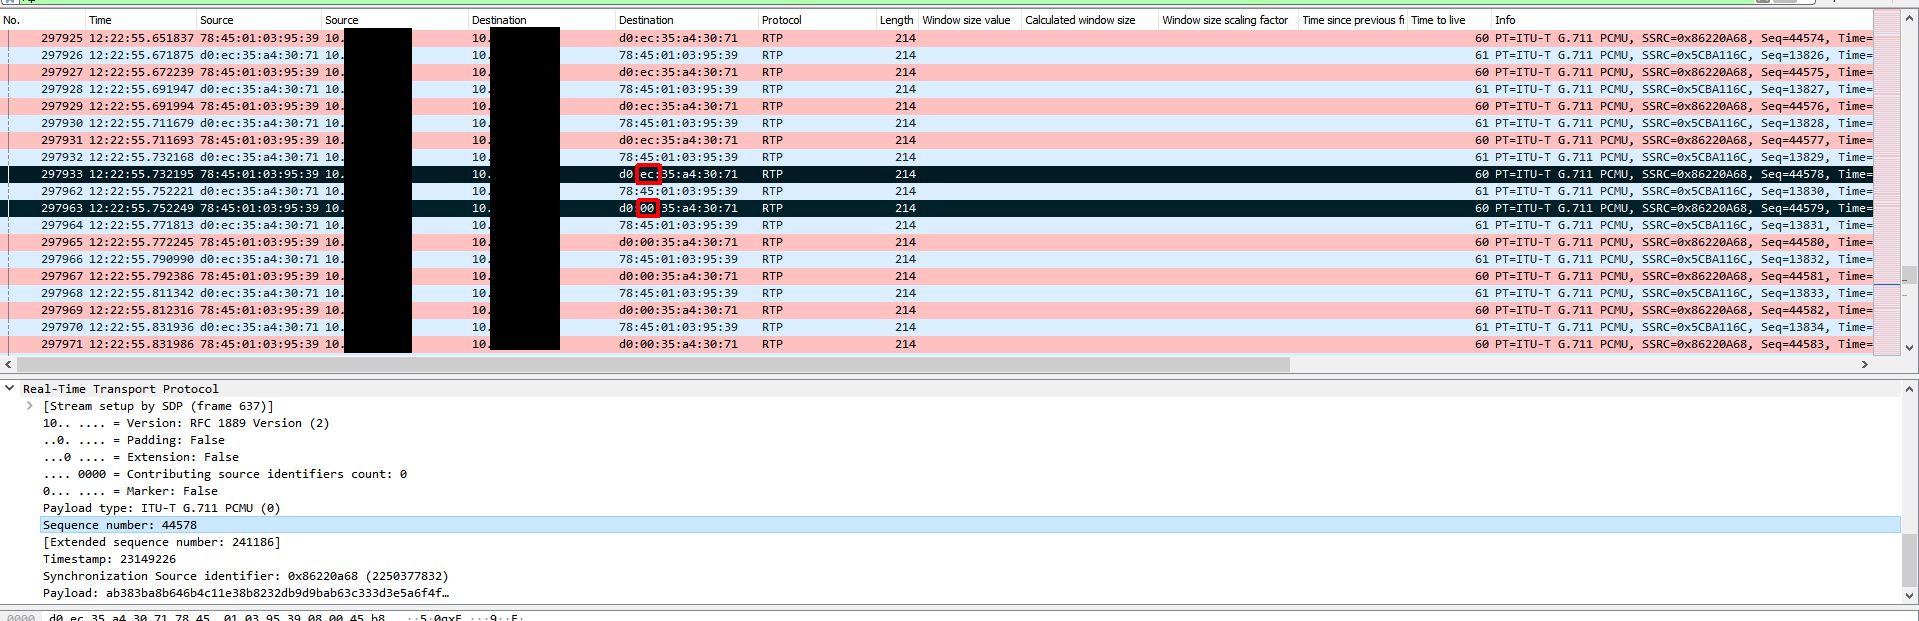
At this point I was a little baffled and had to retrace my steps since this wasn’t making any sense. To do this I took the last received RTP packet before an instance of audio loss on the gateway side capture and made note of the RTP sequence number. I used this sequence number to locate the outgoing packet on the Biamp device capture. I then marked this packet and marked the very next outgoing packet and started comparing them. This is when it got interesting. The destination MAC address changed between the two packets and remained that way for the duration of the audio loss. What made it even more interesting is the only thing that changed in the MAC address was the second byte which went from EC to 00. This MAC address was the address of the VLAN SVI (gateway). At this point I created new columns that included MAC addresses in my Wireshark view.

To figure out what could have caused this let’s keep this first marked packet highlighted and remove our filter (I was filtering down to SIP + RTP traffic in most of these screenshots) to see all traffic on the Biamp device span. The ONLY traffic that is visible to the Biamp device in between the last ‘good’ RTP packet and the first ‘bad’ RTP packet is a series of ARP request broadcasts from the switch. These ARP requests were normal requests looking for who had a series of IP addresses. It seems that when the Biamp device sees a number of these ARP request broadcasts it relearns the switch’s MAC address incorrectly or these APR request broadcasts somehow trigger a software bug that essentially poisons the Biamp device’s ARP cache by causing that second byte to go from EC to 00.

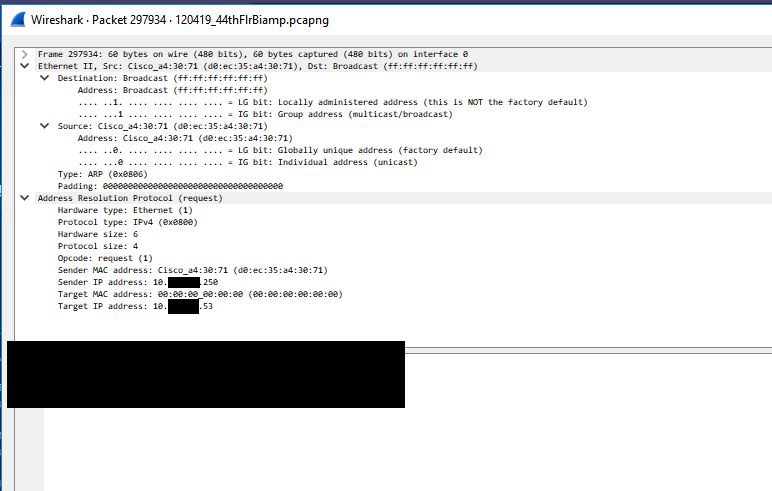
Even though it is normal and shouldn’t cause any issues we traced the reason for these ARP requests back to a network scan happening on this subnet at the time. None of these IP addresses are valid addresses and network scan is what triggered the switches to start searching for these addresses via ARP requests. Below is one of the ARP request packets. There is nothing in this packet that references the ‘bad’ switch MAC address with the second byte having 00 instead of EC.

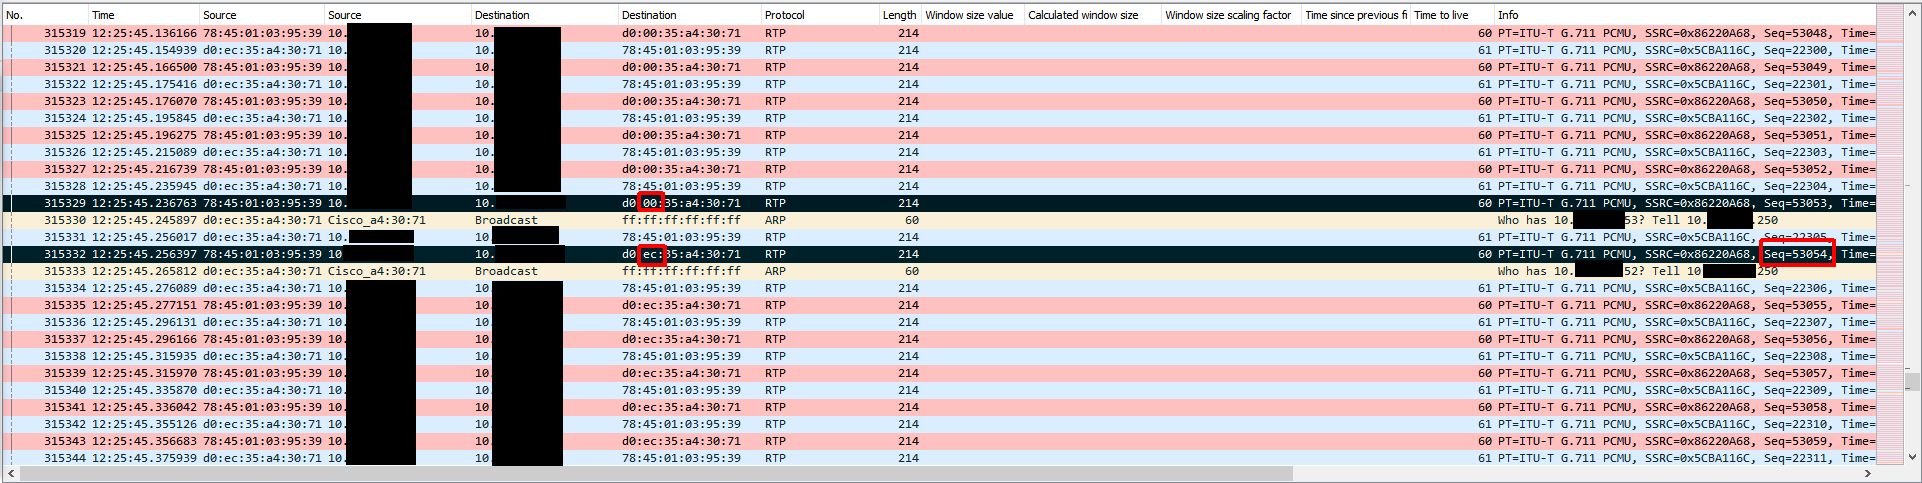
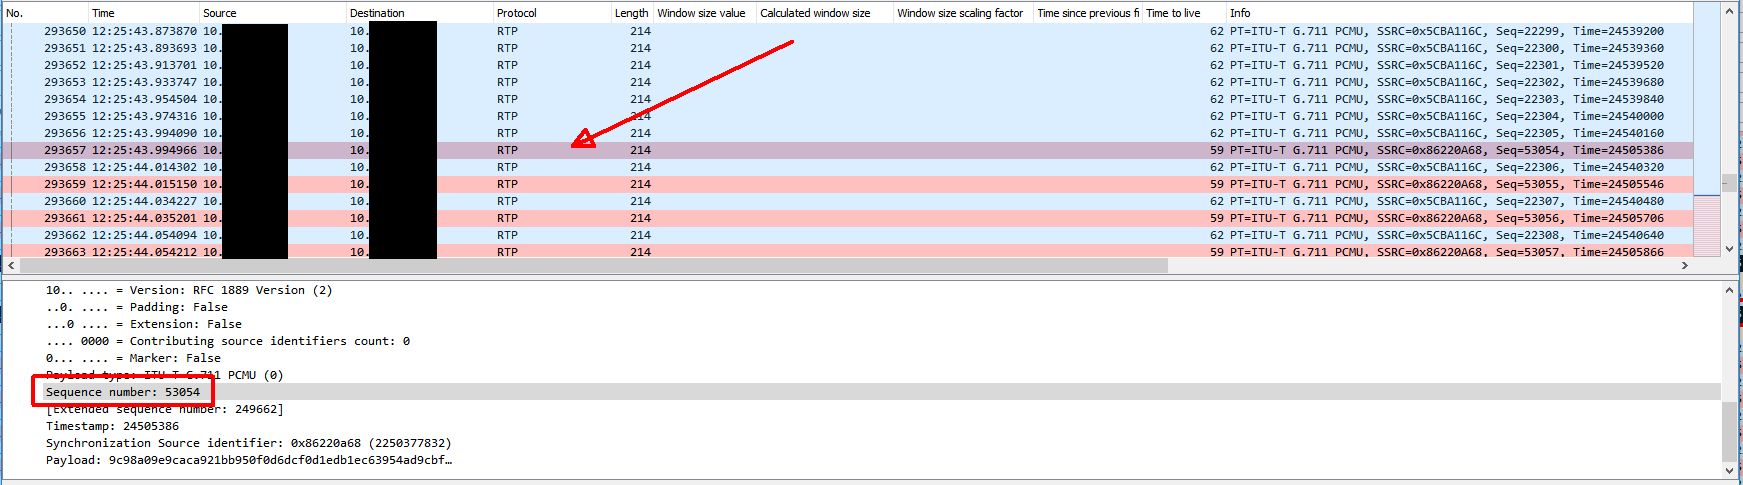
The next thing to look at is what actually causes the audio to be restored after a few minutes. Below is the same trace, but later on when the audio loss ends. The first marked (black) packet is the last ‘bad’ RTP packet and the last marked (black) packet is the first ‘good’ RTP packet when audio is restored. With no filter applied we can see that the ONLY thing happening between these two packets is ANOTHER ARP request broadcast. This ARP request seems to cause the Biamp device to re-learn the switch’s MAC address properly which restores RTP traffic delivery. The first ‘good’ RTP packet is the RTP packet with sequence number 53054. We can use the capture on the gateway side to find this packet.

With this new knowledge we were able to reproduce the issue on demand by scanning 20-30 non-existent IPs on the subnet which triggered the ARP requests. We could then restore audio by doing the same scan. Sometimes it would take a few extra scans to trigger the behavior.

We handed all of this information off to Biamp and they are still investigating the issue. When they come back with more information and/or a resolution I will update this thread. An important lesson here is to pay attention to the details. I technically had all the data I needed to figure out the issue in the original capture on the first day I was involved, but I wasn’t forced to look more closely until I looked at many other things.

UPDATE (2/7/20): Biamp eventually was able to reproduce the issue in their lab after we handed over the findings. They have since released a firmware update (3.14.1) that resolves this issue. The fix is listed as ‘Fixed issue where unsolicited ARPs impact the VoIP ARP table‘.

Google Voice + Incredible PBX + OBi 110


UPDATE #3 (6/21/2019):
I did some digging and found the core issue (which has been talked about on other forums). In March Google disabled Google Voice access via the ‘https://www.googleapis.com/auth/googletalk’ API. They are only allowing access via a private ObiTalk API now. You basically have to get the OAuth client ID, client secret, and a refresh token for this ObiTalk app. Once you have these three things they can be used in the procedure below. After this you will be up and running again. Thank you again, naf!

UPDATE #2: As of 3/25/2019 my GVSIP trunk is showing a rejected status again. This time it seems the actual server is rejecting authentication. This is the error I am receiving in the Asterisk logs:

[2019-03-25 11:26:42] DEBUG[7278] res_pjsip_outbound_registration.c: Registration re-using transport 0x7ff23001f748
[2019-03-25 11:26:42] WARNING[7278] res_pjsip_outbound_registration.c: Fatal response '403' received from 'sip:obihai.sip.google.com' on registration attempt to 'sip:gv1143131xxxxxxxxxx@obihai.sip.google.com', stopping outbound registration

UPDATE: As of 3/19/2019 my GVSIP trunk was showing a rejected status. It seems that this version of IncrediblePBX was using a static IP for the outbound proxy which just stopped working. After looking into it more I realized the ‘nafkeys-update’ script updates this for you, but I didn’t use that script since it can no longer download the certificates. I have updated the steps (step 5) below to show how to resolve this. This was the error I was receiving in the Asterisk logs:

[2019-03-19 08:32:52] WARNING[3715] pjproject:                        SSL SSL_ERROR_SSL (Handshake): Level: 0 err: <336151568>  len: 0
[2019-03-19 08:32:52] WARNING[3716] res_pjsip_outbound_registration.c: No response received from 'sip:obihai.sip.google.com' on registration attempt to 'sip:gv1143131xxxxxxxxxx@obihai.sip.google.com', retrying in '60'

If you were already running this setup and you are now having this issue run the following commands to replace the static IP with the proper address:

  • sed -i ‘s|64.9.242.172|obihai.telephony.goog|’ /etc/asterisk/pjsip_custom.conf
  • amportal restart


I have been using a cordless house phone in conjunction with Google Voice ever since purchasing a home a number of years ago. This was accomplished using an OBi 110 device, but recently stopped working last year because Google updated certificates on their end and this model device did not trust this new certificate chain. OBi stated the box was end of life and they would not offer an update. At that time I setup a FreePBX instance between my OBi 110 and GV, but recently has Google ended XMPP support which nuked my new configuration. OBi now has a relationship with Google and conveniently offers a new model that works with Google Voice’s new SIP protocol (GVSIP). I have already had to replace my OBi once due to a hardware issue and they did not offer a simple update to fix the certificate issue last time. I am not willing to shell out more money to get this working. I searched the internet for options (surly if Google Voice is using SIP now there is a way to connect to it). A contributor to the Asterisk  project (the core of FreePBX/Incredible PBX) named naf has already developed a way to connect Asterisk to GVSIP. The problem is forums are removing references to files and instructions because of Google ToS violations. I spent some time figuring all this out and was able to hook my OBi 110 device up to an Incredible PBX VM. The VM has a GVSIP trunk and everything is working perfectly (hopefully for a long time). The steps are basically installing CentOS, installing Incredible PBX, obtaining a OBi certificate/private key pair (Google is using it to whitelist SIP connections), configuring the PBX trunks/routes, and configuring the OBi to talk to the PBX over SIP. Here are the steps I took to get this running:

  1. Download/install CentOS 6.10 minimal and Incredible PBX 16-15 (http://nerdvittles.com/?p=27089). As I said before I deployed this to my ESXi cluster at home, but this could easily run on a local VM. I’m looking into translating this setup into a Raspberry Pi deployment
  2. Obtain Obi client certificate/private key pair
    • All references to the certificates have been removed. You can actually pull the certificate and private key off of an OBi 110 and use this on Incredible PBX. This requires modified firmware (using a firmware patch). This patch process involves using bsdiff to patch the original firmware file with the aforementioned patch file, flashing the device with the patched firmware file, setting up a syslog server, configuring the syslog server on the OBi, initiating a device backup (which will send the cert/key in binary DER format to the syslog server), and converting cert/key pair to PEM
    • I will save you some time and provide you with the already patched firmware here, but I cannot publicly provide the certs for legal reasons (you can try dropping me a message). OBi 110 devices are available extremely cheap on eBay as they are now defunct. An OBi type device will be necessary for connecting GVSIP to a traditional phone anyway
  3. Copy the certificate pair to Incredible PBX (obihainaf.crt + obihainaf.key) under /etc/asterisk/keys
  4. Create a Google Voice refresh_token for your account. You will use the Incredible PBX OAuth Client ID and OAuth Secret found at /etc/asterisk/pjsip_custom.conf
  5. Obtain an ObiTalk-based OAuth client ID, client secret, refresh token. If you have access to a newer Obi device you can possibly install custom firmware that will allow you to SSH to it and pull these values for reuse. You can technically recreate the ObiTalk OAuth exchange and get a refresh token that way, but that is something that can’t be publicly posted. I will say that the ObiTalk OAuth client ID is: 565436231175-v2ed4f21arki7dt43pks0jlsujatiq2i.apps.googleusercontent.com
  6. Run the following commands to update the install-gvsip script with the ObiTalk OAuth client ID and client secret from step 5 (you can manually update the file if you don’t want to run the ‘sed’ commands):
    • sed -i ‘s|466295438629-prpknsovs0b8gjfcrs0sn04s9hgn8j3d.apps.googleusercontent.com|<CLIENT ID YOU OBTAINED IN STEP 5>|’ /root/gvsip-naf/install-gvsip
    • sed -i ‘s|4ewzJaCx275clcT4i4Hfxqo2|<CLIENT SECRET YOU OBTAINED IN STEP 5>|’ /root/gvsip-naf/install-gvsip
  7. Run the following command to update the install-gvsip script with the proper proxy address (you can manually update the file if you don’t want to run the ‘sed’ commands):
    • sed -i ‘s|64.9.242.172|obihai.telephony.goog|’ /root/gvsip-naf/install-gvsip
  8. Create your GVSIP trunk(s). You will be prompted for the refresh token you retrieved in step 5
  9. Verify trunks registered and working
    • cd /root/gvsip-naf/
    • ./show-trunks
  10. Setup the OBi 110 as an extension in Incredible PBX and set the OBi 110 to connect to Incredible PBX
  11. Configure inbound and outbound routes to the OBi 110 extension
  12. Configure SIP local networks in CIDR format under Settings -> General SIP Settings -> NAT Settings -> Local Networks. I had issues with my SIP services shutting down right after boot up in Incredible PBX and traced it back to this in the logs. I added my home subnet (192.168.0.0/24) and it stopped going down
  13. Test inbound and outbound calls

Note: This could also be deployed to a Raspberry Pi 3. I just didn’t have an unused Pi 3 handy, so I went with a VM. I was running my previous FreePBX instance on an older Pi B+ for over a year.