A few months ago a tenant next to my friends’ warehouse threw way something like 100 IP cameras that were still sealed in the box. One of my other friends took the bulk of them with hopes of making a profit and the friend who initially found them saved me a few because he thought I’d like playing with them (little did he know what this would turn into). When I tried setting one up I found that it was a Verizon-branded version of the Sercomm RC8021 camera. The web console had a username/password combination that did not match up with anything I found online. Because of this the camera was essentially useless as you could not configure any settings or join it to a wireless network. I thought cracking this camera would make for an interesting exercise/challenge and It turned out be exactly that…
Initial Reconnaissance
I started out by researching the camera model and any default passwords associated with it. I came across references to the default credentials for an RC8021 being ‘administrator’ with a blank password. That didn’t work along with anything else I could think of admin/blank, admin/admin, administrator/admin, etc. Resetting the camera didn’t help with this either. Verizon’s own document for this camera was still available online, but had nothing useful. Some Googling also revealed some documented APIs for the camera, but any of the APIs I hoped to get access to required authentication. A port scan did not yield anything useful. I did find that the camera had a port open for UPnP, but I wasn’t able to use any of the known UPnP exploits to gain access to the camera or its file system.
Obtaining Physical Access
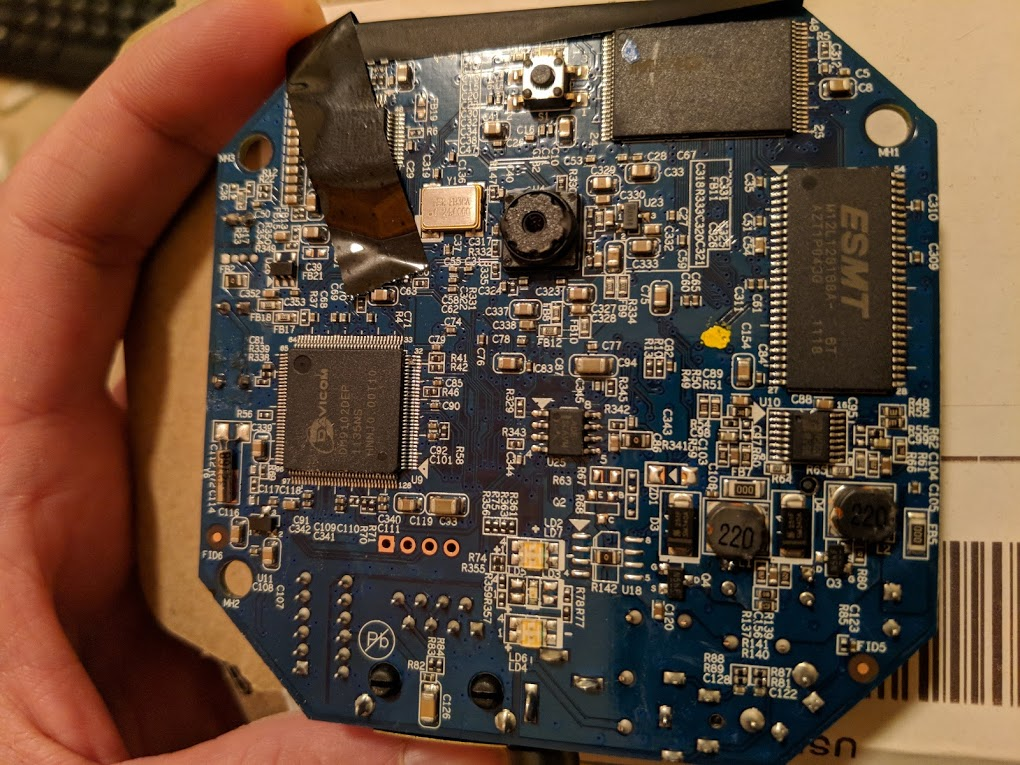
After all my initial attempts to get into this camera were unsuccessful, I decided to crack the camera open and start poking around. Below are both sides of the camera board. The four connection points within red square below are indicative of a UART connection. The other clue to this was the square connection to the far right. That would likely be the ground. I used my multi-meter to test these points and verified this.
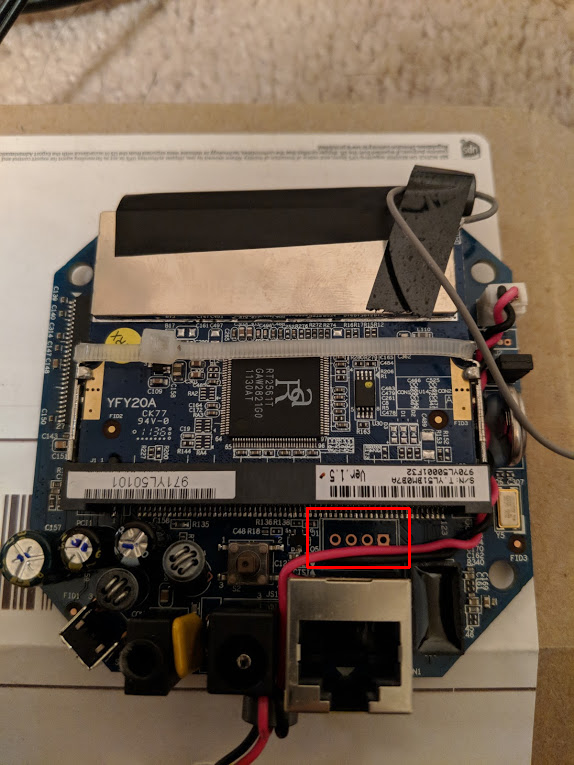
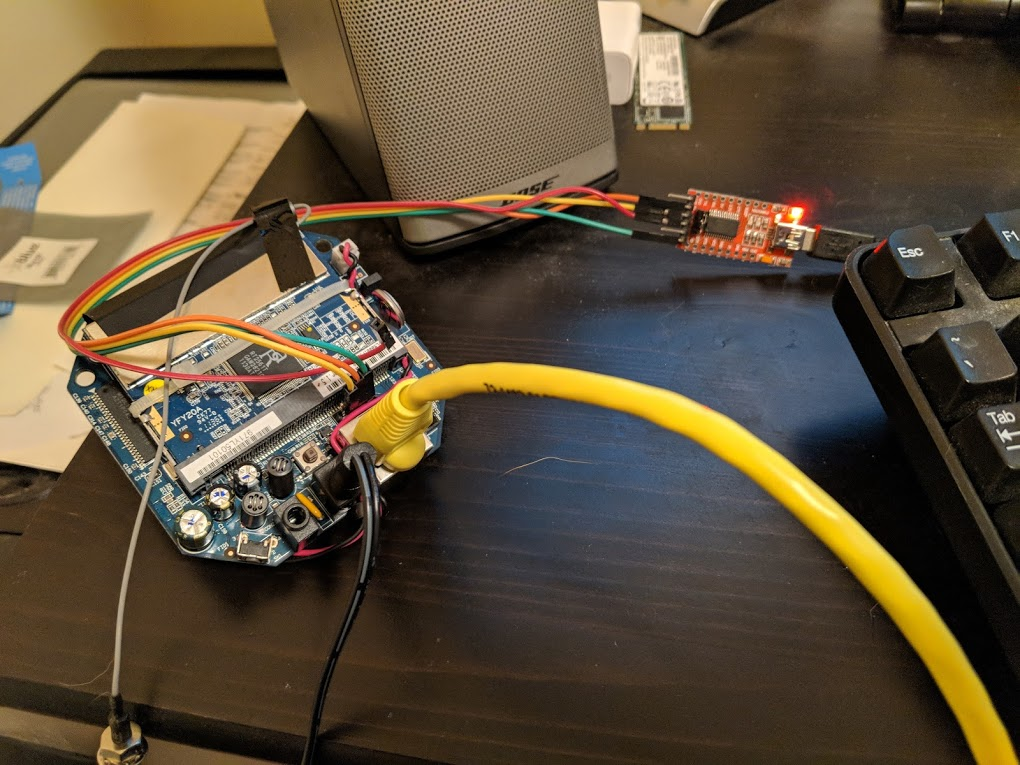
Now that I was confident I had located a UART connection I broke out the soldering iron and soldered a four pin header here…
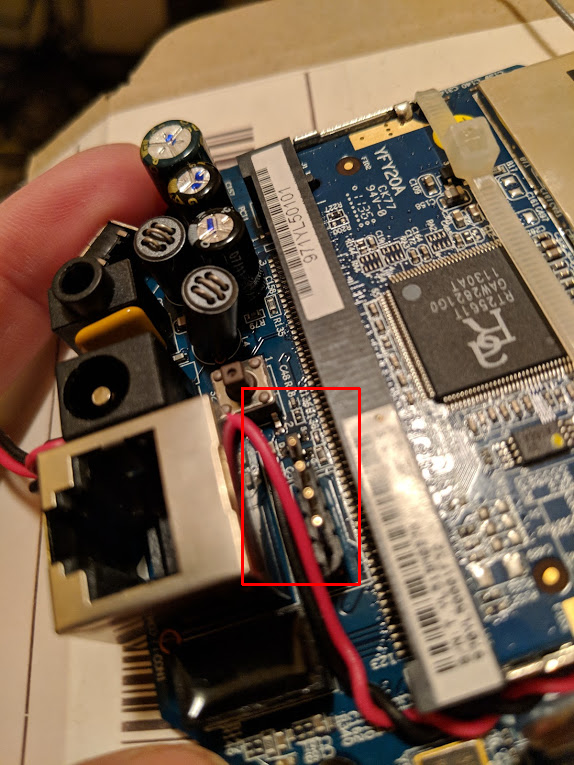
After soldering the header I just needed to figure out which pin was RX and which was TX. I already knew what ground was, so figuring out RX/TX was simple. VCC was not necessary since the camera had its own power supply. I hooked up three of the pins to a USB->UART converter, connected Putty to the COM port assigned to the converter on my computer, and set the Putty serial session with a common config:
Speed (baud): 115200
Data bits: 8
Stop bits: 1
Parity: Even
Flow control: None
Once I hooked the camera up to power I was able to watch the entire boot process and eventually received logon prompt. My initial hope was that the shell was not password protected or at least had a blank root password, but I was not that lucky. This was the the boot up output:
 The bootloader version 4.09
 Flash Size = 4M(8K x 8,64K x 63)
 MAC address 00:0e:8f:7a:34:83
 unprotected area checksum = 00000000
 Uncompressing Linux………………………………………… done, booting the kernel.
 Linux version 2.4.19-pl1029 (peggy@ISBU-Compiler-B1) (gcc version 3.3.4) #294 Thu Sep 29 14:27:29 CST 2011
 CPU: Faraday FA526id(wb) revision 1
 ICache:16KB enabled, DCache:16KB enabled, BTB support, IDLE support
 Machine: Prolific ARM9v4 - PL1029
 Prolific arm arch version 1.0.11
 On node 0 totalpages: 8192
 zone(0): 8192 pages.
 zone(1): 0 pages.
 zone(2): 0 pages.
 Kernel saved command line [arch]: root=/dev/mtdblock3 rootfstype=squashfs
 Kernel command line [options]: root=/dev/mtdblock3 rootfstype=squashfs
 plser console driver v2.0.0
 Calibrating delay loop… 147.56 BogoMIPS
 Memory: 32MB = 32MB total
 Memory: 30764KB available (1263K code, 284K data, 64K init)
 Dentry cache hash table entries: 4096 (order: 3, 32768 bytes)
 Inode cache hash table entries: 2048 (order: 2, 16384 bytes)
 Mount-cache hash table entries: 512 (order: 0, 4096 bytes)
 Buffer-cache hash table entries: 1024 (order: 0, 4096 bytes)
 Page-cache hash table entries: 8192 (order: 3, 32768 bytes)
 POSIX conformance testing by UNIFIX
 PCI: Probing PCI hardware on host bus 0.
 Linux NET4.0 for Linux 2.4
 Based upon Swansea University Computer Society NET3.039
 Initializing RT netlink socket
 tts/{a2a43ffa4022ea385038b9b7ab8e5db884a5cf9868153c481440e673f79e035a}d0 at MEM 0x1b000400 (irq = 2) is a PLSER
 Prolific addr driver v0.0.4
 Starting kswapd
 devfs: v1.12a (20020514) Richard Gooch (rgooch@atnf.csiro.au)
 devfs: boot_options: 0x1
 squashfs: version 3.0 (2006/03/15) Phillip Lougher
 i2c-core.o: i2c core module version 2.8.1 (20031005)
 i2c-dev.o: i2c /dev entries driver module version 2.8.1 (20031005)
 Prolific i2c algorithm module v1.2
 Initialize Prolific I2C adapter module v1.2.1
  found i2c adapter at 0xd9440000 irq 17. Data tranfer clock is 100000Hz
 i2c-proc.o version 2.8.1 (20031005)
 pty: 256 Unix98 ptys configured
 Software Watchdog Timer: 0.05, timer margin: 60 sec
 RAMDISK driver initialized: 16 RAM disks of 4096K size 1024 blocksize
 PPP generic driver version 2.4.2
 PPP Deflate Compression module registered
 PPP BSD Compression module registered
 Linux video capture interface: v1.00
 Prolific Audio AC97 driver version 2.2.2 for 63 and 29 Audio Module 2006/03/21
 ac97_codec: AC97 Audio codec, id: 0x414c:0x4770 (Realtek ALC203/203LF)
 PL-1029 NOR flash driver for MTD, version 0.8.0 sc 1
 NOR flash type: ppi-amd 8x8 64x63
 NOR flash id = 0xa8
 nor interrupt 30 registered
 Creating 9 MTD partitions on "plnormtd":
 0x00000000-0x00008000 : "bootloader"
 0x0000c000-0x0000e000 : "MAC"
 0x000e0000-0x00400000 : "SQUASHFS"
 0x0000e000-0x00010000 : "LOGO Image"
 0x00020000-0x00400000 : "Kernel+FS"
 0x00000000-0x00400000 : "ALL"
 0x0000a000-0x0000c000 : "HTTPS CA"
 0x00010000-0x00020000 : "CONFIG"
 0x00008000-0x0000a000 : "Reserve"
 usb.c: registered new driver hub
 usb-ohci-pci.c: usb-00:05.0, PCI device 180d:2300
 usb-ohci.c: USB OHCI at membase 0xd8400000, IRQ 9
 usb.c: new USB bus registered, assigned bus number 1
 usb.c: ### @@@ usb_set_address
 usb.c: >>> usb_get_device_descriptor
 usb.c: >>> usb_get_configuration
 hub.c: USB hub found
 hub.c: 4 ports detected
 Prolific Real-Time Clock Driver version 1.0.0 (2003-04-02)
 PL UART driver version 1.0.1-1 (2006-04-21)
 Initializing Cryptographic API
 NET4: Linux TCP/IP 1.0 for NET4.0
 IP Protocols: ICMP, UDP, TCP, IGMP
 IP: routing cache hash table of 512 buckets, 4Kbytes
 TCP: Hash tables configured (established 2048 bind 4096)
 ip_tables: (C) 2000-2002 Netfilter core team
 NET4: Unix domain sockets 1.0/SMP for Linux NET4.0.
 802.1Q VLAN Support v1.8 Ben Greear greearb@candelatech.com
 All bugs added by David S. Miller davem@redhat.com
 Fast Floating Point Emulator V0.9 (c) Peter Teichmann.
 RAMDISK: squashfs filesystem found at block 0
 RAMDISK: Loading 2221 blocks [1 disk] into ram disk… done.
 VFS: Mounted root (squashfs filesystem) readonly.
 Mounted devfs on /dev
 Freeing init memory: 64K
 pl serial only support even parity
 init started:  BusyBox v1.01 (2011.09.29-06:29+0000) multi-call binary
 init started:  BusyBox v1.01 (2011.09.29-06:29+0000) multi-call binary
 Starting pid 11, console /dev/tts/0: '/etc/init.d/rcS'
 Starting the boot scripts…
 Watchdog is at home.
 Using /lib/modules/2.4.19-pl1029/watchdog.o
 Using /lib/modules/2.4.19-pl1029/gpio_drv.o
 insmod: io_expander.o: no module by that name found
 insmod: leds.o: no module by that name found
 insmod: lcd.o: no module by that name found
 insmod: switchs.o: no module by that name found
 Using /lib/modules/2.4.19-pl1029/reset.o
 insmod: rtc_drv.o: no module by that name found
 insmod: iris_drv.o: no module by that name found
 insmod: analog_out.o: no module by that name found
 insmod: echo_cancel.o: no module by that name found
 /etc/init.d/rcS: 69: /usr/local/bin/pt_chk: not found
 /sbin/ifconfig lo
 RT61: Vendor = 0x1814, Product = 0x0301
 System Info:
         fw_ver: V1.0.03
         fw_create_date: [2011-09-29 14:31:19 +0800 ]
         mac_addr: 00:0e:8f:7a:34:83
         def_name: VZ7A3483
         release_date: Sep 29,2011
         model_name: RC8021V
 Assigned Info:
         domain=0x10
         language=0x00000000
         serial=
         pin=
         rc4=
         pid=
         vid=
         en_name=
         desp=
         time=
         boot_mode=0x0
         power line freq=60
         lens_type=1
 aes interrupt 12 registered
 Using /lib/modules/crypt.o
 cp: /usr/local/bin/stunnel.pem: No such file or directory
 cp: /usr/local/bin/CAcerts.pem: No such file or directory
 OV7725 detected!
 Using /lib/modules/2.4.19-pl1029/ov_7725.o
 plmedia version 1.2.11.1
 Hello Grabber!
 Hello Encoder!
 Hello PLMD!
 Using /lib/modules/plmedia.o
 Using /lib/modules/2.4.19-pl1029/dmac.o
 DMAC Driver (Ver: 1.0.0.1, Release-Date: 25-Sep-2009)
 /etc/init.d/rcS: 102: /usr/local/bin/io_init: not found
 /etc/init.d/rcS: 116: /usr/local/bin/dnswitch_action: not found
 Davicom DM91xx net driver loaded, version 1.37 (JUN 16, 2004): VLAN support 4…
 RT61: Vendor = 0x1814, Product = 0x0301
 Ethernet link is ready now
 Jan  1 00:00:09 dhcpcd[136]:  DHCP successfully worked with the server (192.168.0.43)
 /etc/init.d/rcS: 139: /usr/local/bin/jabberlog: not found
 pl serial only support even parity
 RC8021V7A3483 login: pc : [<0000a8a4>]    lr : [<0000a868>]    Not tainted
 sp : bffffb28  ip : ffffffff  fp : 00036e90
 r10: 00024eb8  r9 : 00033ce0  r8 : 00033ca8
 r7 : 00000000  r6 : 00021db8  r5 : 00000000  r4 : 0000000a
 r3 : 00000000  r2 : 0000000a  r1 : 000171ca  r0 : 00000000
 Flags: nZCv  IRQs on  FIQs on  Mode USER_32  Segment user
 Control: 397D  Table: 01E8C000  DAC: 00000015
 RC8021V7A3483 login:
With this output we’re able to see a few interesting things. We get a lot of information about what the underlying bootloader/OS/filesystem look like, we get more hardware information, and all of this gives us more information we can Google against. I tried logging into the camera with root and various passwords, but was unsuccessful. Once I started Googling against this information I found that this camera platform was actually fairly common and that a number of other cameras were pretty much identical to this one. Some models were Sercomm RC8021, ADT Pulse RC8021W, Linksys WVC54GCA, Sitecom WL-404, Sitecom LN-406, NorthQ NQ-9006, and some others. The actual manufacturer of this platform was Sercomm with their RC8021 camera, but unfortunately their web site had absolutely nothing to offer.