Over the last few months we have gone through a Defender pilot and rollout. I’ll admit I was surprised how relatively painless the rollout has been. Major problems were scarce and we have been able to enable most features for the general landscape. One feature that is not turned on by default that we decided to turn on was Network Protection. This features provides filtering and detection around web traffic. When we first enabled this in our pilot a number of us were on persistent Citrix VDIs and would randomly experience disconnects and reconnects to our machines. Sometimes this would go away for days or weeks and then randomly come back. Another issue we had was when we were trying to roll out Defender to some of our backup servers. These servers were physical servers with a number of iSCSI volumes mounted on them (using the Microsoft iSCSI Initiator). When the server would boot up they would hang at logon and the system event log would report a ton of iScsiPrt/Event ID: 9 errors around timeouts while trying to mount the storage. Both of these issues were immediately resolved simply by enabling asynchronous inspection. I have found almost nothing on the internet about this, but it resolved two major issues for us. This setting doesn’t seem to be exposed in GPO or other the other management methods and needs to be done manually on the machine. This setting can be enabled in PowerShell using this command:
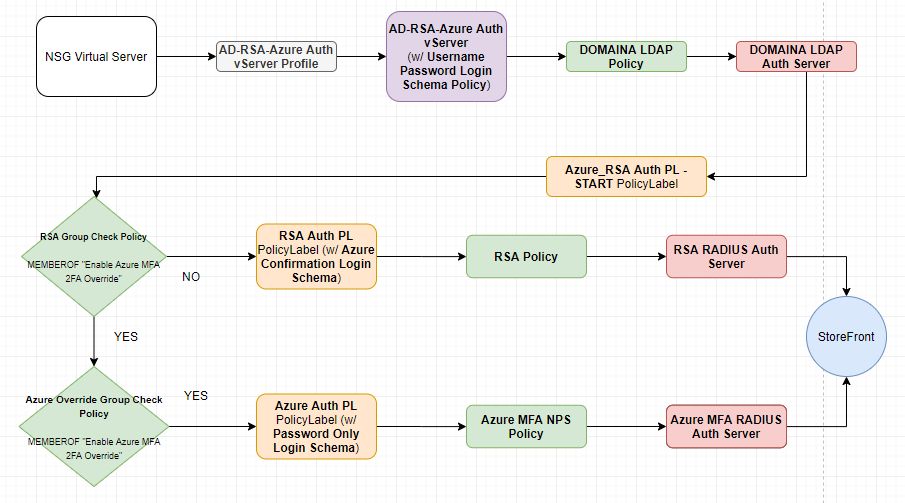
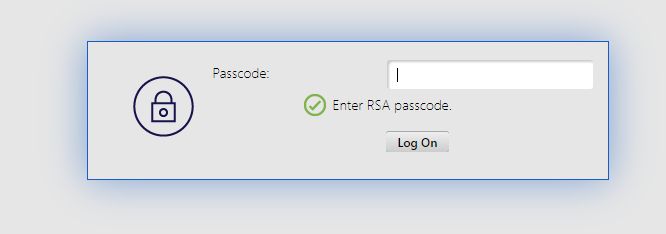
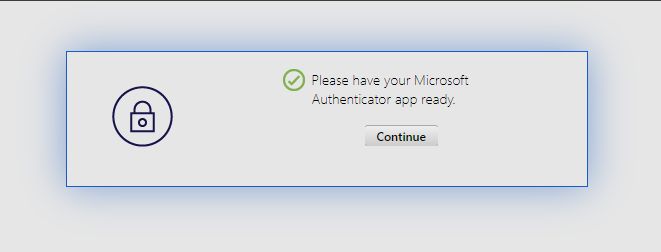
I have been working on implementing services like Azure AD and O365 in my work place. One of the services we are are adopting is Azure MFA. We currently use RSA SecurID company-wide for multiple remote access services and needed a way move users over in batches. One of the larger services to integrate Azure MFA with was Citrix NetScaler. Our original NSG (NetScaler Gateway) authentication configuration consisted of multiple LDAP policies and a set of RADIUS polices for RSA SecurID. Our goal was to create a configuration where we could control where users authenticate for their second factor via an Active Directory group. To do this kind of dynamic authentication in NSG we would have to move authentication from the basic model to an advanced nFactor-based configuration. The other requirement we had was to have a landing page before an Azure MFA authentication. We needed this because if your default sign-in method is set to ‘notification’ the RADIUS authentication could easily time out if the user doesn’t have their device running Microsoft Authenticator next to them. The page would let the user know to have their device ready before initiating authentication.
Below is a flowchart of the configuration end result. Objects of the same type share the same color (Gray – Authentication Virtual Server Profile, Purple – Authentication Virtual Server, Green – Advanced Authentication Policy, Orange – Advanced Authentication PolicyLabel, Red – Authentication Server (LDAP/RADIUS).
The first step in setting up Azure MFA is to stand up one or multiple NPS (Network Policy Server) instances and install the Azure MFA NPS Extension. I won’t go into the whole setup of this since it is documented, but I will comment on the policy config within NPS. It could be a little confusing because we are just going to pass the username to NPS, NPS will not be authenticating the user against AD. Azure MFA authentication in NPS happens AFTER NPS authenticates the user against AD. To make this work we will have to create a Connection Request Policy that just passes the user without authentication. The steps involved are as follows:
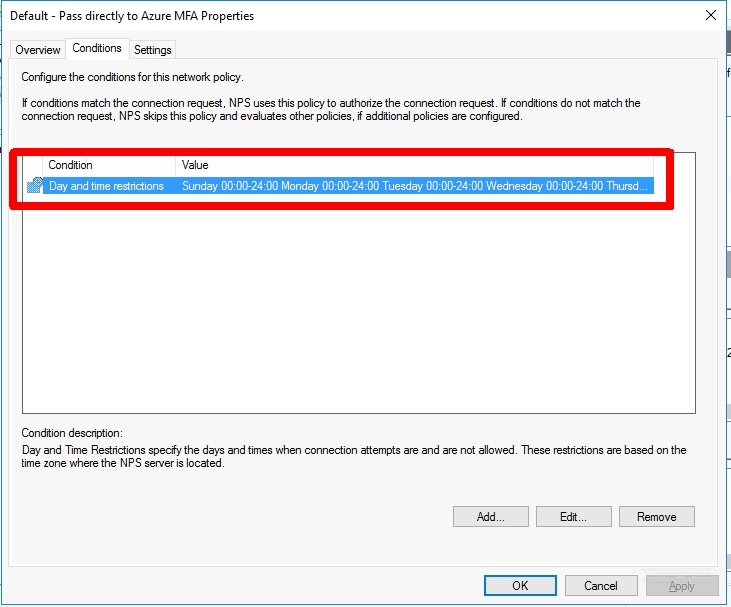
Create a new Connection Request Policy called ‘Default – Pass directly to Azure MFA‘
Add a Day and time restriction that covers 24 hours and 7 days
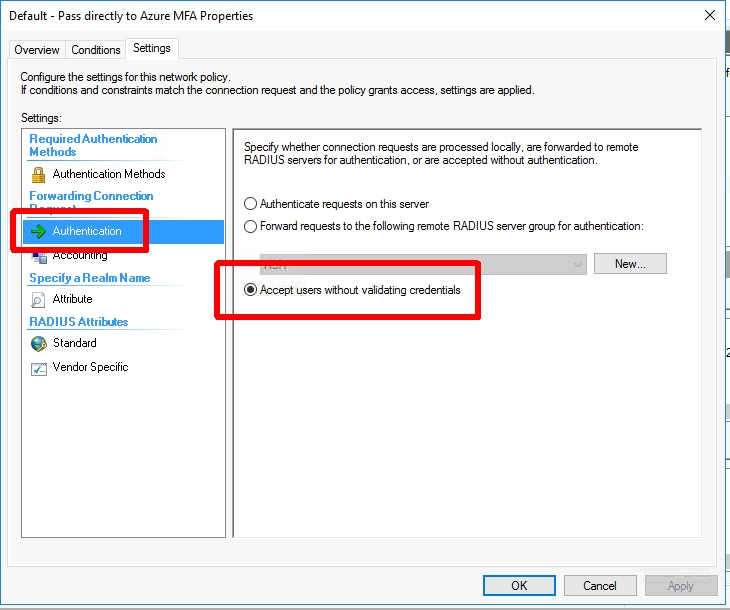
Set the ‘Authentication’ settings‘ to ‘Accept users without validating credentials‘. (This will not perform an AD authentication and just pass the username along to the Azure MFA NPS Extension)
Now we can add this new Azure MFA RADIUS server to NetScaler.
Go to ‘NetScaler -> System -> Authentication -> Basic Policies -> RADIUS‘
Create a new Server using the settings from the NPS server above
Next we will create our Login Schemas. We will need an initial logon schema for the LDAP credentials, a login schema for the RSA SecurID token, and a prompt only login schema for the page we want to show before authentication is passed to the NPS RADIUS server we setup earlier for Azure MFA.
Go to ‘NetScaler -> Security -> AAA – Application Traffic -> Login Schema‘
Create a login schema profile called ‘Username Password Login Schema‘
Set the authentication schema to ‘SingleAuth.xml‘
Set ‘User Credential Index‘ to 11
Set ‘Password Credential Index‘ to 12
Create a login schema policy called ‘Username Password Login Schema Policy‘
Set the profile to be the schema profile you just created above (‘Username Password Login Schema‘)
Set the ‘Rule’ expression to ‘REQ.HTTP.HEADER User-Agent NOTCONTAINS CitrixReceiver‘ (Receiver does not support the nFactor flow, this will be for web clients only)
Create a login schema profile called ‘Password Only Login Schema‘
Create a new XML file called ‘RSAOnly.xml‘ using the XML below
Upload this to ‘/flash/nsconfig/loginschema/LoginSchema‘
Set the user expression to ‘HTTP.REQ.USER.ATTRIBUTE(11)‘. (This will carry the username from the first logon page to the RSA logon page)
Create a login schema profile called ‘No Prompt Login Schema‘
Set authentication schema to ‘noschema‘
Leave everything else blank
Create a login schema profile called ‘Azure Confirmation Login Schema‘
Create a new XML file called ‘Azure.xml‘ using the XML below
Upload this to ‘/flash/nsconfig/loginschema/LoginSchema‘
Set the user expression to ‘HTTP.REQ.USER.NAME‘. (This will pass the UPN to NPS after acknowledging the prompt)
<?xml version="1.0" encoding="UTF-8"?>
<AuthenticateResponse xmlns="http://citrix.com/authentication/response/1">
<Status>success</Status>
<Result>more-info</Result>
<StateContext></StateContext>
<AuthenticationRequirements>
<PostBack>/nf/auth/doAuthentication.do</PostBack>
<CancelPostBack>/nf/auth/doLogoff.do</CancelPostBack>
<CancelButtonText>Cancel</CancelButtonText>
<Requirements>
<Requirement><Credential><Type>none</Type></Credential><Label><Text>Please have your Microsoft Authentcator app ready.</Text><Type>confirmation</Type></Label><Input /></Requirement>
<Requirement><Credential><ID>loginBtn</ID><Type>none</Type></Credential><Label><Type>none</Type></Label><Input><Button>Continue</Button></Input></Requirement>
</Requirements>
</AuthenticationRequirements>
</AuthenticateResponse>
Now we are going to create our Policy/PolicyLabel chain. The important thing here is to understand how they relate to each other. A Policy is exactly that… an authentication policy. You can define an expression and an authentication request server to use once the expression is matched. A PolicyLabel contains one or more Policy bindings with priorities, goto expressions (like NEXT/END), and a ‘Next Factor’ which gives you the ability to link to ANOTHER PoilcyLabel. First, we will start with our Policies.
Go to ‘NetScaler -> Security -> AAA – Application Traffic -> Policies -> Authentication -> Advanced Policies -> Policy‘
Create an LDAP authentication policy
Set Name to be specific to the domain it is servicing (ex. ‘DOMAINA LDAP Policy‘)
Set Action Type to ‘LDAP‘
Set Action to your existing LDAP server
Set Expression to ‘REQ.HTTP.HEADER User-Agent NOTCONTAINS CitrixReceiver‘
Create a Azure MFA RADIUS authentication policy
Set Name to ‘Azure MFA NPS Policy‘
Set Action Type to ‘RADIUS‘
Set Action to the NPS RADIUS server you created earlier
Set Expression to ‘true‘
Create a RSA RADIUS authentication policy
Set Name to ‘RSA Policy‘
Set Action Type to ‘RADIUS‘
Set Action to your existing RSA RADIUS server
Set Expression to ‘true‘
Create an Active Directory group that will contain the users you are cutting over to Azure MFA. I used the name ‘Enable Azure MFA 2FA Override’. We will use this group in the next two policies
Create the RSA check policy
Set Name to ‘RSA Group Check Policy‘
Set Action Type to ‘NO_AUTHN‘
Set Expression to ‘HTTP.REQ.USER.IS_MEMBER_OF(“Enable Azure MFA 2FA Override”).NOT‘
Create the Azure override check policy
Set Name to ‘Azure Override Group Check Policy‘
Set Action Type to ‘NO_AUTHN‘
Set Expression to ‘HTTP.REQ.USER.IS_MEMBER_OF(“Enable Azure MFA 2FA Override”)‘
Next we can create our PolicyLabels. These objects will reference Login Schemas/Policies and will chain together.
Go to ‘NetScaler -> Security -> AAA – Application Traffic -> Policies -> Authentication -> Advanced Policies -> PolicyLabel‘
Create the Azure PolicyLabel
Set Name to ‘Azure Auth PL‘
Set Login Schema to ‘Azure Confirmation Login Schema‘ (we created this earlier)
Set Feature Type to ‘AAATM_REQ‘
Click Continue
Add a policy binding for ‘Azure MFA NPS Policy‘ (we created this earlier)
Set Priority to 100
Set Goto Expression to NEXT
Leave Next Factor empty
Create the RSA Policy
LabelSet Name to ‘RSA Auth PL‘
Set Login Schema to ‘Password Only Login Schema ‘ (we created this earlier)
Set Feature Type to ‘AAATM_REQ‘
Click Continue
Add a policy binding for ‘RSA Policy‘ (we created this earlier)
Set Priority to 100
Set Goto Expression to NEXT
Leave Next Factor empty
Create the primary PolicyLabel
Set Name to ‘Azure_RSA Auth PL – START‘
Set Login Schema to ‘No Prompt Login Schema‘ (we created this earlier)
Set Feature Type to ‘AAATM_REQ‘
Click Continue
Add a policy binding for ‘RSA Group Check Policy‘ (we created this earlier)
Set Priority to 100
Set Goto Expression to NEXT
Set Next Factor to ‘RSA Auth PL‘ (we created this earlier)
Add a policy binding for ‘Azure Override Group Check Policy‘ (we created this earlier)
Set Priority to 110
Set Goto Expression to NEXT
Set Next Factor to ‘Azure Auth PL‘ (we created this earlier)
Now we are going to create an authentication vServer and profile.
Create the authentication vServer
Go to ‘NetScaler -> Security -> AAA – Application Traffic -> Authentication Virtual Servers‘ and click ‘Add‘
Set the name to ‘AD-RSA-Azure Auth vServer‘
Set ‘IP Address Type‘ to ‘Non Addressable‘. (This authentication vServer will only be used internally, so we don’t need an IP address)
Under Advanced Authentication Policies add a binding for the LDAP policy you created above (ex. DOMAINA LDAP Policy)
Set the priority to 100
Set the Goto Expression to NEXT
Set the Next Factor to ‘Azure_RSA Auth PL – START‘ PolicyLabel we created this above
Under Login Schemas add a binding for the ‘Username Password Login Schema Policy‘ policy we created this earlier
Create an authentication profile
Go to ‘NetScaler -> Security -> AAA – Application Traffic -> Authentication Profile‘ and click ‘Add‘
Set the name to ‘AD-RSA-Azure Auth vServer Profile‘
Set Authentication Host to ‘fake‘ (this won’t be used)
Set Virtual Server Type to ‘Authentication Virtual Server‘
Set the Authentication Virtual Server to the ‘AD-RSA-Azure Auth vServer‘ we created above
Leave Authentication Domain blank
Leave Authentication Level to set 0
Now that everything has been created all that is left is to configure the NetScaler Gateway Virtual Server. If you already have one setup you can simply remove all authentication profile bindings and add the Authentication Profile we just created above.
With everything created we can test the authentication flow…
This is the login flow when the user IS NOT a member of the ‘Enable Azure MFA 2FA Override‘ group.
This is the login flow when the user IS a member of the ‘Enable Azure MFA 2FA Override‘ group. Depending on what the Azure AD user’s ‘Default sign-in method’ is set to they may or may not receive a prompt after the 2nd prompt. If their default method is set to something like SMS or Authenticator App code they will receive a 3rd window asking for that code. This prompt is automatically generated, so we did not have to create it like we did for the RSA prompt. In the case below the user’s default method was set to ‘Microsoft Authenticator – notification’, so the login flow will wait until the prompt is acknowledged, denied, or times out on the user’s Microsoft Authenticator instance.
The last thing to mention is that a little extra configuration needs to be added to support Citrix Receiver clients (Windows/Mac/Android/iOS). In 11.1 52.x+ NetScaler AAA servers need to be configured with a separate set of polices for requests where the User-Agent header contains ‘CitrixReceiver’. It is fairly straightforward and Citrix has a write up on this, so I won’t write it all out. I will say the one thing to consider is that you will not be able to support multiple second factor methods using the AD group. For these clients you will have to choose one or the other. In our case we will be sticking with RSA until the majority of users are moved over meaning those users connecting Receiver directly to NSG will need to have that method available. Fortunately for us we do not have many users that access our environment this way. Citrix’s documentation on this can be found here: https://support.citrix.com/article/CTX223386.
The other day one of our NetScaler appliances was unable to boot up after a power down. It was getting stuck during the FreeBSD bootup phase (before the NetScaler software actually loads) with the error:
Fatal trap 9: general protection fault while in kernel mode
The only information I could find on this specific issue was here: https://support.citrix.com/article/CTX238252, but this was not relevant to us. I could not find anything else online talking about receiving this error on a NetScaler appliance. Restoring to previous snapshots of the appliance didn’t resolve the issue. After some digging I found that this VM was set to the highest VM compatibility level. At some point someone had set the comparability level of the VM to be upgraded to version 15, but this didn’t take effect until the VM was actually powered down (it had been rebooted many times since without issues).
To remediate this issue I did the following:
Removed the VM from inventory
Manually edited the vmx file ‘virtualHW.version‘ line to say virtualHW.version = “4”. I chose a lower version, so that I could use the GUI to upgrade the version later. This can be done using WinSCP or something similar to download/edit the file
Added VM back to inventory
Upgraded VM compatibility to version 7 in vCenter to let the system actually run through the VMX and check settings
After doing all of the above I was able to successfully boot up the NetScaler appliance. The main takeaway here is that the ‘fatal trap’ error was directly related to the VM compatibility setting in ESXi in this particular case.
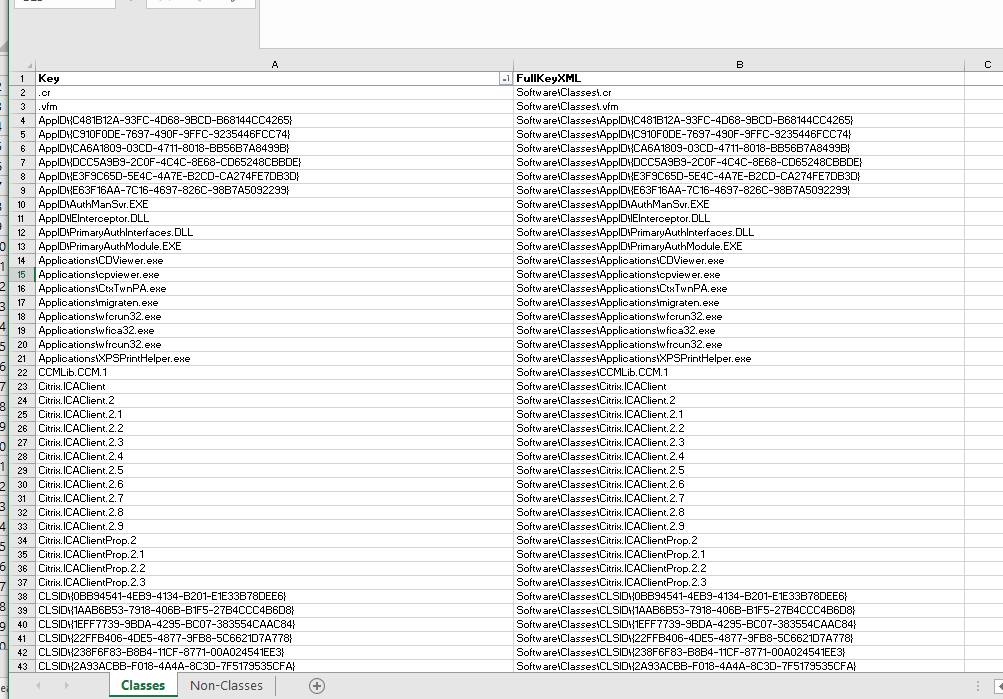
For years Citrix has created the Receiver installer with per-user installation functionality where if the installer is launched in the context of a regular user it will install/register the components to the local user’s profile rather than just failing with a permission error. This creates a huge headache when trying to mass deploy Receiver (now Citrix Workspace) to the environment. You wind up with machines that have both installed. When this happens the user that had the per-user installation cannot launch applications. Even worse the machine/profile usually winds up being in a state where the per-user installation cannot be removed. Even if you get it removed the uninstaller and Citrix’s own cleanup utilities do an awful job at cleaning up the registered classes/components in the per-user installation. Their tools only clean up a fraction of what is actually there. My last two work environments (and current) have been plagued with these installations. I spent time a while back figuring out how to clean it up manually, but it is a major headache to do so. I tried logging a case (and an enhancement request) with Citrix about two years ago stating their ‘Receiver Clean-up Utility‘ utility does not properly clean up these installations. They later came back saying they no longer are supporting the utility. It seems that since then they’ve updated the utility to clean installs up to version 4.3.
Let’s take a look what Citrix is missing in their utility… To do this I take a clean profile, install Citrix Receiver 4.3.100 (not elevated/per-user install), and uninstall it using the Receiver Clean-up Utility (running as an administrator/elevated) while the regular user is still logged in and has their profile loaded. Here is a high-level list of what was left behind in the registry:
HKCU\Software\Classes\* – File Associations and COM object registrations
When it is run against a machine it doesn’t properly load other existing (unloaded) profiles. This caused it not to fully process other user profiles on the machine
It doesn’t always kill processes correctly leaving file/directories behind
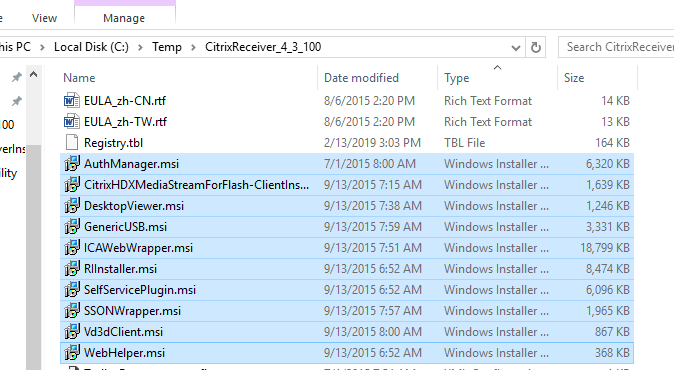
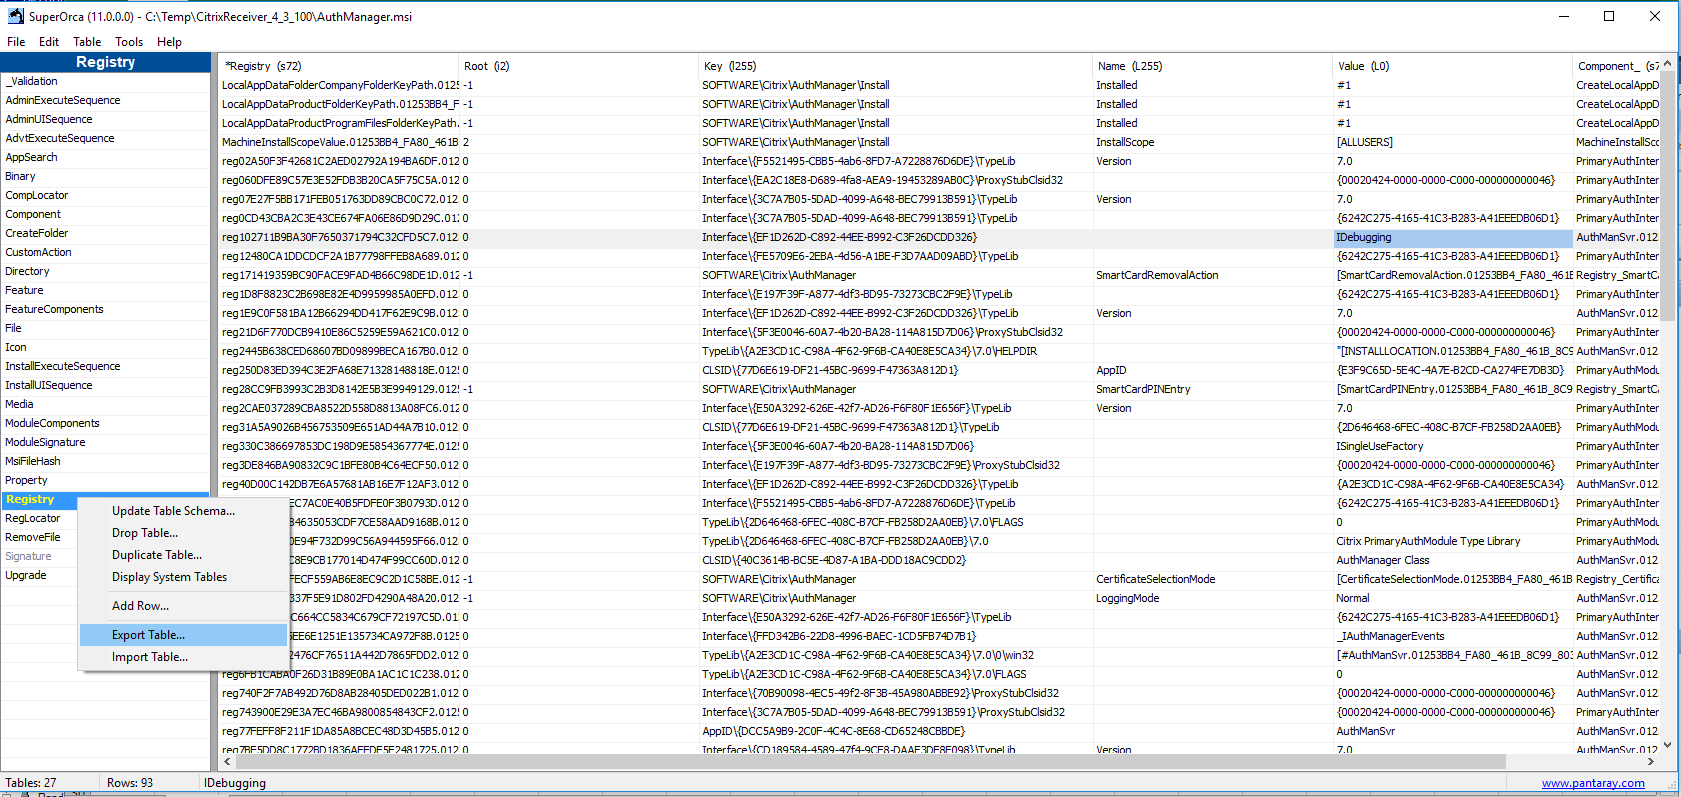
I decided to build a wrapper script around the Citrix Receiver Clean-up Utility to fill in the gaps. To do so I had to create a full list of everything I had to target. I decided to extract the MSIs from the installer I was testing with and dissect them. I used SuperOrca to pull the ‘Registry’ table from each MSI. I imported those into Excel and used filtering/VLOOKUPs to extract what I needed.
After chopping up the data I am left with the following groups of items to target:
A static list of unique registry keys under the user’s profile (this is a good start, but I noticed that some of the IDs in CLSID and Interface are different between versions)
A list of values to search for under ‘HKCU\Software\Classes\CLSID’ in order to determine of the root key should be deleted. Also need to target the WOW6432Node path
A list of values to search for under ‘HKCU\Software\Classes\Interface’ in order to determine of the root key should be deleted. Also need to target the WOW6432Node path
A list of values to search for under ‘HKCU\Software\Microsoft\Installer\Products’ in order to determine of the root key should be deleted. The clean-up utility cleaned up most of this, but one was left over for me
Now that I have the targets it’s time to write the script. In addition to targeting the various registry locations I want to:
Identify and load all profile registry hives. This will allow me to run my clean-up process against all profiles, but it will also allow the clean-up utility to process them without the having to be logged in
Kill processes that reside in certain paths using wildcards
Execute the Citrix Receiver Clean-up Utility silently
Clean up a static list of registry keys in all user profiles
Search for a list of value strings under in the ‘CLSID’ keys and delete the parent key if a match is found
Search for a list of value strings under in the ‘Interface’ keys and delete the parent key if a match is found
Search for a list of ‘ProductName‘ value strings under in the ‘Installer\Products’ keys and delete the product key if a match is found
Unload all registry hives that were manually loaded in the first step
I also wanted the script to work with older versions of PowerShell. I did my best to make it compatible with PS V2
I have tested the script with multiple versions and so far it is working well. It does require that you download the ‘Receiver Clean-up Utility‘ and place the executable in the same directory as the script. Feel free to submit any issues here or in the GitHub repository.
We’ve slowly been transitioning our Citrix XenApp environment from static VMs to Machine Creation Services (MCS) based VMs. My goal was to have two master (fat) images and two machine catalogs. Because of policy and application segregation requirements those two catalogs translated into more than two delivery groups. With these delivery groups came the requirement to apply different group policies to different machines. One option would be to move the corresponding AD object into a different OU and apply policy that way. While that would work due to AD objects not being automatically moved/re-created after machine creation it still requires some administrative overhead. It was clear that dynamically adjusting certain policies based on delivery group membership would be ideal.
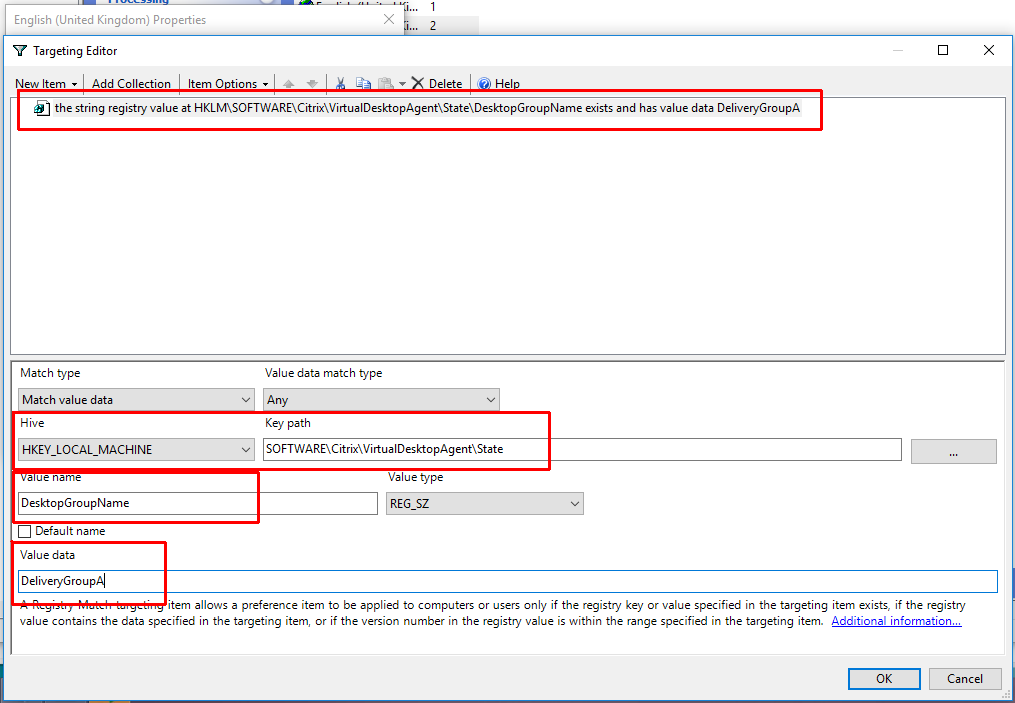
After a little digging I found where both the delivery group and machine catalog memberships were written to in the registry by the VDA. Below is an example of how we applied a user GPP item dynamically based on the delivery group of the machine.
Registry Key Path: HKEY_LOCAL_MACHINE\SOFTWARE\Citrix\VirtualDesktopAgent\State Delivery Group Value Name: DesktopGroupName Machine Catalog Value Name: DesktopCatalogName
I recently received a call from a former colleague where they were unable to update a machine catalog. They stated nothing had changed in vCenter, Citrix, or the master image. The error they were receiving was:
Error Id: XDDS:919D761E

Exception:     Citrix.Console.Models.Exceptions.ProvisioningTaskException Create Catalog failed with an unknown reason, see terminating error for more details.        at Citrix.Console.PowerShellSdk.ProvisioningSchemeService.BackgroundTasks.ProvisioningSchemeTask.CheckForTerminatingError(SdkProvisioningSchemeAction sdkProvisioningSchemeAction)        at Citrix.Console.PowerShellSdk.ProvisioningSchemeService.BackgroundTasks.ProvisioningSchemeTask.WaitForProvisioningSchemeActionCompletion(Guid taskId, Action`1 actionResultsObtained)        at Citrix.Console.PowerShellSdk.ProvisioningSchemeService.BackgroundTasks.ProvisioningSchemeCreationTask.StartProvisioningAction()        at Citrix.Console.PowerShellSdk.ProvisioningSchemeService.BackgroundTasks.ProvisioningSchemeCreationTask.RunTask()        at Citrix.Console.PowerShellSdk.BackgroundTaskService.BackgroundTask.Task.Run()


DesktopStudio_ErrorId : ProvisioningTaskError
     ErrorCategory : NotSpecified
     ErrorID : NetworkNotPermitted
     TaskErrorInformation : Terminated
     InternalErrorMessage : A NIC device is tied to a disallowed network.
     DesktopStudio_PowerShellHistory : Create Machine Catalog 'XenApp - WSRV12 - DAPPS - DR'
     11/25/2018 7:09:42 AM
The key error here is ‘A NIC device is tied to a disallowed network’. If you do a quick search you will find an article referencing this error: CTX139460. This points to a change in the vCenter networking config, but supposedly there weren’t any changes. Time to do some digging. I asked them to get networking info from both vCenter and CItrix using PowerShell.
To get the hypervisor networking I asked him to log in to one of the delivery controllers, launch PowerShell as administrator, and run the following:
Add-PSSnapin Citrix*
dir XDHyp:\HostingUnits | Select PSPath,HostingUnit*,*Network* | Format-List
The thing to take note of is the ‘NetworkId‘ for the DR hosting connection. This Id is the vCenter MoRef (Managed Object Reference) for the VM network. I then had him pull the VM networks from vCenter using PowerCLI.
To get the VM networks (with MoRef) from vCenter I asked him to launch VMware PowerCLI as administrator and run the following:
Name                                                        MoRef
 ----                                                        -----
 VM Network 201                                              Network-network-4790

...
The MoRef was network-641 in MCS, but network-4790 in vCenter even though the VM network names were the same. From this it was clear there was a networking change performed on the vCenter side at some point. After stating this, it was revealed that port groups were deleted and recreated (which generated new MoRef ids) in this DR cluster. At this point we have to reconfigure the hosting connection networking with the new MoRef and this cannot be done in Citrix Studio. To do this we have to reconfigure the ‘NetworkPath‘ in the hosting connection, but use the same ‘NetworkPath‘ since the network name did not change. Running this will force the network MoRef to be queried and updated in the MCS hosting connection.
To reset (or change if needed) the ‘NetworkPath‘ in the hosting connection you take the ‘PSPath‘ from the first command and copy everything starting with ‘XDHyp‘. I took that path and provided them with this command to run:
Finally, I asked them to re-run the first ‘dir‘ command again to verify the network MoRef updated. After doing this they were able to successfully update the machine catalog.