Obtaining Root
In the last post I went over obtaining terminal access to the camera via the UART connection points on the main board. One I had terminal access I was still presented with a login that I needed to get past. With no other way at the time to get this I started doing more research on this and the other related camera models I mentioned previously. I was hoping to find firmware that could lead me to a static root password. I was unable to find any export of the Verizon firmware, but I did find others. With some Google searches I stumbled across unpublished links for source-code builds on the Sitecom web site for both the WL-404 and LN-406 cameras. The two archives I used were under: https://www.sitecom.com/documents/. Let’s take a look at
GPL _ LN-406_WL-404 _ fw1_0_11.zip. If we dig into ZIP we can a lot of source code, but more importantly we see an /etc/passwd file. The contents of this file were:
root:9szj4G6pgOGeA:0:0:root:/root:/bin/sh
The string we are concerned with is ‘9szj4G6pgOGeA‘. Taking a closer look at the string we see It is an old descrypt crypt(3) Unix password hash. The password itself has a maximum length of eight characters combined with a two character salt (‘9s‘). If you Google this hash you find that it actually is common among many of the camera models I mentioned in part 1, but I was unable to find any instance of this hash actually being cracked. Looking at the firmware it seemed that this was based on a core source code distribution that originally came from Sercomm (the actual manufacturer of the camera). I figured that there was a high probability of this being actual root password on the camera I was trying to crack. At this point I decided that cracking the root password may be the easiest way to get the web console admin password and get access to the camera.
Cracking a crypt(3) Unix Password
I had never attempted to crack this algorithm before and knowing the password wasn’t overly simple (as others have attempted to crack it) I knew I’d need external resources to accomplish this. I started off by calculating the approximate number of password combinations I’d have to go through. I know nothing about the password, so I’d at least have to assume it could have all printable characters with a length between one and eight characters. The math for this would be: 93^1 + 93^2 + 93^3 + 93^4 + 93^5 + 93^6 + 93^7 + 93^8 = 5656642206396600 combinations. I ran a quick Jonn the Ripper benchmark on a decent Azure VM (no GPU) and the descrypt performance on that box was only around 16385000 c/s. At that rate it would take ~11 years to crack. I found the most powerful video card I had lying around which was an NVIDIA GTX 750Ti (forgive me, I am not a gamer). The Hashcat benchmark for this card cracking descrypt was around 28989000 c/s. This was significantly faster, but still would take ~6 years. I started researching video cards and found that one of the more popular cards, the NVIDIA 1080 GTX Ti, had a descrypt crack rate of around 1227000000 c/s. At this rate it would take around ~53 days. I had a colleague who actually had this card at home and I figured I’d make a deal with him to run this crack for me during idle time if I couldn’t find anything else. I started researching heavy GPU cloud systems and the most powerful (GPU-wise) I found was the Amazon p3.16xlarge configuration which used EIGHT NVIDIA® V100 Tensor Core GPUs. These GPUs are commonly used in the machine learning space and are a bit more powerful than the top gaming GPUs. An instance with this configuration has a descrypt crack rate of around 15571600000 c/s and could crack the password in around ~4 days, but would cost $2000 for the privilege. As a last resort when looking at computing rentals I turned to Vast.ai. Playing with different GPU/server rental combinations I found the password could be cracked somewhere around $250, but I couldn’t get it any lower than this. Doing further research I came across and interesting site called Crack.sh which was founded by David Hulton (also a founder of ToorCon). He created a purpose-built system that uses a series of FPGAs and specializes in cracking DES. They rent it out for much less than any other cracking service comes close to and even offer some services for free. Because this system was specifically created for cracking DES it actually can crack a descrypt password in ~3 days which is even faster than the Amazon configuration I spec’d out. I decided to eat the cost in the name of the project and figured the cracked password would be useful to others as well. Once my crack job actually started after sitting in the queue for a while I had the password in around three days. The email read:
Crack.sh has found a password that works against your hash. The password match is included below both in ASCII and HEX:
HASH: 9szj4G6pgOGeA
Password (ASCII): "h@11oCAM"
Password (HEX): 684031316f43414d
This run took 313726 seconds. Thank you for using crack.sh, this concludes your job.
The password was a bit comical. I took the first instance of idle time I had, remotely connected to my lab environment, and attempted getting into the camera’s shell using the password. To my dismay I found that the password DID NOT WORK on this camera. I felt somewhat defeated at this point, but I had known when going this route that there was some percentage chance that the password was in the Verizon firmware was not the same as the other cameras using the same platform. Cracking what was LIKELY the root password was sort of an easy way out.
Flashing New Firmware
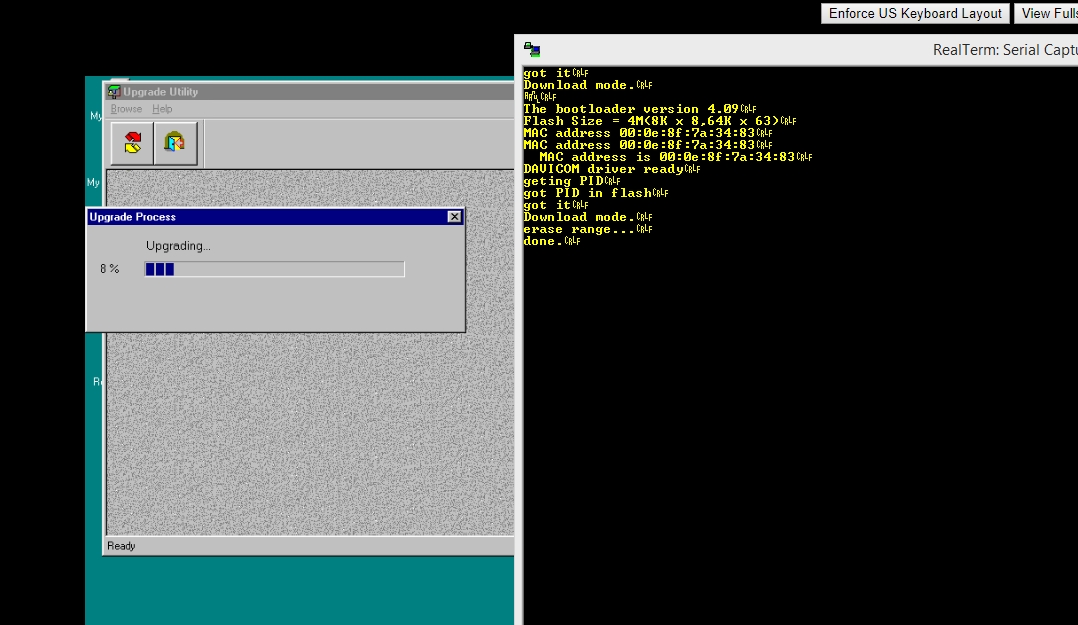
Since I had multiple versions of usable firmware (with a default web console password I actually knew) I decided to look into somehow flashing alternate firmware. I forgot to mention this in part 1, but during discovery I found that holding the reset button and powering the camera on put the camera into a download mode. I was able to see this through the UART connection. When in this mode the output showed this:
The bootloader version 4.09
Flash Size = 4M(8K x 8,64K x 63)
MAC address 00:0e:8f:7a:34:83
MAC address 00:0e:8f:7a:34:83
  MAC address is 00:0e:8f:7a:34:83
DAVICOM driver ready
geting PID
got PID in flash
got it
Download mode.
The reason I didn’t further explore this was because at time I didn’t see how there was a way to upload this firmware. When in download mode the camera did not have an IP address and the UART connection didn’t seem to accept any input in this mode. What I didn’t realize at the time was that it was able to accept a firmware download over network in this mode, but not via TCP/IP. Further research led me to an old Sercomm tool that was used to flash a number of Sercomm-based products. I had seen references to this tool earlier on, but knowing it was a network-based utility I didn’t see how it could be used for this device. The filename/download for this tool is: Upgrade_207_XP.zip. The tool required a 32-bit OS and I didn’t have any instances running, so I decided to quickly spin up a Windows 98 VM. To my surprise the application immediately discovered the camera on the network.
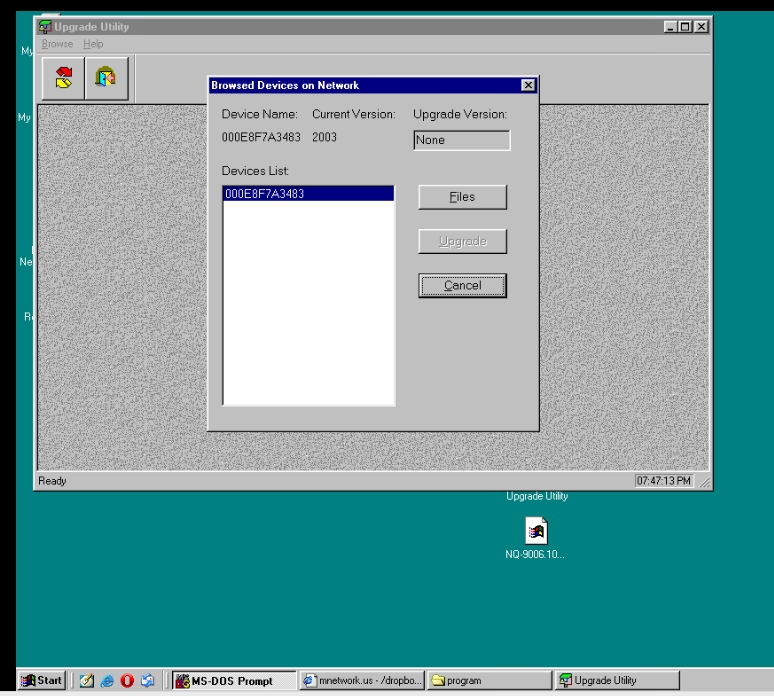
I was curious what protocol this was using since it was not using IP, so I used the span port I setup earlier when I was performing the initial reconnaissance on the camera to sniff this traffic.
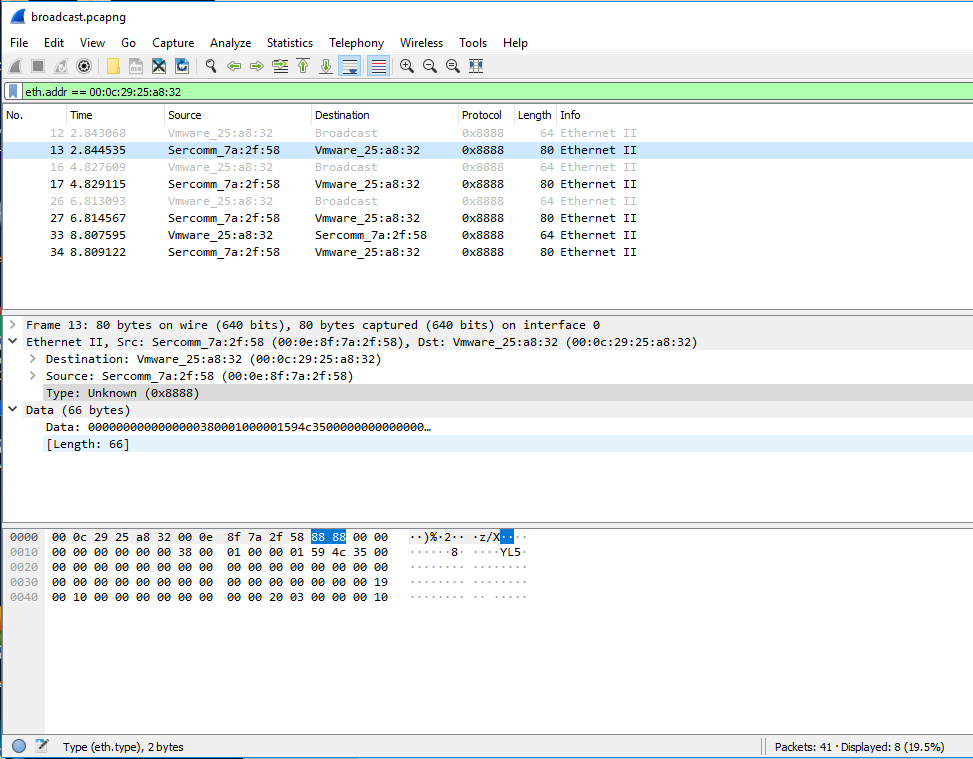
I found that the upgrade utility sent a layer 2 broadcast and the camera responded. The Ethernet protocol type shown in the packet capture was 0x8888. A Google search of this revealed a little information about the protocol and its commands. I attempted to flash the NQ-9006 version firmware (NQ-9006.1009.bin) to this camera and it took without any issue.
After the firmware update I was FINALLY able to get into the camera’s admin console making the camera completely usable. Though I technically accomplished my original goal I was not happy about spending time on the password crack that turned out to be a dead end and I still did not have or know the default admin console password (or root password) that the Verizon firmware was using. Also, my buddies would need to open and manually flash every camera before attempting to sell them. True to form I could not let it be and I will cover this in part 3!
UAU WOW!!! YOU DID IT!!!!!! your discovered password worked.
we are excited to tell you the hacked password works !!
SOLUTION:
1. FIRST INITIATE TELNETD !! VIA THE MANUFACUTERER’S OWN BACKDOOR.. :>
2. THEN FROM A LINUX BOX #telnet
3. LOGIN AS:
root
h@11oCAM
You were not defeated ! It worked right away on our test camera. Simply put, this is THE TELNET PASSWORD AFTER YOU ACTIVATE the telnetd deamon on this camera, via the own manufacturer’s backdoor.
I have a RC8021 from a Cox security system. How does one activate the telnet daemon?
Where can I find the NQ-9006.1009.bin firmware?
The link in this article doesn’t seem to work anymore. I’ll see if I still have the ZIP lying around later.
Hello, I found this BIN if you still need it: https://blog.markdepalma.com/wp-content/uploads/2025/03/NQ-9006.1009.zip
If anyone need a log, this is what we did.
1. FIRST USE THE MANUFACTURER’S OWN BACKDOOR. First enable telnetd !!
2. THEN:
root@minipc:/home/backup-3009/ftp# telnet 192.168.15.25
Trying 192.168.15.25…
Connected to 192.168.15.25.
Escape character is ‘^]’.
00C0023FBA81 login: root
Password:
BusyBox v1.01 (2009.07.30-08:13+0000) Built-in shell (ash)
Enter ‘help’ for a list of built-in commands.
# ps -ef
PID Uid VmSize Stat Command
1 root 304 S init
2 root SW [keventd]
3 root RWN [ksoftirqd_CPU0]
4 root SW [kswapd]
5 root SW [bdflush]
6 root SW [kupdated]
7 root SW [mtdblockd]
8 root SW [khubd]
28 root 396 S /sbin/insmod watchdog
43 root 364 S /usr/sbin/crond
44 root 404 S /usr/local/bin/gpio_listen
46 root 404 S /usr/local/bin/gpio_listen
50 root 404 S /usr/local/bin/gpio_listen
52 root 404 S /usr/local/bin/gpio_listen
75 root 6280 S < /usr/local/bin/hydra
76 root 404 S /usr/local/bin/sensor_daemon
78 root 420 S /usr/local/bin/dsp_dae
83 root 332 S /usr/local/bin/read_push
86 root 6280 S < /usr/local/bin/hydra
87 root 6280 S < /usr/local/bin/hydra
88 root 6280 S < /usr/local/bin/hydra
89 root 6280 S /mnt/ramdisk/root
drwxrwxr-x 2 532 532 121 Jul 30 2009 sbin
lrwxrwxrwx 1 532 532 16 Jul 30 2009 tmp -> /mnt/ramdisk/tmp
drwxrwxr-x 6 532 532 56 Jul 30 2009 usr
lrwxrwxrwx 1 532 532 16 Jul 30 2009 var -> /mnt/ramdisk/var
# date
Thu Jan 12:12:00 UTC NNNN
# ?????
BusyBox v1.01 (2009.07.30-08:13+0000) multi-call binary
# df
Filesystem 1k-blocks Used Available Use% Mounted on
/dev/root 2624 2624 0 100% /
———– CAREFUL MAY CRASH YOUR TINY CAMERA
#reboot
#do not do this !!
THANK YOU “Mark de palma” YOU RULED !! AN INSPIRATION.
Thank you. Happy this cracked password was useful. What model camera did you use this on?
Camera is: WCW 100 working at first with ‘NEXIA’ cell phone software app.
Model/specs on amazon: https://www.amazon.com/Schlage-WCW100-Wireless-Network-Camera/dp/B002BA5VVA
We dismissed/cancelled Nexia because their free product version was quite sluggish, had a low frame-rate, and enormous delays; plus we simply wanted the hardware part, not the software, and not the free service.
1. For the firmware we gone the same path: Upgrade_207_XP.zip and NQ-9006.1009.bin ; It was way easier to upload this one (..1009.bin) than download the original from it’s flash memory.
2. Than we run NQ-9006.1009.bin on linux BINWALK !! Extracted 22BD8, size 1388040 bytes; extracted squashfs-root and suprise !!
3. suprise is that we found the telnetd backdoor !!!
4. finally you came to us with your root password !! then it was a breeze 🙂
5. You gave us root prompt and a nice linux box to play with.
salut.