We’ve slowly been transitioning our Citrix XenApp environment from static VMs to Machine Creation Services (MCS) based VMs. My goal was to have two master (fat) images and two machine catalogs. Because of policy and application segregation requirements those two catalogs translated into more than two delivery groups. With these delivery groups came the requirement to apply different group policies to different machines. One option would be to move the corresponding AD object into a different OU and apply policy that way. While that would work due to AD objects not being automatically moved/re-created after machine creation it still requires some administrative overhead. It was clear that dynamically adjusting certain policies based on delivery group membership would be ideal.
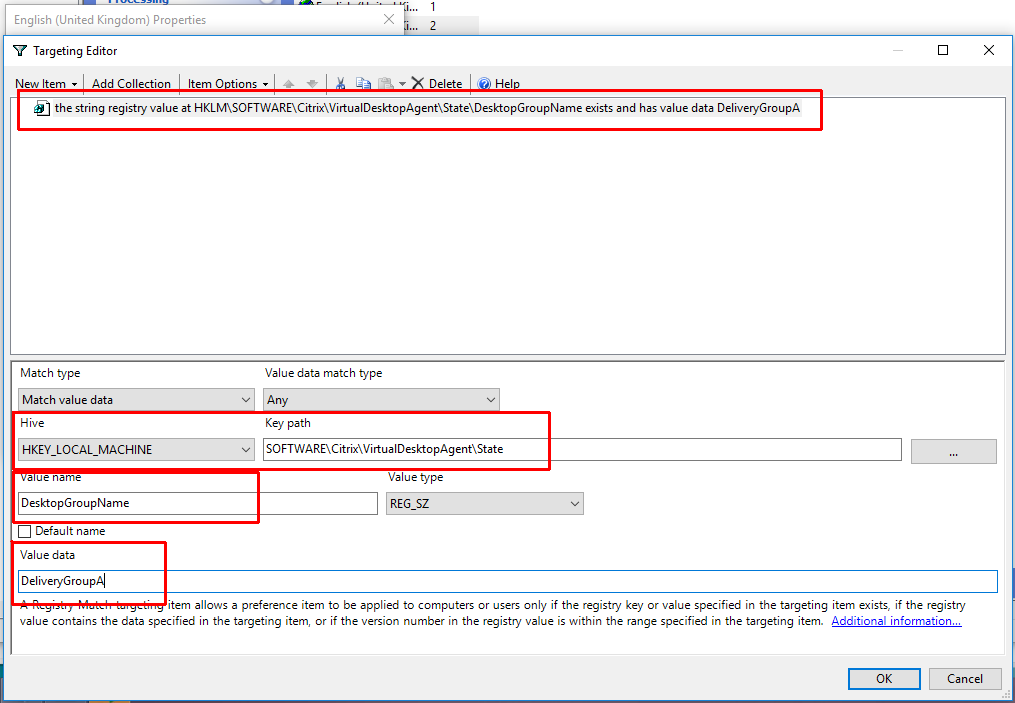
After a little digging I found where both the delivery group and machine catalog memberships were written to in the registry by the VDA. Below is an example of how we applied a user GPP item dynamically based on the delivery group of the machine.
Registry Key Path: HKEY_LOCAL_MACHINE\SOFTWARE\Citrix\VirtualDesktopAgent\State Delivery Group Value Name: DesktopGroupName Machine Catalog Value Name: DesktopCatalogName
I was recently tasked with setting up the AD side of PAN-OS Credential Phishing Prevention. For some technical reason that I haven’t been able to find it requires a read-only domain controller (I attempted putting the credential agent on a regular DC just to see if it would work and it seemed to read credentials without issue. If anyone has information about RODC requirement I’d love to hear it.) We don’t have or use any read-only domain controllers currently, so I had to deploy one for each domain we needed to protect. This brought up a few questions to mind…
How would I decide/maintain what users have their passwords replicated to the RODC?
How do these passwords get replicated to the RODC? By design passwords are only replicated to an RODC after an initial authentication attempt when they are configured for password replication.
Since the sole reason this domain controller is being deployed is for PAN-OS I don’t want it to handle logons and I want to make it very lightweight. How do I prevent user logons/authentication from occurring on this DC?
How are usernames identified? Will it handle all formats (samAccountName, explicit UPN, implicit UPN, and email address)?
How would I decide/maintain what users have their passwords replicated to the RODC?
This one is pretty easy for me. I don’t see any reason to exclude any accounts from credential detection, so I will use ‘Domain Users’. I usually stay away from using default groups, but this is one of the few cases where it makes sense to do so.
How do these passwords get replicated to the RODC?
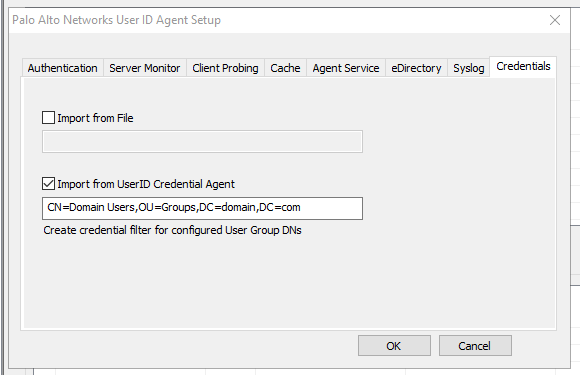
I turned the logging level up to verbose (HKEY_LOCAL_MACHINE\SOFTWARE\Palo Alto Networks\User-ID Credential Agent\Log | DebugLevel=5) on the credential agent after full configuration and saw that the agent enumerates all the objects within the ‘msDS-Reveal-OnDemandGroup‘ attribute of the RODC computer object (and DNs manually specified in the user-id agent seen in the screenshot below) and executes ‘repadmin‘ against each object to force replication. As password changes are detected it re-replicates passwords using the same method.
How do I prevent user logons/authentication?
Clients discover domain controllers using DC Locator. I decided to prevent the domain controller from registering all SRV records except for the two necessary for replication (LdapIpAddress + DsaCname). To do this I set a local policy under ‘Computer Settings → Administrative Templates → System → NetLogon → DC Locator DNS records‘ called ‘DC Locator DNS Records not registered by the DCs‘. The value I set for this policy was:
After experimentation it is clear that when using the domain credential filter method PAN-OS is getting the user from the IP<->user relationship and only looks for that user’s password in web site submissions. No matter what username I put in a form the submission triggered a detection as long as the password matched my password. Another user’s credentials under my session did not trigger a detection. I was happy with this because I do not have to worry about certain username formats not being detected.
After all of these questions/concerns were addressed came the actual implementation. You are required to install both the ‘User-ID Agent’ and the ‘User-ID Credential Agent’ on the RODC. According to the documentation this instance of the user-id agent should not be used for IP<->user relationship gathering and should only be pulling credentials. The credential agent creates the ‘bloom filter’ and sends it over to the user-id agent. PAN-OS connects to the user-id agent receives the newest version of the bloom filter. One issue I ran into was around permissioning and service accounts. Normally you would assign a domain account with limited permissions to the user-id agent, but the thing to consider here is that credential agent and user-id agent communicate using named pipes.According to the documentation on named pipes if no ACL is specified when creating a named pipe the default ACL is:
LocalSystem – Full Control
Administrators – Full Control
Creator Owner – Full Control
Everyone – Read
Anonymous – Read
The issue here is that the credential agent only runs under LocalSystem and assigning a non-administrator account to the user-id agent service prevents the user-id agent from communicating to the credential agent’s named pipe. Leaving the user-id agent service running under LocalSystem worked, but created another problem. When running under LocalSystem for some reason it was unable to enumerate the ‘msDS-Reveal-OnDemandGroup‘ attribute (seen in the UaDebug.log file) for the RODC meaning it couldn’t determine what user accounts were allowed to sync to this RODC. I found that if I manually specified a group DN in the user-id agent it would work under LocalSystem. The only other option would be switching to a ‘DOMAIN\Administrators’ service account (since this a domain controller) which I did not want to do. Since I’m only using ‘Domain Users’ this was easy enough to configure.
UPDATE: There seems to be a discrepancy between how the User-ID agent worked previously, the current documentation, and how it works now. In the past the User-ID agent configuration utility would adjust the ‘Log on as’ value for the ‘User-ID Agent’ service to the account you specified in the agent setup ‘Authentication’ tab. It seems now the service continues to run as LocalSystem, but uses the account specified in the configuration to actually probe the DCs and AD. I was able to leave it running as LocalSystem, specify an account with the proper rights in the ‘Authentication’ tab, and leave the group DN blank under the ‘Credentials’ tab in the user-id agent configuration utility. I verified the agent was using the account via logon events in the security event log on the RODC.
After configuring this you can monitor both log files to verify proper operation and then later verify PAN-OS is properly receiving the bloom filters. Be sure to restart the user-id agent after making any changes.
02/08/19 12:43:46:593 [ Info 667]: Sent BF to UaService. 21edc031f4891d2c42c133acded980ba
User-ID Agent log (UaDebug.log) receiving bloom filter from credential agent:
02/08/19 12:43:46:593[ Info 2896]: Received BF Push. Different from current one.
02/08/19 12:43:46:593[ Info 2897]: 0829f71740aab1ab98b33eae21dee122->21edc031f4891d2c42c133acded980ba
We recently went through some Exchange Online Protection (EOP) cleanup and part of that involved turning on Directory Based Edge Blocking. We already went through the exercise of syncing all objects (especially ones part of Exchange), but the only ones that weren’t being synced were mail-enabled public folders. After turning on Directory Based Edge Blocking we realized there were a few public folders that needed to receive mail from the Internet. After syncing mail-enabled public folders (this is a newer feature in AD Connect) we received synchronization errors for four objects. The only thing these objects had in common was that they referenced a mail-enabled public folder by either having that object as a group member or having it as a forwarding object on a mailbox.
The errors we receiving were:
The cause of the error is not clear. This operation will be retried during the next synchronization. If the issue persists, contact Technical Support.
IdentityDataValidationFailed
The workaround is to create a mail contact object that has the same targetAddress as the mail-enabled public folder object and use that object in place of the public folder object in something like a group membership. The issue with this is that by design a mail contact’s targetAddress is also part of its proxyAddresses attribute and the mail-enabled public folder object of course already has the email address as part of its proxyAddresses attribute. This duplicate is not allowed. The way around this is to modify the mail contact object so that the targetAddress is not part of proxyAddresses. To create this special mail contact you do the following:
Create a mail contact in Exchange with a fake external address
Disable e-mail address policy for the object
Use ADSIEdit to:
Change the targetAddress to the email address of the mail-enabled public folder
Remove the fake external address you specified earlier from proxyAddresses
After the object has been created you can now use it in lieu of the mail-enabled public folder in group memberships and other attributes.
I recently did a complete overhaul of my home ESXi home lab environment. With the new capacity/reliability came the desire to move as much onto it as possible. One of these items was my Home Assistant Hass.io instance which was running on a Raspberry Pi 3 (and originally a Raspberry Pi 1 B). Running it on the Pi has always come with painfully slow reboot and update times. With VM real estate available I see no reason to rely on mini computers to run various workloads around my home. I can re-purpose these boards for other projects. ESXi will also bring the ability to do machine-level snapshots which will be more complete and easier to revert to than the snapshot mechanism within Hass.io.
The main issue I ran into was with the VMDK. The way the VMDK was created it split into multiple files and I couldn’t consolidate or delete snapshots. The VMDK was also getting locked preventing vMotions. To get around this I cloned the VMDK in shell using vmkfstools. I also had to use the proper storage controller, network adapter, and firmware settings. I’ve listed all steps below:
Create a new VM with the following parameters:
Guest OS – CentOS 7 (64-bit) (The VM will adjust this automatically later)
1 vCPU
2GB RAM
1x E1000 NIC (NIC will not be usable as VMXNET 3)
Remove any other devices like CD-ROM, hard disk, SCSI controller, etc.
Copy this VMDK up to the VM directory in ESXi/vSphere
Open an SSH session to the ESXi host and change directory to the location of the VMDK you just copied (ex. cd /vmfs/volumes/datastore1/HASSOSVM)
Clone the VMDK using the following command: vmkfstools -i “hassos_ova-2.8.vmdk” “hassos_ova-2.8_new.vmdk” (This creates a thick copy of the disk and avoids locking/snapshot issues with the virtual disk)
Delete the original VMDK from the datastore as it is no longer needed
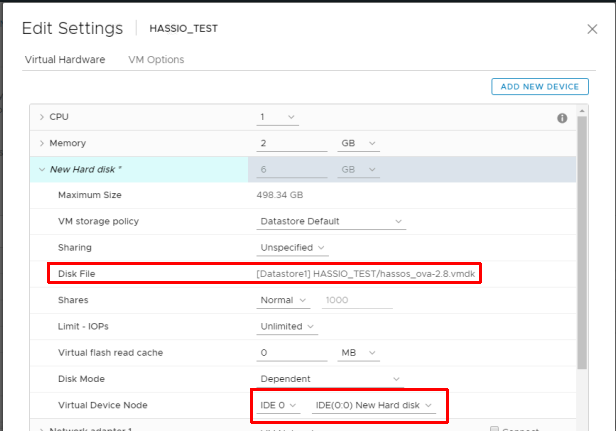
Edit the VM and add an existing hard drive selecting the VMDK you just cloned
Change the controller for the disk from “New SCSI controller” to “IDE 0”
Remove the newly added SCSI controller as it is not needed for the IDE virtual disk
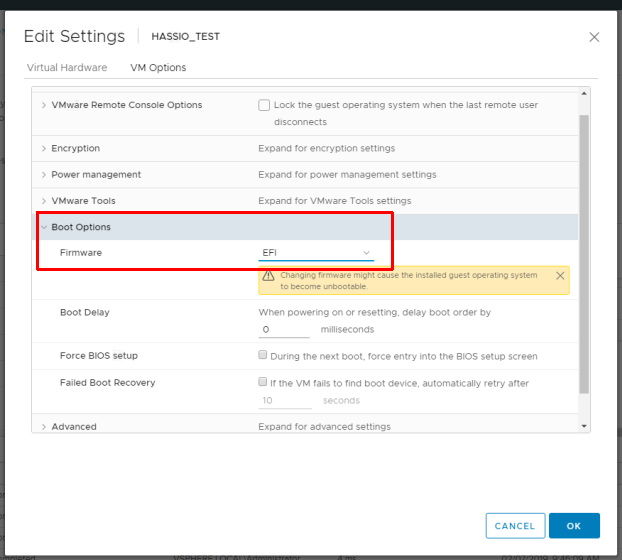
Go to “VM Options” and change the Firmware from “BIOS” to “EFI”
image
After all this has been completed you just need to power on the VM. Assuming DHCP is configured properly on the network Hass.io is using it will pick up an IP and start configuring. With Hass.io running on an older Xeon-powered host I have never seen the VM get over 50-60 percent CPU utilization and even then I’ve only seen those spikes when running an update. Updates of HassOS and Hass.io take a minute or two when they would sometimes take up to 10-15 minutes when running on a Pi.
I recently was creating a PowerShell script that uses the AirWatch REST API to perform mass updates to enrollment users. When testing the process using an API tool (Insomnia) I was receiving the following error when issuing a POST to “/api/V1/system/users/{id}/update“:
I was using an XML body to pass one parameter as per the documentation and the user id was correct. I was unable to find any information on this error and the only thing I was left with was using a JSON body instead of XML for the POST. Once I switched to a JSON body the call was successful. I tested other POST commands using an XML body and they did not produce this error.
I recently received a call from a former colleague where they were unable to update a machine catalog. They stated nothing had changed in vCenter, Citrix, or the master image. The error they were receiving was:
Error Id: XDDS:919D761E

Exception:     Citrix.Console.Models.Exceptions.ProvisioningTaskException Create Catalog failed with an unknown reason, see terminating error for more details.        at Citrix.Console.PowerShellSdk.ProvisioningSchemeService.BackgroundTasks.ProvisioningSchemeTask.CheckForTerminatingError(SdkProvisioningSchemeAction sdkProvisioningSchemeAction)        at Citrix.Console.PowerShellSdk.ProvisioningSchemeService.BackgroundTasks.ProvisioningSchemeTask.WaitForProvisioningSchemeActionCompletion(Guid taskId, Action`1 actionResultsObtained)        at Citrix.Console.PowerShellSdk.ProvisioningSchemeService.BackgroundTasks.ProvisioningSchemeCreationTask.StartProvisioningAction()        at Citrix.Console.PowerShellSdk.ProvisioningSchemeService.BackgroundTasks.ProvisioningSchemeCreationTask.RunTask()        at Citrix.Console.PowerShellSdk.BackgroundTaskService.BackgroundTask.Task.Run()


DesktopStudio_ErrorId : ProvisioningTaskError
     ErrorCategory : NotSpecified
     ErrorID : NetworkNotPermitted
     TaskErrorInformation : Terminated
     InternalErrorMessage : A NIC device is tied to a disallowed network.
     DesktopStudio_PowerShellHistory : Create Machine Catalog 'XenApp - WSRV12 - DAPPS - DR'
     11/25/2018 7:09:42 AM
The key error here is ‘A NIC device is tied to a disallowed network’. If you do a quick search you will find an article referencing this error: CTX139460. This points to a change in the vCenter networking config, but supposedly there weren’t any changes. Time to do some digging. I asked them to get networking info from both vCenter and CItrix using PowerShell.
To get the hypervisor networking I asked him to log in to one of the delivery controllers, launch PowerShell as administrator, and run the following:
Add-PSSnapin Citrix*
dir XDHyp:\HostingUnits | Select PSPath,HostingUnit*,*Network* | Format-List
The thing to take note of is the ‘NetworkId‘ for the DR hosting connection. This Id is the vCenter MoRef (Managed Object Reference) for the VM network. I then had him pull the VM networks from vCenter using PowerCLI.
To get the VM networks (with MoRef) from vCenter I asked him to launch VMware PowerCLI as administrator and run the following:
Name                                                        MoRef
 ----                                                        -----
 VM Network 201                                              Network-network-4790

...
The MoRef was network-641 in MCS, but network-4790 in vCenter even though the VM network names were the same. From this it was clear there was a networking change performed on the vCenter side at some point. After stating this, it was revealed that port groups were deleted and recreated (which generated new MoRef ids) in this DR cluster. At this point we have to reconfigure the hosting connection networking with the new MoRef and this cannot be done in Citrix Studio. To do this we have to reconfigure the ‘NetworkPath‘ in the hosting connection, but use the same ‘NetworkPath‘ since the network name did not change. Running this will force the network MoRef to be queried and updated in the MCS hosting connection.
To reset (or change if needed) the ‘NetworkPath‘ in the hosting connection you take the ‘PSPath‘ from the first command and copy everything starting with ‘XDHyp‘. I took that path and provided them with this command to run:
Finally, I asked them to re-run the first ‘dir‘ command again to verify the network MoRef updated. After doing this they were able to successfully update the machine catalog.
Last week I had deploy a new domain controller to the root domain in a forest (it happened to be an RODC for a unique use case, but that is irrelevant). The domain only partially replicated before failing and showing errors on the new DC.
The errors were:
Log Name:      Directory Service
 Source:        Microsoft-Windows-ActiveDirectory_DomainService
 Date:          1/4/2019 11:19:18 AM
 Event ID:      1791
 Task Category: Replication
 Level:         Error
 Keywords:      Classic
 User:          ANONYMOUS LOGON
 Computer:      rodc1.domain.com
 Description:
Replication of application directory partition DC=domain,DC=com from source 24c77a2c-6da0-41a1-95cf-e0542bca5b89 (dc1.domain.com) has been aborted. Replication requires consistent schema but last attempt to synchronize the schema had failed. It is crucial that schema replication functions properly. See previous errors for more diagnostics. If this issue persists, please contact Microsoft Product Support Services for assistance. Error 8418: The replication operation failed because of a schema mismatch between the servers involved..
Log Name:      Directory Service
 Source:        Microsoft-Windows-ActiveDirectory_DomainService
 Date:          1/4/2019 11:19:31 AM
 Event ID:      1203
 Task Category: Replication
 Level:         Warning
 Keywords:      Classic
 User:          ANONYMOUS LOGON
 Computer:      rodc1.domain.com
 Description:
 The directory service could not replicate the following object from the source directory service at the following network address because of an Active Directory Domain Services schema mismatch.
 Object:
 CN=Bob Smith,OU=Users,OU=All Users,DC=domain,DC=com
 Network address:
 24c77a2c-6da0-41a1-95cf-e0542bca5b89._msdcs.domain.com
It was obvious that the object referenced in the second event was causing the issue, but this object was in use and I couldn’t just remove it. When looking for related errors on the source DC I found this:
Log Name:      Directory Service
 Source:        Microsoft-Windows-ActiveDirectory_DomainService
 Date:          1/4/2019 11:04:33 AM
 Event ID:      1450
 Task Category: Internal Processing
 Level:         Error
 Keywords:      Classic
 User:          ANONYMOUS LOGON
 Computer:      dc1.domain.com
 Description:
 The security descriptor propagation task could not calculate a new security descriptor for the following object.
 Object:
 CN=Bob Smith,OU=Users,OU=All Users,DC=domain,DC=com
 This operation will be tried again later.
 User Action
 If this condition continues, attempt to view the status of this object and manually change the security descriptor.

Additional Data
 Error value:
 1340 The inherited access control list (ACL) or access control entry (ACE) could not be built.
This was much more specific and showed there was an issue with the ACL of the object. I tried making one small change to the security ACL on the object to verify there was an issue and received an error. This ACL was either corrupt or too large. I decided to try repairing the ACL on the object by using ADSI Edit (adsiedit.msc) to remove everything from the ACL, add only ‘Domain Admins’ and ‘SYSTEM’ with Full Control, and then resetting it using DSACLS. I also had to do this for the ‘ExchangeActiveSyncDevices’ child object and the leaf objects under that since this user had Exchange ActiveSync devices. I verified the child and leaf objects were inheriting from the user object and proceeded to reset the ACL using the DSACLS:
After resetting the ACL replication to this domain controller completed with this event:
Log Name:      Directory Service
 Source:        Microsoft-Windows-ActiveDirectory_DomainService
 Date:          1/4/2019 11:49:51 AM
 Event ID:      1394
 Task Category: Service Control
 Level:         Information
 Keywords:      Classic
 User:          ANONYMOUS LOGON
 Computer:      rodc1.domain.com
 Description:
 All problems preventing updates to the Active Directory Domain Services database have been cleared. New updates to the Active Directory Domain Services database are succeeding. The Net Logon service has restarted.
I recently ran across an issue during a ESXi cluster/SAN migration where we were down to a handful of VMs that were failing when trying to move them to the new cluster/SAN (using simultaneous compute/storage vMotion operations). I’d like to note that this was on vCenter 6.7 and ESXi 6.5.
The errors were:
Timed out waiting for migration data. The source detected that the destination failed to resume.
Operation timed out.
Timed out waiting for migration data. vMotion migration {#######################} failed to read stream keepalive: connection closed by remote host, possibly due to timeout.
I looked at all the standard issues (storage issues, vMotion connectivity issues, etc.) When looking at the VMs the only thing that made them different compared others in the cluster was the number of virtual disks attached to them. All four of the VMs were SQL Server Availability Group members and had a larger number of disks (5+). When looking into timeouts related to the number of disks I came across this VMware article: Using Storage vMotion to migrate a virtual machine with many disks timeout (1010045). The errors in the article were not the same, but it it aligned with my suspicion about the number of disks. I couldn’t look at the kernel vpxd logs because they had already rolled over, but I decided to give it a shot. I shutdown the problem VMs, set the fsr.maxSwitchoverSeconds configuration parameter to 900 for each one, powered them on, and retried the compute/storage vMotion operations. All vMotion operations completed successfully after this change.
I would like to note that there is a separate configuration parameter called vmotion.maxSwitchoverSeconds which controls the compute side of things. You can try adjusting this as well when having vMotion timeout issues.
UPDATE #3 (6/21/2019): I did some digging and found the core issue (which has been talked about on other forums). In March Google disabled Google Voice access via the ‘https://www.googleapis.com/auth/googletalk’ API. They are only allowing access via a private ObiTalk API now. You basically have to get the OAuth client ID, client secret, and a refresh token for this ObiTalk app. Once you have these three things they can be used in the procedure below. After this you will be up and running again. Thank you again, naf!
UPDATE #2: As of 3/25/2019 my GVSIP trunk is showing a rejected status again. This time it seems the actual server is rejecting authentication. This is the error I am receiving in the Asterisk logs:
[2019-03-25 11:26:42] DEBUG[7278] res_pjsip_outbound_registration.c: Registration re-using transport 0x7ff23001f748
[2019-03-25 11:26:42] WARNING[7278] res_pjsip_outbound_registration.c: Fatal response '403' received from 'sip:obihai.sip.google.com' on registration attempt to 'sip:gv1143131xxxxxxxxxx@obihai.sip.google.com', stopping outbound registration
UPDATE: As of 3/19/2019 my GVSIP trunk was showing a rejected status. It seems that this version of IncrediblePBX was using a static IP for the outbound proxy which just stopped working. After looking into it more I realized the ‘nafkeys-update’ script updates this for you, but I didn’t use that script since it can no longer download the certificates. I have updated the steps (step 5) below to show how to resolve this. This was the error I was receiving in the Asterisk logs:
[2019-03-19 08:32:52] WARNING[3715] pjproject:                        SSL SSL_ERROR_SSL (Handshake): Level: 0 err: <336151568>  len: 0
[2019-03-19 08:32:52] WARNING[3716] res_pjsip_outbound_registration.c: No response received from 'sip:obihai.sip.google.com' on registration attempt to 'sip:gv1143131xxxxxxxxxx@obihai.sip.google.com', retrying in '60'
If you were already running this setup and you are now having this issue run the following commands to replace the static IP with the proper address:
sed -i ‘s|64.9.242.172|obihai.telephony.goog|’ /etc/asterisk/pjsip_custom.conf
amportal restart
I have been using a cordless house phone in conjunction with Google Voice ever since purchasing a home a number of years ago. This was accomplished using an OBi 110 device, but recently stopped working last year because Google updated certificates on their end and this model device did not trust this new certificate chain. OBi stated the box was end of life and they would not offer an update. At that time I setup a FreePBX instance between my OBi 110 and GV, but recently has Google ended XMPP support which nuked my new configuration. OBi now has a relationship with Google and conveniently offers a new model that works with Google Voice’s new SIP protocol (GVSIP). I have already had to replace my OBi once due to a hardware issue and they did not offer a simple update to fix the certificate issue last time. I am not willing to shell out more money to get this working. I searched the internet for options (surly if Google Voice is using SIP now there is a way to connect to it). A contributor to the Asterisk project (the core of FreePBX/Incredible PBX) named naf has already developed a way to connect Asterisk to GVSIP. The problem is forums are removing references to files and instructions because of Google ToS violations. I spent some time figuring all this out and was able to hook my OBi 110 device up to an Incredible PBX VM. The VM has a GVSIP trunk and everything is working perfectly (hopefully for a long time). The steps are basically installing CentOS, installing Incredible PBX, obtaining a OBi certificate/private key pair (Google is using it to whitelist SIP connections), configuring the PBX trunks/routes, and configuring the OBi to talk to the PBX over SIP. Here are the steps I took to get this running:
Download/install CentOS 6.10 minimal and Incredible PBX 16-15 (http://nerdvittles.com/?p=27089). As I said before I deployed this to my ESXi cluster at home, but this could easily run on a local VM. I’m looking into translating this setup into a Raspberry Pi deployment
Obtain Obi client certificate/private key pair
All references to the certificates have been removed. You can actually pull the certificate and private key off of an OBi 110 and use this on Incredible PBX. This requires modified firmware (using a firmware patch). This patch process involves using bsdiff to patch the original firmware file with the aforementioned patch file, flashing the device with the patched firmware file, setting up a syslog server, configuring the syslog server on the OBi, initiating a device backup (which will send the cert/key in binary DER format to the syslog server), and converting cert/key pair to PEM
I will save you some time and provide you with the already patched firmware here, but I cannot publicly provide the certs for legal reasons (you can try dropping me a message). OBi 110 devices are available extremely cheap on eBay as they are now defunct. An OBi type device will be necessary for connecting GVSIP to a traditional phone anyway
Copy the certificate pair to Incredible PBX (obihainaf.crt + obihainaf.key) under /etc/asterisk/keys
Run the following commands to update the install-gvsip script with the ObiTalk OAuth client ID and client secret from step 5 (you can manually update the file if you don’t want to run the ‘sed’ commands):
sed -i ‘s|466295438629-prpknsovs0b8gjfcrs0sn04s9hgn8j3d.apps.googleusercontent.com|<CLIENT ID YOU OBTAINED IN STEP 5>|’ /root/gvsip-naf/install-gvsip
sed -i ‘s|4ewzJaCx275clcT4i4Hfxqo2|<CLIENT SECRET YOU OBTAINED IN STEP 5>|’ /root/gvsip-naf/install-gvsip
Run the following command to update the install-gvsip script with the proper proxy address (you can manually update the file if you don’t want to run the ‘sed’ commands):
sed -i ‘s|64.9.242.172|obihai.telephony.goog|’ /root/gvsip-naf/install-gvsip
Configure SIP local networks in CIDR format under Settings -> General SIP Settings -> NAT Settings -> Local Networks. I had issues with my SIP services shutting down right after boot up in Incredible PBX and traced it back to this in the logs. I added my home subnet (192.168.0.0/24) and it stopped going down
Test inbound and outbound calls
Note: This could also be deployed to a Raspberry Pi 3. I just didn’t have an unused Pi 3 handy, so I went with a VM. I was running my previous FreePBX instance on an older Pi B+ for over a year.
A team member was recently tasked with deploying a number of OVA templates provided by a vendor. There was difficulty with the OVA deployment failing after sitting on “Validating” for a long time. This would usually happen after selecting a compute resource in vCenter. The vendor stated they have seen this numerous times with vCenter 6.5 clients. They advised to remove a host from the cluster and deploy directly to that host. Being a person that cannot accept hacky workarounds I decided to dive into it. We are currently on vCenter 6.7 U1 with 6.5 ESXi U3 hosts. I extracted the OVA and started looking into the OVF XML. Everything looked to be formatted correctly, but I still felt vCenter wasn’t liking something in the XML. I began troubleshooting by commenting out entire <ProductSections> elements of the XML. Commenting out the first set of options did not work, but the second did. Looking closer at the second showed a very long ‘ValueMap’ string for the time zone selector in the ovf:qualifiers attribute. The most likely scenario was this this causing the issue with its length and complexity. I decided to clear out the entire ovf:qualifiers attribute (empty quotes) and hard code the value to be ‘America/New_York’. I then saved the OVF, initiated a new deployment (selecting all VMDKs, the OVF, but excluding the MF file as that would cause a checksum error), and hitting next… VOILA! I was able to successfully deploy this OVF without any errors. I also performed the same action for all of the other vendor templates.
Original time zone property:
Modified time zone property:
I didn’t dig further, but I imagine the vendor’s standalone host hack worked because the web GUI on the host has different code (maybe missing a bug) than vCenter. I’d also like to note that this could be accomplished by using the Import-VApp PowerCLI PowerShell cmdlet (without modifying any files), but you’d also have to create a OvfConfiguration hashtable object to pass as a parameter which may be more work than it is worth.