I recently did a complete overhaul of my home ESXi home lab environment. With the new capacity/reliability came the desire to move as much onto it as possible. One of these items was my Home Assistant Hass.io instance which was running on a Raspberry Pi 3 (and originally a Raspberry Pi 1 B). Running it on the Pi has always come with painfully slow reboot and update times. With VM real estate available I see no reason to rely on mini computers to run various workloads around my home. I can re-purpose these boards for other projects. ESXi will also bring the ability to do machine-level snapshots which will be more complete and easier to revert to than the snapshot mechanism within Hass.io.
The main issue I ran into was with the VMDK. The way the VMDK was created it split into multiple files and I couldn’t consolidate or delete snapshots. The VMDK was also getting locked preventing vMotions. To get around this I cloned the VMDK in shell using vmkfstools. I also had to use the proper storage controller, network adapter, and firmware settings. I’ve listed all steps below:
- Create a new VM with the following parameters:
- Guest OS – CentOS 7 (64-bit) (The VM will adjust this automatically later)
- 1 vCPU
- 2GB RAM
- 1x E1000 NIC (NIC will not be usable as VMXNET 3)
- Remove any other devices like CD-ROM, hard disk, SCSI controller, etc.

- Download the latest stable HassOS VMDK from https://github.com/home-assistant/hassos/releases
- Copy this VMDK up to the VM directory in ESXi/vSphere
- Open an SSH session to the ESXi host and change directory to the location of the VMDK you just copied (ex. cd /vmfs/volumes/datastore1/HASSOSVM)
- Clone the VMDK using the following command: vmkfstools -i “hassos_ova-2.8.vmdk” “hassos_ova-2.8_new.vmdk” (This creates a thick copy of the disk and avoids locking/snapshot issues with the virtual disk)
- Delete the original VMDK from the datastore as it is no longer needed
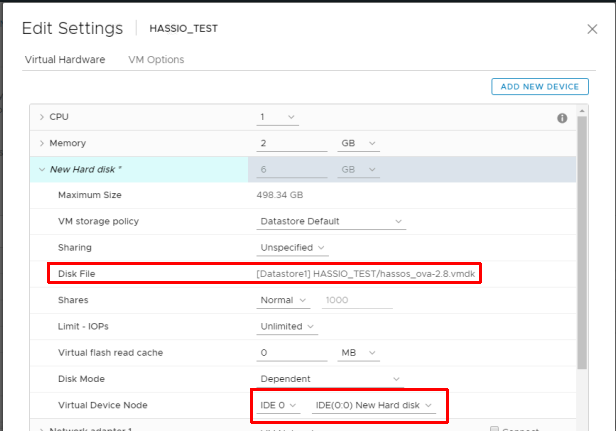
- Edit the VM and add an existing hard drive selecting the VMDK you just cloned
- Change the controller for the disk from “New SCSI controller” to “IDE 0”
- Remove the newly added SCSI controller as it is not needed for the IDE virtual disk
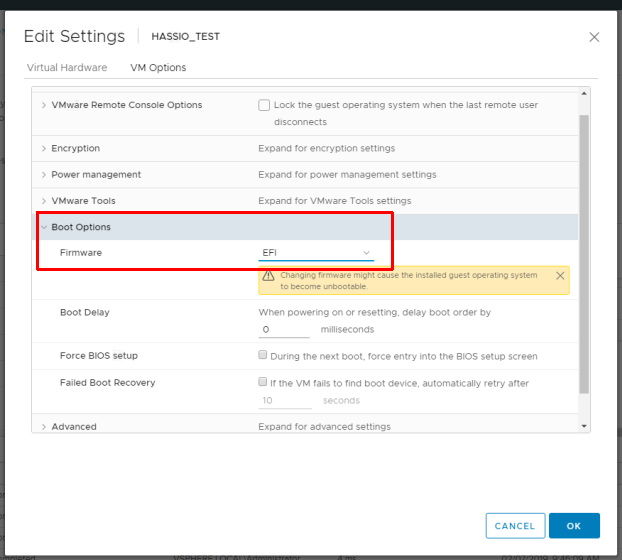
- Go to “VM Options” and change the Firmware from “BIOS” to “EFI”
After all this has been completed you just need to power on the VM. Assuming DHCP is configured properly on the network Hass.io is using it will pick up an IP and start configuring. With Hass.io running on an older Xeon-powered host I have never seen the VM get over 50-60 percent CPU utilization and even then I’ve only seen those spikes when running an update. Updates of HassOS and Hass.io take a minute or two when they would sometimes take up to 10-15 minutes when running on a Pi.