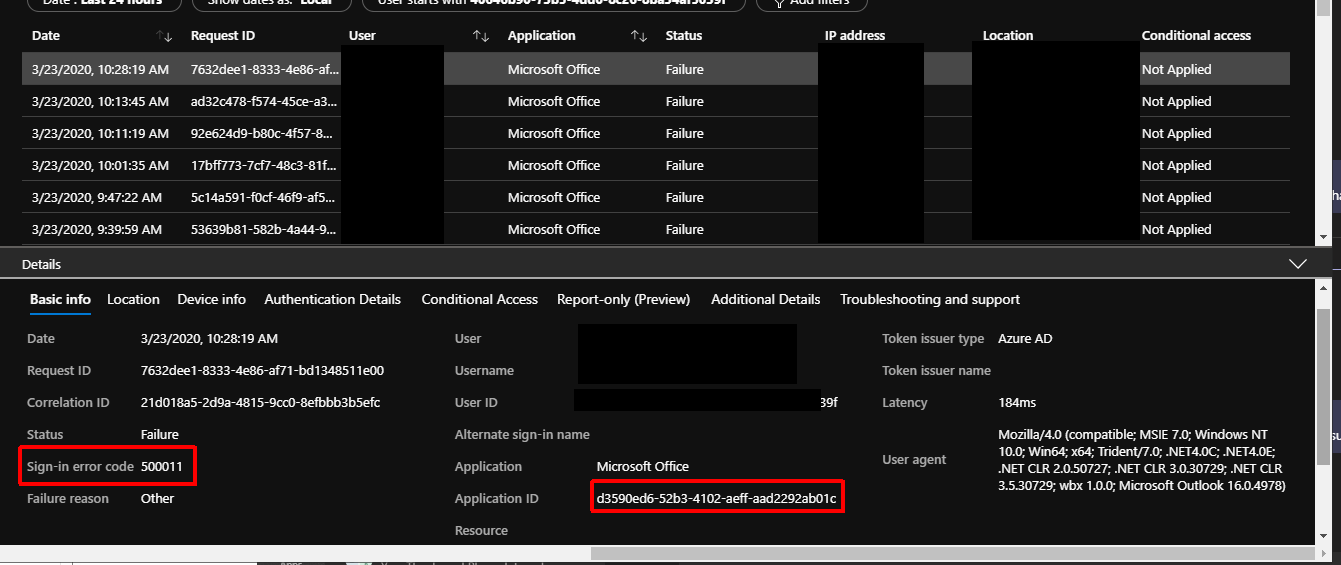
We are in the process of selectively turning on ADAL for Outlook clients. We have already gone through enabling Hybrid Modern Authentication for Exchange (https://docs.microsoft.com/en-us/exchange/configure-oauth-authentication-between-exchange-and-exchange-online-organizations-exchange-2013-help) a while back. We recently ran into an issue where specific users were getting a white box about a minute after launching Outlook. I have seen this issue where all of Outlook freezes, but this was not the same. They receive this error while Outlook continues to run in the background. The error is also accompanied by an Azure AD sign-in failure for the user. The error received is 500011. When looking this up in the documentation (https://login.microsoftonline.com/error?code=500011) you can see it is referring to the error ‘The resource principal named {name} was not found in the tenant named {tenant}‘.
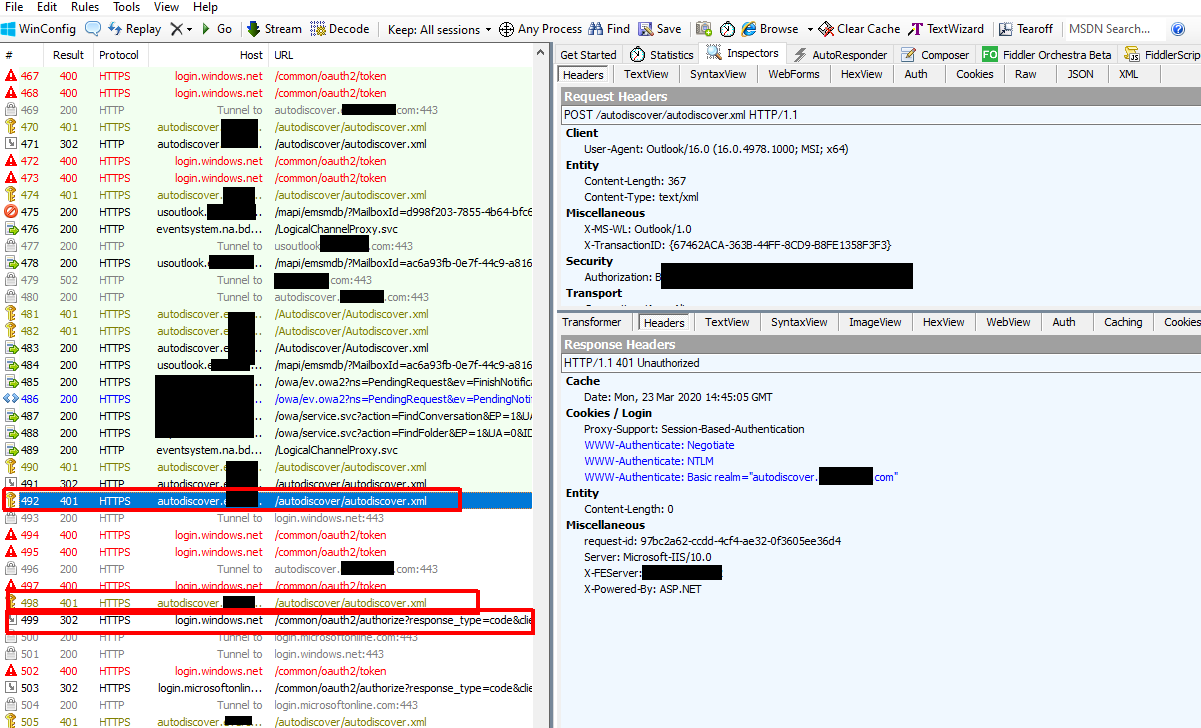
I decided to do a Fiddler trace to get to the bottom of this and this is where the issue started becoming clearer. In the trace you see Outlook reaching out to autodiscover.domainname.com (which is on-prem), getting a 401 response, reaching out to login.windows.net/login.microsoftonline.com, and looping in this manner. This part of the capture aligned exactly with the mysterious white box.
In my case this specific set of users had a different primary SMTP address (and UPN) than the other users we had already enabled ADAL for and their autodiscover.domain.com URL was never added to our Azure AD service principals for the ‘Office 365 Exchange Online‘ application ID. Microsoft documentation talks about this in Step 5 of the link I added at the beginning of this post. Using the ‘MSOnline‘ PowerShell module I was able to add the URL to the service principal list.
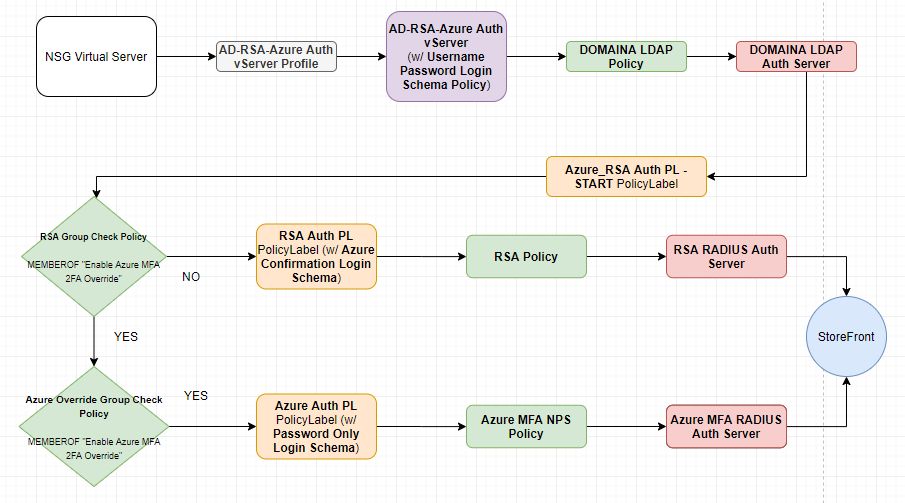
I have been working on implementing services like Azure AD and O365 in my work place. One of the services we are are adopting is Azure MFA. We currently use RSA SecurID company-wide for multiple remote access services and needed a way move users over in batches. One of the larger services to integrate Azure MFA with was Citrix NetScaler. Our original NSG (NetScaler Gateway) authentication configuration consisted of multiple LDAP policies and a set of RADIUS polices for RSA SecurID. Our goal was to create a configuration where we could control where users authenticate for their second factor via an Active Directory group. To do this kind of dynamic authentication in NSG we would have to move authentication from the basic model to an advanced nFactor-based configuration. The other requirement we had was to have a landing page before an Azure MFA authentication. We needed this because if your default sign-in method is set to ‘notification’ the RADIUS authentication could easily time out if the user doesn’t have their device running Microsoft Authenticator next to them. The page would let the user know to have their device ready before initiating authentication.
Below is a flowchart of the configuration end result. Objects of the same type share the same color (Gray – Authentication Virtual Server Profile, Purple – Authentication Virtual Server, Green – Advanced Authentication Policy, Orange – Advanced Authentication PolicyLabel, Red – Authentication Server (LDAP/RADIUS).
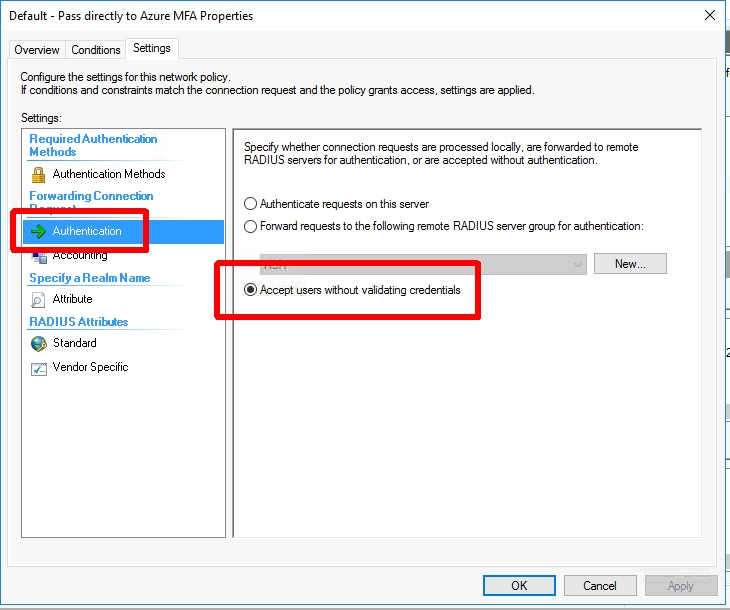
The first step in setting up Azure MFA is to stand up one or multiple NPS (Network Policy Server) instances and install the Azure MFA NPS Extension. I won’t go into the whole setup of this since it is documented, but I will comment on the policy config within NPS. It could be a little confusing because we are just going to pass the username to NPS, NPS will not be authenticating the user against AD. Azure MFA authentication in NPS happens AFTER NPS authenticates the user against AD. To make this work we will have to create a Connection Request Policy that just passes the user without authentication. The steps involved are as follows:
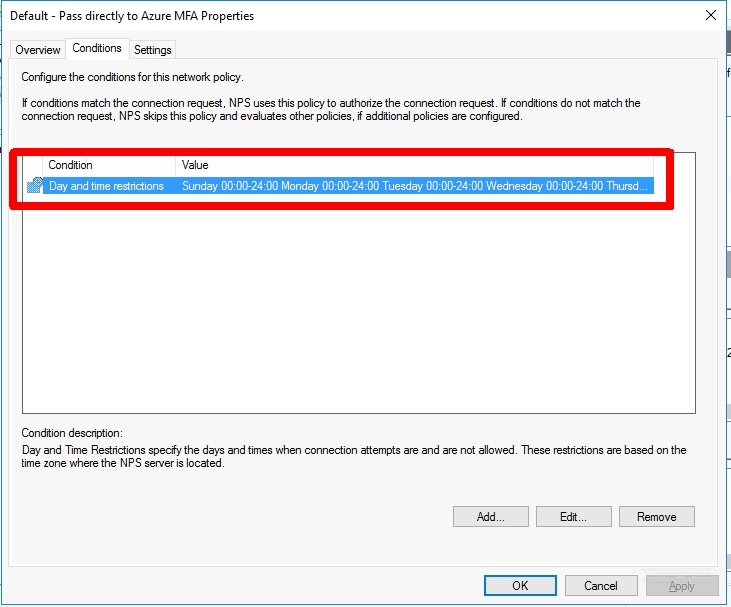
Create a new Connection Request Policy called ‘Default – Pass directly to Azure MFA‘
Add a Day and time restriction that covers 24 hours and 7 days
Set the ‘Authentication’ settings‘ to ‘Accept users without validating credentials‘. (This will not perform an AD authentication and just pass the username along to the Azure MFA NPS Extension)
Now we can add this new Azure MFA RADIUS server to NetScaler.
Go to ‘NetScaler -> System -> Authentication -> Basic Policies -> RADIUS‘
Create a new Server using the settings from the NPS server above
Next we will create our Login Schemas. We will need an initial logon schema for the LDAP credentials, a login schema for the RSA SecurID token, and a prompt only login schema for the page we want to show before authentication is passed to the NPS RADIUS server we setup earlier for Azure MFA.
Go to ‘NetScaler -> Security -> AAA – Application Traffic -> Login Schema‘
Create a login schema profile called ‘Username Password Login Schema‘
Set the authentication schema to ‘SingleAuth.xml‘
Set ‘User Credential Index‘ to 11
Set ‘Password Credential Index‘ to 12
Create a login schema policy called ‘Username Password Login Schema Policy‘
Set the profile to be the schema profile you just created above (‘Username Password Login Schema‘)
Set the ‘Rule’ expression to ‘REQ.HTTP.HEADER User-Agent NOTCONTAINS CitrixReceiver‘ (Receiver does not support the nFactor flow, this will be for web clients only)
Create a login schema profile called ‘Password Only Login Schema‘
Create a new XML file called ‘RSAOnly.xml‘ using the XML below
Upload this to ‘/flash/nsconfig/loginschema/LoginSchema‘
Set the user expression to ‘HTTP.REQ.USER.ATTRIBUTE(11)‘. (This will carry the username from the first logon page to the RSA logon page)
Create a login schema profile called ‘No Prompt Login Schema‘
Set authentication schema to ‘noschema‘
Leave everything else blank
Create a login schema profile called ‘Azure Confirmation Login Schema‘
Create a new XML file called ‘Azure.xml‘ using the XML below
Upload this to ‘/flash/nsconfig/loginschema/LoginSchema‘
Set the user expression to ‘HTTP.REQ.USER.NAME‘. (This will pass the UPN to NPS after acknowledging the prompt)
<?xml version="1.0" encoding="UTF-8"?>
<AuthenticateResponse xmlns="http://citrix.com/authentication/response/1">
<Status>success</Status>
<Result>more-info</Result>
<StateContext></StateContext>
<AuthenticationRequirements>
<PostBack>/nf/auth/doAuthentication.do</PostBack>
<CancelPostBack>/nf/auth/doLogoff.do</CancelPostBack>
<CancelButtonText>Cancel</CancelButtonText>
<Requirements>
<Requirement><Credential><Type>none</Type></Credential><Label><Text>Please have your Microsoft Authentcator app ready.</Text><Type>confirmation</Type></Label><Input /></Requirement>
<Requirement><Credential><ID>loginBtn</ID><Type>none</Type></Credential><Label><Type>none</Type></Label><Input><Button>Continue</Button></Input></Requirement>
</Requirements>
</AuthenticationRequirements>
</AuthenticateResponse>
Now we are going to create our Policy/PolicyLabel chain. The important thing here is to understand how they relate to each other. A Policy is exactly that… an authentication policy. You can define an expression and an authentication request server to use once the expression is matched. A PolicyLabel contains one or more Policy bindings with priorities, goto expressions (like NEXT/END), and a ‘Next Factor’ which gives you the ability to link to ANOTHER PoilcyLabel. First, we will start with our Policies.
Go to ‘NetScaler -> Security -> AAA – Application Traffic -> Policies -> Authentication -> Advanced Policies -> Policy‘
Create an LDAP authentication policy
Set Name to be specific to the domain it is servicing (ex. ‘DOMAINA LDAP Policy‘)
Set Action Type to ‘LDAP‘
Set Action to your existing LDAP server
Set Expression to ‘REQ.HTTP.HEADER User-Agent NOTCONTAINS CitrixReceiver‘
Create a Azure MFA RADIUS authentication policy
Set Name to ‘Azure MFA NPS Policy‘
Set Action Type to ‘RADIUS‘
Set Action to the NPS RADIUS server you created earlier
Set Expression to ‘true‘
Create a RSA RADIUS authentication policy
Set Name to ‘RSA Policy‘
Set Action Type to ‘RADIUS‘
Set Action to your existing RSA RADIUS server
Set Expression to ‘true‘
Create an Active Directory group that will contain the users you are cutting over to Azure MFA. I used the name ‘Enable Azure MFA 2FA Override’. We will use this group in the next two policies
Create the RSA check policy
Set Name to ‘RSA Group Check Policy‘
Set Action Type to ‘NO_AUTHN‘
Set Expression to ‘HTTP.REQ.USER.IS_MEMBER_OF(“Enable Azure MFA 2FA Override”).NOT‘
Create the Azure override check policy
Set Name to ‘Azure Override Group Check Policy‘
Set Action Type to ‘NO_AUTHN‘
Set Expression to ‘HTTP.REQ.USER.IS_MEMBER_OF(“Enable Azure MFA 2FA Override”)‘
Next we can create our PolicyLabels. These objects will reference Login Schemas/Policies and will chain together.
Go to ‘NetScaler -> Security -> AAA – Application Traffic -> Policies -> Authentication -> Advanced Policies -> PolicyLabel‘
Create the Azure PolicyLabel
Set Name to ‘Azure Auth PL‘
Set Login Schema to ‘Azure Confirmation Login Schema‘ (we created this earlier)
Set Feature Type to ‘AAATM_REQ‘
Click Continue
Add a policy binding for ‘Azure MFA NPS Policy‘ (we created this earlier)
Set Priority to 100
Set Goto Expression to NEXT
Leave Next Factor empty
Create the RSA Policy
LabelSet Name to ‘RSA Auth PL‘
Set Login Schema to ‘Password Only Login Schema ‘ (we created this earlier)
Set Feature Type to ‘AAATM_REQ‘
Click Continue
Add a policy binding for ‘RSA Policy‘ (we created this earlier)
Set Priority to 100
Set Goto Expression to NEXT
Leave Next Factor empty
Create the primary PolicyLabel
Set Name to ‘Azure_RSA Auth PL – START‘
Set Login Schema to ‘No Prompt Login Schema‘ (we created this earlier)
Set Feature Type to ‘AAATM_REQ‘
Click Continue
Add a policy binding for ‘RSA Group Check Policy‘ (we created this earlier)
Set Priority to 100
Set Goto Expression to NEXT
Set Next Factor to ‘RSA Auth PL‘ (we created this earlier)
Add a policy binding for ‘Azure Override Group Check Policy‘ (we created this earlier)
Set Priority to 110
Set Goto Expression to NEXT
Set Next Factor to ‘Azure Auth PL‘ (we created this earlier)
Now we are going to create an authentication vServer and profile.
Create the authentication vServer
Go to ‘NetScaler -> Security -> AAA – Application Traffic -> Authentication Virtual Servers‘ and click ‘Add‘
Set the name to ‘AD-RSA-Azure Auth vServer‘
Set ‘IP Address Type‘ to ‘Non Addressable‘. (This authentication vServer will only be used internally, so we don’t need an IP address)
Under Advanced Authentication Policies add a binding for the LDAP policy you created above (ex. DOMAINA LDAP Policy)
Set the priority to 100
Set the Goto Expression to NEXT
Set the Next Factor to ‘Azure_RSA Auth PL – START‘ PolicyLabel we created this above
Under Login Schemas add a binding for the ‘Username Password Login Schema Policy‘ policy we created this earlier
Create an authentication profile
Go to ‘NetScaler -> Security -> AAA – Application Traffic -> Authentication Profile‘ and click ‘Add‘
Set the name to ‘AD-RSA-Azure Auth vServer Profile‘
Set Authentication Host to ‘fake‘ (this won’t be used)
Set Virtual Server Type to ‘Authentication Virtual Server‘
Set the Authentication Virtual Server to the ‘AD-RSA-Azure Auth vServer‘ we created above
Leave Authentication Domain blank
Leave Authentication Level to set 0
Now that everything has been created all that is left is to configure the NetScaler Gateway Virtual Server. If you already have one setup you can simply remove all authentication profile bindings and add the Authentication Profile we just created above.
With everything created we can test the authentication flow…
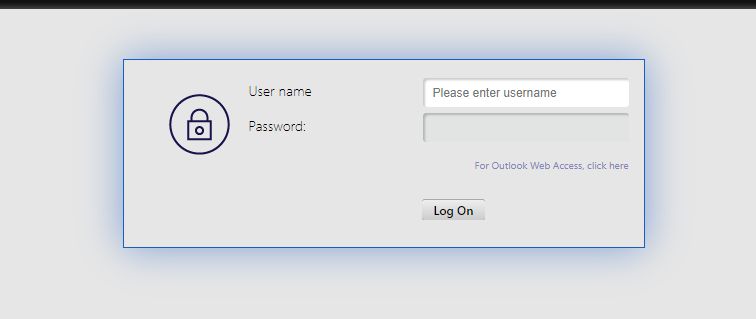
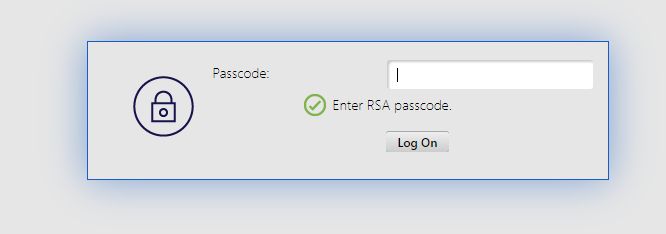
This is the login flow when the user IS NOT a member of the ‘Enable Azure MFA 2FA Override‘ group.
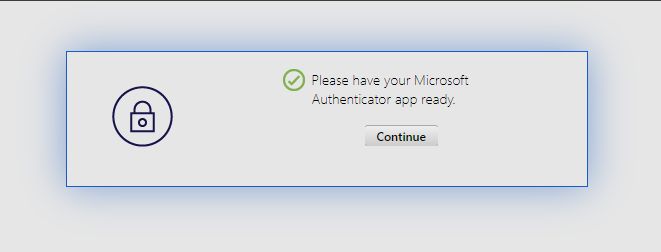
This is the login flow when the user IS a member of the ‘Enable Azure MFA 2FA Override‘ group. Depending on what the Azure AD user’s ‘Default sign-in method’ is set to they may or may not receive a prompt after the 2nd prompt. If their default method is set to something like SMS or Authenticator App code they will receive a 3rd window asking for that code. This prompt is automatically generated, so we did not have to create it like we did for the RSA prompt. In the case below the user’s default method was set to ‘Microsoft Authenticator – notification’, so the login flow will wait until the prompt is acknowledged, denied, or times out on the user’s Microsoft Authenticator instance.
The last thing to mention is that a little extra configuration needs to be added to support Citrix Receiver clients (Windows/Mac/Android/iOS). In 11.1 52.x+ NetScaler AAA servers need to be configured with a separate set of polices for requests where the User-Agent header contains ‘CitrixReceiver’. It is fairly straightforward and Citrix has a write up on this, so I won’t write it all out. I will say the one thing to consider is that you will not be able to support multiple second factor methods using the AD group. For these clients you will have to choose one or the other. In our case we will be sticking with RSA until the majority of users are moved over meaning those users connecting Receiver directly to NSG will need to have that method available. Fortunately for us we do not have many users that access our environment this way. Citrix’s documentation on this can be found here: https://support.citrix.com/article/CTX223386.
As part of piloting O365 I was tasked with implementing hybrid modern authentication in our Exchange org in order to leverage functionality like the Outlook mobile application and MFA within the Windows version of Outlook for on-prem mailboxes. One caveat of enabling hybrid modern authentication in Exchange is that once this is flipped on any compatible client (ex. Outlook 2016) will begin using modern authentication (ADAL) exclusively by default. This switch can potentially be disruptive and we did not want to run into issues with the general user base. To do this we needed to disable modern authentication in Outlook on the client-side while being able to selectively enable it for certain users. This is easily handled with a ‘EnableADAL’ registry setting via GPO/Group Policy Preferences (GPP)/AD group. The issue is when you use an AD group with a group policy any member addition/removal needs to be coupled with a logoff/logon (or a reboot if it involves in a computer object in an AD group) to generate a new Kerberos token. I wanted to be able to quickly enable/disable ADAL for a user without requiring them to logoff/logon.
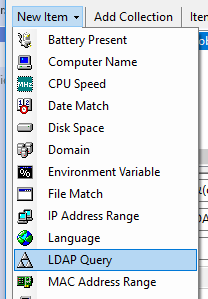
In order to get around this requirement I used GPP targeting with an LDAP query that looked for the group membership rather than standard group membership check. This LDAP query is completely dynamic and isn’t tied to the group list in user’s Kerberos token.
To do this you can do the following:
Create your GPP setting
Enable ‘Item-level targeting‘ on the setting
Create a new ‘LDAP Query‘ item
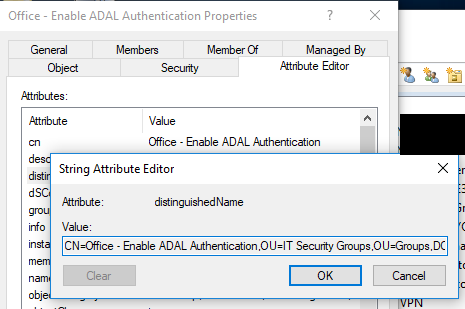
Create your filter using the distinguished name of your AD group and the ‘%LogonUser% variable
Create LDAP QueryCreate LDAP Query conditionRetrieve group distinguishedName
This method could also be used for traditional GPO settings as well, but you’d have to use GPP to directly target GPO registry value(s) (ex. HKCU\Software\Policies\Microsoft\Windows\Control Panel\Desktop – ScreenSaveActive=0/1). This method could also be used for computer-based settings, but the LDAP query would have to be adjusted to target a ‘computer‘ objectCategory and the name of the computer (%ComputerName%). I wouldn’t use this method for everything, but can be very helpful for those one-off situations where you want a setting to take effect immediately without requiring a logoff/logon or reboot.
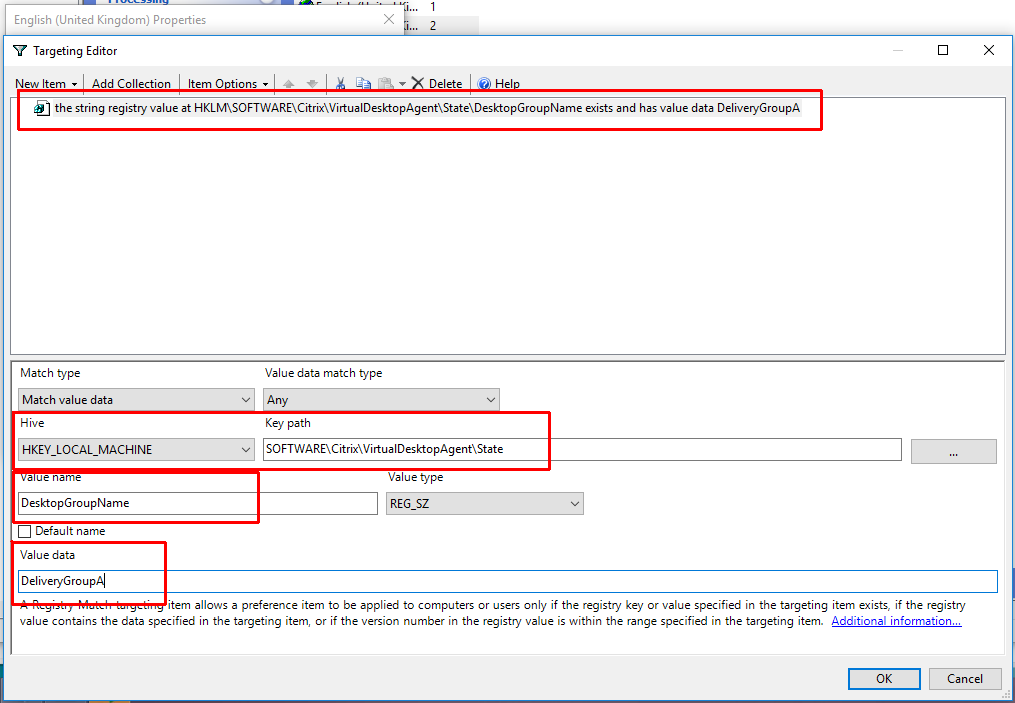
We’ve slowly been transitioning our Citrix XenApp environment from static VMs to Machine Creation Services (MCS) based VMs. My goal was to have two master (fat) images and two machine catalogs. Because of policy and application segregation requirements those two catalogs translated into more than two delivery groups. With these delivery groups came the requirement to apply different group policies to different machines. One option would be to move the corresponding AD object into a different OU and apply policy that way. While that would work due to AD objects not being automatically moved/re-created after machine creation it still requires some administrative overhead. It was clear that dynamically adjusting certain policies based on delivery group membership would be ideal.
After a little digging I found where both the delivery group and machine catalog memberships were written to in the registry by the VDA. Below is an example of how we applied a user GPP item dynamically based on the delivery group of the machine.
Registry Key Path: HKEY_LOCAL_MACHINE\SOFTWARE\Citrix\VirtualDesktopAgent\State Delivery Group Value Name: DesktopGroupName Machine Catalog Value Name: DesktopCatalogName
I was recently tasked with setting up the AD side of PAN-OS Credential Phishing Prevention. For some technical reason that I haven’t been able to find it requires a read-only domain controller (I attempted putting the credential agent on a regular DC just to see if it would work and it seemed to read credentials without issue. If anyone has information about RODC requirement I’d love to hear it.) We don’t have or use any read-only domain controllers currently, so I had to deploy one for each domain we needed to protect. This brought up a few questions to mind…
How would I decide/maintain what users have their passwords replicated to the RODC?
How do these passwords get replicated to the RODC? By design passwords are only replicated to an RODC after an initial authentication attempt when they are configured for password replication.
Since the sole reason this domain controller is being deployed is for PAN-OS I don’t want it to handle logons and I want to make it very lightweight. How do I prevent user logons/authentication from occurring on this DC?
How are usernames identified? Will it handle all formats (samAccountName, explicit UPN, implicit UPN, and email address)?
How would I decide/maintain what users have their passwords replicated to the RODC?
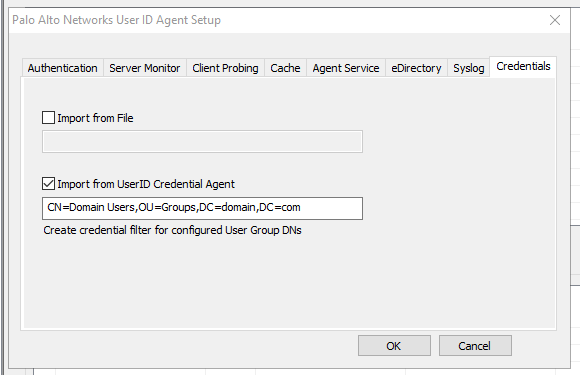
This one is pretty easy for me. I don’t see any reason to exclude any accounts from credential detection, so I will use ‘Domain Users’. I usually stay away from using default groups, but this is one of the few cases where it makes sense to do so.
How do these passwords get replicated to the RODC?
I turned the logging level up to verbose (HKEY_LOCAL_MACHINE\SOFTWARE\Palo Alto Networks\User-ID Credential Agent\Log | DebugLevel=5) on the credential agent after full configuration and saw that the agent enumerates all the objects within the ‘msDS-Reveal-OnDemandGroup‘ attribute of the RODC computer object (and DNs manually specified in the user-id agent seen in the screenshot below) and executes ‘repadmin‘ against each object to force replication. As password changes are detected it re-replicates passwords using the same method.
How do I prevent user logons/authentication?
Clients discover domain controllers using DC Locator. I decided to prevent the domain controller from registering all SRV records except for the two necessary for replication (LdapIpAddress + DsaCname). To do this I set a local policy under ‘Computer Settings → Administrative Templates → System → NetLogon → DC Locator DNS records‘ called ‘DC Locator DNS Records not registered by the DCs‘. The value I set for this policy was:
After experimentation it is clear that when using the domain credential filter method PAN-OS is getting the user from the IP<->user relationship and only looks for that user’s password in web site submissions. No matter what username I put in a form the submission triggered a detection as long as the password matched my password. Another user’s credentials under my session did not trigger a detection. I was happy with this because I do not have to worry about certain username formats not being detected.
After all of these questions/concerns were addressed came the actual implementation. You are required to install both the ‘User-ID Agent’ and the ‘User-ID Credential Agent’ on the RODC. According to the documentation this instance of the user-id agent should not be used for IP<->user relationship gathering and should only be pulling credentials. The credential agent creates the ‘bloom filter’ and sends it over to the user-id agent. PAN-OS connects to the user-id agent receives the newest version of the bloom filter. One issue I ran into was around permissioning and service accounts. Normally you would assign a domain account with limited permissions to the user-id agent, but the thing to consider here is that credential agent and user-id agent communicate using named pipes.According to the documentation on named pipes if no ACL is specified when creating a named pipe the default ACL is:
LocalSystem – Full Control
Administrators – Full Control
Creator Owner – Full Control
Everyone – Read
Anonymous – Read
The issue here is that the credential agent only runs under LocalSystem and assigning a non-administrator account to the user-id agent service prevents the user-id agent from communicating to the credential agent’s named pipe. Leaving the user-id agent service running under LocalSystem worked, but created another problem. When running under LocalSystem for some reason it was unable to enumerate the ‘msDS-Reveal-OnDemandGroup‘ attribute (seen in the UaDebug.log file) for the RODC meaning it couldn’t determine what user accounts were allowed to sync to this RODC. I found that if I manually specified a group DN in the user-id agent it would work under LocalSystem. The only other option would be switching to a ‘DOMAIN\Administrators’ service account (since this a domain controller) which I did not want to do. Since I’m only using ‘Domain Users’ this was easy enough to configure.
UPDATE: There seems to be a discrepancy between how the User-ID agent worked previously, the current documentation, and how it works now. In the past the User-ID agent configuration utility would adjust the ‘Log on as’ value for the ‘User-ID Agent’ service to the account you specified in the agent setup ‘Authentication’ tab. It seems now the service continues to run as LocalSystem, but uses the account specified in the configuration to actually probe the DCs and AD. I was able to leave it running as LocalSystem, specify an account with the proper rights in the ‘Authentication’ tab, and leave the group DN blank under the ‘Credentials’ tab in the user-id agent configuration utility. I verified the agent was using the account via logon events in the security event log on the RODC.
After configuring this you can monitor both log files to verify proper operation and then later verify PAN-OS is properly receiving the bloom filters. Be sure to restart the user-id agent after making any changes.
02/08/19 12:43:46:593 [ Info 667]: Sent BF to UaService. 21edc031f4891d2c42c133acded980ba
User-ID Agent log (UaDebug.log) receiving bloom filter from credential agent:
02/08/19 12:43:46:593[ Info 2896]: Received BF Push. Different from current one.
02/08/19 12:43:46:593[ Info 2897]: 0829f71740aab1ab98b33eae21dee122->21edc031f4891d2c42c133acded980ba
We recently went through some Exchange Online Protection (EOP) cleanup and part of that involved turning on Directory Based Edge Blocking. We already went through the exercise of syncing all objects (especially ones part of Exchange), but the only ones that weren’t being synced were mail-enabled public folders. After turning on Directory Based Edge Blocking we realized there were a few public folders that needed to receive mail from the Internet. After syncing mail-enabled public folders (this is a newer feature in AD Connect) we received synchronization errors for four objects. The only thing these objects had in common was that they referenced a mail-enabled public folder by either having that object as a group member or having it as a forwarding object on a mailbox.
The errors we receiving were:
The cause of the error is not clear. This operation will be retried during the next synchronization. If the issue persists, contact Technical Support.
IdentityDataValidationFailed
The workaround is to create a mail contact object that has the same targetAddress as the mail-enabled public folder object and use that object in place of the public folder object in something like a group membership. The issue with this is that by design a mail contact’s targetAddress is also part of its proxyAddresses attribute and the mail-enabled public folder object of course already has the email address as part of its proxyAddresses attribute. This duplicate is not allowed. The way around this is to modify the mail contact object so that the targetAddress is not part of proxyAddresses. To create this special mail contact you do the following:
Create a mail contact in Exchange with a fake external address
Disable e-mail address policy for the object
Use ADSIEdit to:
Change the targetAddress to the email address of the mail-enabled public folder
Remove the fake external address you specified earlier from proxyAddresses
After the object has been created you can now use it in lieu of the mail-enabled public folder in group memberships and other attributes.
Last week I had deploy a new domain controller to the root domain in a forest (it happened to be an RODC for a unique use case, but that is irrelevant). The domain only partially replicated before failing and showing errors on the new DC.
The errors were:
Log Name:      Directory Service
 Source:        Microsoft-Windows-ActiveDirectory_DomainService
 Date:          1/4/2019 11:19:18 AM
 Event ID:      1791
 Task Category: Replication
 Level:         Error
 Keywords:      Classic
 User:          ANONYMOUS LOGON
 Computer:      rodc1.domain.com
 Description:
Replication of application directory partition DC=domain,DC=com from source 24c77a2c-6da0-41a1-95cf-e0542bca5b89 (dc1.domain.com) has been aborted. Replication requires consistent schema but last attempt to synchronize the schema had failed. It is crucial that schema replication functions properly. See previous errors for more diagnostics. If this issue persists, please contact Microsoft Product Support Services for assistance. Error 8418: The replication operation failed because of a schema mismatch between the servers involved..
Log Name:      Directory Service
 Source:        Microsoft-Windows-ActiveDirectory_DomainService
 Date:          1/4/2019 11:19:31 AM
 Event ID:      1203
 Task Category: Replication
 Level:         Warning
 Keywords:      Classic
 User:          ANONYMOUS LOGON
 Computer:      rodc1.domain.com
 Description:
 The directory service could not replicate the following object from the source directory service at the following network address because of an Active Directory Domain Services schema mismatch.
 Object:
 CN=Bob Smith,OU=Users,OU=All Users,DC=domain,DC=com
 Network address:
 24c77a2c-6da0-41a1-95cf-e0542bca5b89._msdcs.domain.com
It was obvious that the object referenced in the second event was causing the issue, but this object was in use and I couldn’t just remove it. When looking for related errors on the source DC I found this:
Log Name:      Directory Service
 Source:        Microsoft-Windows-ActiveDirectory_DomainService
 Date:          1/4/2019 11:04:33 AM
 Event ID:      1450
 Task Category: Internal Processing
 Level:         Error
 Keywords:      Classic
 User:          ANONYMOUS LOGON
 Computer:      dc1.domain.com
 Description:
 The security descriptor propagation task could not calculate a new security descriptor for the following object.
 Object:
 CN=Bob Smith,OU=Users,OU=All Users,DC=domain,DC=com
 This operation will be tried again later.
 User Action
 If this condition continues, attempt to view the status of this object and manually change the security descriptor.

Additional Data
 Error value:
 1340 The inherited access control list (ACL) or access control entry (ACE) could not be built.
This was much more specific and showed there was an issue with the ACL of the object. I tried making one small change to the security ACL on the object to verify there was an issue and received an error. This ACL was either corrupt or too large. I decided to try repairing the ACL on the object by using ADSI Edit (adsiedit.msc) to remove everything from the ACL, add only ‘Domain Admins’ and ‘SYSTEM’ with Full Control, and then resetting it using DSACLS. I also had to do this for the ‘ExchangeActiveSyncDevices’ child object and the leaf objects under that since this user had Exchange ActiveSync devices. I verified the child and leaf objects were inheriting from the user object and proceeded to reset the ACL using the DSACLS:
After resetting the ACL replication to this domain controller completed with this event:
Log Name:      Directory Service
 Source:        Microsoft-Windows-ActiveDirectory_DomainService
 Date:          1/4/2019 11:49:51 AM
 Event ID:      1394
 Task Category: Service Control
 Level:         Information
 Keywords:      Classic
 User:          ANONYMOUS LOGON
 Computer:      rodc1.domain.com
 Description:
 All problems preventing updates to the Active Directory Domain Services database have been cleared. New updates to the Active Directory Domain Services database are succeeding. The Net Logon service has restarted.